
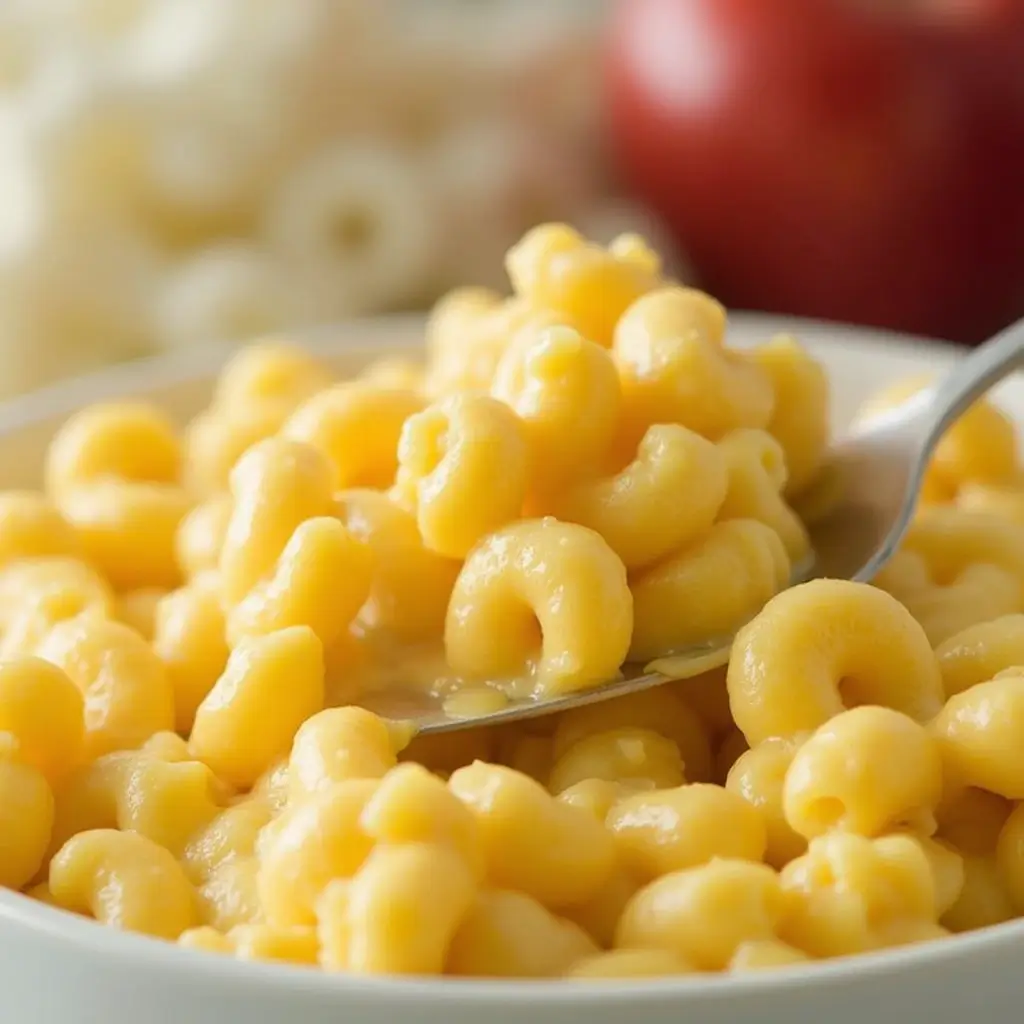
There’s nothing quite like a bowl of rich, creamy mac and cheese to bring comfort and satisfaction. Whether you’re craving a classic stovetop version or a baked dish with a golden, crispy topping, mastering the perfect cheese-to-pasta ratio is the key to achieving silky, melt-in-your-mouth goodness.
But what exactly makes mac and cheese extra creamy? The secret lies in using the right cheeses, dairy choices, and cooking techniques to create a smooth, velvety sauce that coats every bite. In this guide, we’ll walk you through everything from selecting the best ingredients to avoiding common mistakes that can lead to grainy or dry mac and cheese.
Get ready to elevate your mac and cheese game with pro tips, creative variations, and foolproof methods that guarantee a cheesy, decadent dish every time!
Choosing the Best Ingredients for Creamy Mac and Cheese
Best Cheese for Mac and Cheese (Cheddar, Parmesan, Mozzarella, etc.)
Choosing the right cheese is the most important step in making ultra-creamy mac and cheese. Not all cheeses melt the same way, and some provide better flavor, texture, and creaminess than others. A perfect mac and cheese should have a balanced blend of sharpness, creaminess, and stretchiness to create that smooth, rich, and cheesy experience.
1. Cheddar – The Classic Choice
Why it works:
- Cheddar is the most popular cheese for mac and cheese because of its bold, tangy flavor and smooth melting ability.
- It adds a deep, rich color and a creamy texture when melted properly.
- For best results, use sharp or extra-sharp cheddar for a stronger flavor.
Best pairing:
- Combine with mozzarella for extra stretch.
- Mix with Monterey Jack or Colby for a milder, creamier texture.
2. Parmesan – The Flavor Booster
Why it works:
- Parmesan isn’t a great melting cheese on its own, but it adds a savory, nutty depth to mac and cheese.
- It works best when mixed with more melty cheeses like cheddar or gouda.
- Freshly grated Parmesan is best—avoid pre-grated versions, as they contain anti-caking agents that affect texture.
Best pairing:
- Mix with cheddar for extra depth.
- Works well as a topping for baked mac and cheese, creating a crispy, golden crust.
3. Mozzarella – For Extra Stretch
Why it works:
- Mozzarella is the cheese that gives mac and cheese that ooey-gooey, stretchy texture.
- It melts beautifully, making it great for those who love stringy, pull-apart cheese.
- It has a mild, creamy flavor, so it’s best when combined with stronger cheeses.
Best pairing:
- Blend with sharp cheddar to balance creaminess and sharpness.
- Use fresh mozzarella for extra creaminess, or low-moisture mozzarella for better meltability.
4. Gouda – The Ultimate Creamy Cheese
Why it works:
- Gouda has a buttery, slightly sweet taste and melts into a silky smooth sauce.
- It’s ideal for making mac and cheese extra creamy and velvety.
- Smoked gouda can add a delicious smoky depth to your dish.
Best pairing:
- Mix with Monterey Jack for extra creaminess.
- Combine with Parmesan for a rich, nutty flavor boost.
5. Monterey Jack – The Mild and Creamy Option
Why it works:
- Monterey Jack has a super smooth melt and a mild, buttery flavor, making it great for extra creamy mac and cheese.
- It’s perfect for those who prefer a less tangy, more neutral cheese flavor.
Best pairing:
- Combine with cheddar for a balanced taste.
- Mix with gouda for a richer, creamier sauce.
6. Brie – For a Decadent Touch
Why it works:
- Brie melts beautifully into a luscious, velvety sauce, making mac and cheese ultra-rich.
- It adds a mild, buttery flavor that complements other cheeses well.
Best pairing:
- Remove the rind for a smoother texture.
- Combine with Parmesan and gouda for an elevated, gourmet mac and cheese.
Final Cheese Blend Recommendations
For the creamiest, most flavorful mac and cheese, try these winning cheese combinations:
✅ Classic Blend: Sharp cheddar + Monterey Jack + Parmesan
✅ Ultra-Creamy Blend: Gouda + Mozzarella + Heavy Cream
✅ Gourmet Blend: Brie + Smoked Gouda + Sharp Cheddar
✅ Baked Mac and Cheese Blend: Cheddar + Parmesan + Panko Breadcrumbs for a crispy topping
By mixing different cheeses, you can create a perfectly balanced, creamy, and flavorful mac and cheese that suits your taste!
Pasta Selection: Why Elbow Macaroni Works Best
Choosing the right type of pasta is just as important as selecting the best cheese for mac and cheese. The shape, texture, and composition of the pasta impact how well it holds onto the creamy cheese sauce. While there are many pasta varieties you can use, elbow macaroni remains the top choice for a reason. Let’s explore why this small, curved pasta is the ultimate pick for mac and cheese, along with some alternative options if you want to experiment.
1. Why Elbow Macaroni is the Best Choice
✔ Perfect Shape for Holding Sauce
Elbow macaroni has a small, curved, and hollow tube structure, which helps it trap and hold the creamy cheese sauce in every bite. This ensures a balanced pasta-to-cheese ratio, preventing the sauce from pooling at the bottom of the dish.
✔ Ideal Texture for Creamy Mac and Cheese
Made from durum wheat semolina, elbow macaroni has a slightly firm and chewy texture when cooked to al dente. This allows it to stay intact and not turn mushy when combined with the cheese sauce or baked in the oven.
✔ Even Cooking & Quick Cooking Time
- Elbow macaroni has a uniform size and shape, which means it cooks evenly without some pieces becoming overcooked while others remain too firm.
- It also has a relatively short cooking time (about 7–9 minutes), making it perfect for quick and easy mac and cheese recipes.
2. Alternative Pasta Options for Mac and Cheese
While elbow macaroni is the go-to choice, you can try other pasta shapes to switch up the texture and experience. Here are some great alternatives:
🟡 Cavatappi (Corkscrew Pasta)
Why it works:
- Its spiral shape helps it hold onto cheese sauce exceptionally well.
- It provides a slightly firmer bite compared to elbow macaroni.
- Works great for baked mac and cheese since it holds its shape beautifully.
🟡 Shells (Conchiglie)
Why it works:
- The bowl-like shape of shells allows them to scoop up plenty of creamy cheese sauce.
- Small shells are great for a smooth and creamy mac and cheese, while medium or large shells work well for chunkier add-ins like bacon or chicken.
🟡 Penne or Rigatoni
Why it works:
- Both types have a larger tube structure, allowing them to hold a lot of sauce inside.
- Their firm, ridged texture helps cheese sauce cling better, making them a great option for baked mac and cheese.
🟡 Fusilli or Rotini
Why it works:
- Their twisted shape creates more surface area for the cheese sauce to cling to.
- Great for extra cheesy, gooey mac and cheese since it holds sauce in all the little grooves.
🟡 Farfalle (Bowtie Pasta)
Why it works:
- The wide surface area of bowtie pasta makes it great for holding thick cheese sauces.
- Best for those who like a firmer, chewier bite in their mac and cheese.
3. How to Cook Pasta for the Creamiest Mac and Cheese
Regardless of which pasta you choose, how you cook it can make or break your mac and cheese. Follow these tips for the best results:
✅ Cook to Al Dente: Always cook pasta until it’s just slightly firm to the bite (al dente) to avoid mushy mac and cheese. Overcooked pasta will break down when mixed with cheese sauce.
✅ Salt the Water Generously: Adding salt to the boiling water enhances the pasta’s natural flavor, making your mac and cheese more flavorful.
✅ Do Not Rinse the Pasta: After draining, avoid rinsing the pasta with water. The starchy coating helps the cheese sauce stick better, making the dish creamier.
✅ Reserve Some Pasta Water: Save ½ cup of pasta water before draining—it can be added to the cheese sauce to adjust consistency and enhance creaminess.
4. Final Thoughts: The Best Pasta for the Creamiest Mac and Cheese
While you can experiment with different pasta shapes, elbow macaroni remains the best choice because of its ability to hold cheese sauce, ideal texture, and fast cooking time. However, if you want a more unique mac and cheese experience, consider alternatives like cavatappi, shells, or fusilli to enhance texture and sauce retention.
At the end of the day, the perfect mac and cheese is all about personal preference—so feel free to get creative and find your favorite pasta-cheese combo!
Dairy Choices: Milk, Heavy Cream, and Butter for Richness
One of the key elements that contribute to the creaminess, richness, and smooth texture of mac and cheese is the dairy you choose. The combination of milk, heavy cream, and butter plays a crucial role in achieving the perfect consistency and depth of flavor. Let’s break down how each ingredient impacts your dish and explore some dairy-free alternatives for those with dietary restrictions.
1. The Role of Dairy in Mac and Cheese
Dairy products add:
✅ Creaminess – Helps bind the cheese into a smooth, silky sauce.
✅ Flavor Depth – Contributes to the richness and indulgence of the dish.
✅ Texture – Ensures the sauce coats the pasta evenly without being too runny or too thick.
Now, let’s dive into the best dairy choices for the ultimate mac and cheese experience.
2. Milk: The Essential Base
Milk is the most common liquid base used in mac and cheese. It provides a smooth consistency without making the sauce too heavy. Here’s a look at different types of milk and how they affect your dish:
🥛 Whole Milk (Best Choice)
- Contains higher fat content (about 3.5%), making it rich and creamy.
- Provides a good balance between thickness and lightness.
- Recommended for both stovetop and baked mac and cheese recipes.
🥛 2% or Low-Fat Milk
- Works well if you prefer a lighter mac and cheese.
- Produces a slightly thinner sauce, so it may require additional butter or cheese to compensate.
- Good for those looking for a lower-fat alternative without sacrificing too much creaminess.
🥛 Skim Milk (Least Recommended)
- Contains very little fat, making the sauce less creamy.
- Works if you’re looking for a low-calorie option, but it may result in a less indulgent texture.
✅ Pro Tip: If you use low-fat or skim milk, consider adding a little butter or cheese to make up for the lost richness.
3. Heavy Cream: The Secret to Ultra-Creamy Mac and Cheese
If you want the creamiest, most indulgent mac and cheese, heavy cream (or heavy whipping cream) is the way to go.
🧴 Why Use Heavy Cream?
- Has a much higher fat content (about 36-40%), making the sauce thicker and more luxurious.
- Helps prevent the cheese sauce from breaking or curdling.
- Adds a silky, restaurant-quality texture to the dish.
🧴 How to Use It?
- Full heavy cream makes for ultra-rich mac and cheese—perfect for special occasions.
- Half-and-half (equal parts milk and heavy cream) is a great compromise if you want richness without being overly heavy.
✅ Pro Tip: If you’re using heavy cream, you may need less cheese or butter to avoid making the dish too rich.
4. Butter: Enhancing Flavor and Texture
Butter is a non-negotiable ingredient in traditional mac and cheese recipes. It provides:
🧈 Richness – Deepens the overall flavor.
🧈 Smooth Texture – Helps create a silky, velvety sauce.
🧈 Binding Agent – Ensures all the ingredients come together harmoniously.
🧈 Best Types of Butter for Mac and Cheese
- Unsalted Butter (Best Choice) – Allows you to control the saltiness of the dish.
- Salted Butter – Works too, but you may need to adjust the salt in your recipe.
- European-Style Butter – Contains more butterfat for a richer flavor.
✅ Pro Tip: Always melt the butter before adding it to your sauce to ensure even distribution.
5. Dairy-Free Alternatives for Mac and Cheese
For those who are lactose-intolerant, vegan, or dairy-free, you can still enjoy a creamy mac and cheese by using the following substitutes:
🥥 Dairy-Free Milk Options
- Oat Milk – Creamy and neutral in taste, making it a great replacement for whole milk.
- Almond Milk – Lighter than dairy milk but works well in cheese sauce.
- Cashew Milk – Naturally creamy, making it ideal for mac and cheese.
- Coconut Milk – Provides richness but may add a slight coconut flavor.
🌿 Non-Dairy Cream Substitutes
- Coconut Cream – Thick and rich, but has a mild coconut taste.
- Blended Silken Tofu – Creates a creamy consistency similar to heavy cream.
- Cashew Cream (Blended Cashews + Water) – A homemade alternative that mimics the texture of dairy-based cream.
🧈 Vegan Butter Alternatives
- Plant-Based Butter (Margarine or Coconut Oil-Based) – Works just like regular butter but is dairy-free.
- Olive Oil or Avocado Oil – Can be used in place of butter for a slightly different texture.
✅ Pro Tip: If using dairy-free alternatives, pair them with nutritional yeast or vegan cheese to enhance the cheesy flavor.
6. Final Thoughts: How to Choose the Best Dairy for Your Mac and Cheese
The combination of milk, heavy cream, and butter is what makes mac and cheese rich, creamy, and indulgent. Here’s a quick guide to choosing the best option:
- For the creamiest mac and cheese: Use heavy cream + butter.
- For a balanced flavor and texture: Use whole milk + butter.
- For a lighter version: Use 2% milk + a small amount of cream.
- For a dairy-free version: Use oat milk + coconut cream + vegan butter.
By selecting the right dairy ingredients, you can customize your mac and cheese to be as decadent or as light as you prefer. No matter your choice, the result should be a smooth, cheesy, and irresistible bowl of comfort food!
Secret Ingredients for Extra Creaminess (Cream Cheese, Evaporated Milk, etc.)
If you want your mac and cheese to be ultra-creamy, velvety, and rich, there are a few secret ingredients that can take your dish to the next level. While traditional recipes rely on milk, butter, and cheese, adding certain unexpected ingredients can enhance smoothness, depth of flavor, and texture. Here’s a breakdown of some of the best secret ingredients and how they work.
1. Cream Cheese: The Ultimate Creaminess Booster
One of the best-kept secrets in making super creamy mac and cheese is cream cheese. It adds a tangy, rich flavor while ensuring the cheese sauce stays smooth and thick.
🧀 Why Use Cream Cheese?
- Increases the silkiness of the sauce.
- Contains stabilizers that help prevent the sauce from becoming grainy.
- Adds a slight tang that balances out the richness of the cheese.
🧀 How to Use It:
- Add 2 to 4 ounces of cream cheese to your sauce while melting the other cheeses.
- Whisk well to ensure it fully melts and blends into the sauce.
- For an extra cheesy punch, mix it with sharp cheddar or Gruyère.
✅ Pro Tip: Use full-fat cream cheese for the creamiest texture. Reduced-fat versions may make the sauce slightly thinner.
2. Evaporated Milk: Richer and Smoother Sauce
Evaporated milk is a popular ingredient in many Southern-style mac and cheese recipes because it provides a rich, creamy texture without adding extra fat like heavy cream.
🥛 Why Use Evaporated Milk?
- Contains less water than regular milk, making the sauce thicker and creamier.
- Helps prevent curdling when mixed with cheese.
- Adds a subtle sweetness that balances the saltiness of the cheese.
🥛 How to Use It:
- Replace regular milk with evaporated milk in a 1:1 ratio for extra richness.
- Combine with a small amount of whole milk or heavy cream for a balanced sauce.
- Works especially well in baked mac and cheese, keeping it from drying out.
✅ Pro Tip: Avoid sweetened condensed milk—it’s much too sweet for mac and cheese!
3. Sour Cream: A Tangy, Creamy Twist
Sour cream might not be the first thing that comes to mind when making mac and cheese, but it can add a tangy depth that enhances the overall flavor.
🥄 Why Use Sour Cream?
- Creates a thick, creamy texture.
- Adds a slight tang that balances the richness of the cheese.
- Helps prevent the cheese sauce from becoming too oily.
🥄 How to Use It:
- Stir in ¼ to ½ cup of sour cream after melting the cheese.
- Mix with cream cheese for an extra luxurious texture.
- Works great in both stovetop and baked mac and cheese recipes.
✅ Pro Tip: If you want a milder tang, try Greek yogurt instead of sour cream.
4. Mustard (Dijon or Dry Mustard Powder): Flavor Enhancer
While mustard doesn’t necessarily make the sauce creamier, it does enhance the cheesy flavor and prevent the dish from tasting flat.
🌟 Why Use Mustard?
- Adds a subtle depth to the cheese sauce.
- Helps cut through the richness, making the dish more balanced.
- Works well with sharp cheeses like cheddar or Gruyère.
🌟 How to Use It:
- Add ½ to 1 teaspoon of Dijon mustard for a smooth flavor.
- Use ½ teaspoon of dry mustard powder if you prefer a milder, more blended taste.
- Stir it into the cheese sauce before adding the pasta.
✅ Pro Tip: A little goes a long way! Start with a small amount and adjust to taste.
5. Egg Yolks: Silky, Custard-Like Texture
Egg yolks are commonly used in Southern-style baked mac and cheese to create a rich, custard-like consistency.
🥚 Why Use Egg Yolks?
- Adds a silky, thick texture to the sauce.
- Helps bind the ingredients together in baked mac and cheese.
- Provides a slight richness without making the sauce too heavy.
🥚 How to Use Them:
- Whisk 1 to 2 egg yolks in a small bowl.
- Slowly add a few tablespoons of warm cheese sauce to the yolks while whisking (this prevents scrambling).
- Stir the tempered yolks back into the sauce and mix well.
✅ Pro Tip: Only use egg yolks in baked mac and cheese. If using on the stovetop, heat the sauce gently to avoid scrambling the eggs.
6. Velveeta: The Secret to Ultra-Smooth Cheese Sauce
While some mac and cheese purists may prefer only natural cheeses, Velveeta (or other processed cheese) can be a game-changer if you want a super creamy, never-grainy sauce.
🧀 Why Use Velveeta?
- Melts smoothly without clumping.
- Contains emulsifiers that keep the sauce creamy for longer.
- Blends well with real cheese for a perfect balance of texture and taste.
🧀 How to Use It:
- Mix Velveeta with sharp cheddar for the best combination of creaminess and flavor.
- Melt it into the sauce over low heat to prevent separation.
- Works particularly well in stovetop mac and cheese.
✅ Pro Tip: Use half real cheese, half Velveeta to get the best of both worlds—flavor and creaminess.
7. Cottage Cheese: A Surprising Secret Ingredient
Cottage cheese might seem like an unusual choice, but when blended, it creates a creamy, protein-packed cheese sauce that enhances both flavor and texture.
🧀 Why Use Cottage Cheese?
- Adds extra protein without making the dish too heavy.
- Blends into a super smooth sauce when mixed with other cheeses.
- Helps create a lighter version of mac and cheese while keeping it creamy.
🧀 How to Use It:
- Blend ½ cup of cottage cheese until smooth, then stir into the sauce.
- Works best in baked mac and cheese recipes.
- Pair it with cheddar, Parmesan, or Gruyère for added richness.
✅ Pro Tip: If you want a smoother consistency, blend the cottage cheese with a little milk before adding it to the sauce.
Final Thoughts: Choosing the Best Secret Ingredients for Extra Creaminess
To make the creamiest mac and cheese, try combining a few of these secret ingredients:
✔ For ultra-rich, velvety sauce: Use cream cheese + heavy cream + butter.
✔ For a smooth, never-grainy texture: Use evaporated milk + Velveeta + Dijon mustard.
✔ For baked mac and cheese: Add egg yolks + sour cream + cottage cheese.
✔ For a lighter, healthier version: Use Greek yogurt + blended cottage cheese.
By experimenting with these ingredients, you can create a truly indulgent, restaurant-quality mac and cheese that’s rich, creamy, and absolutely irresistible.
Step-by-Step Guide to Making the Creamiest Mac and Cheese
Making the Perfect Roux for a Smooth Cheese Sauce
The roux is the foundation of any creamy sauce, and it plays a crucial role in ensuring your mac and cheese has that velvety, smooth texture you crave. It’s essentially a flour-and-fat mixture that thickens the sauce, making it rich and creamy without becoming lumpy or greasy. Knowing how to make the perfect roux is essential for creating a smooth, velvety cheese sauce that coats your pasta beautifully. Here’s how to master this fundamental step.
1. What is a Roux and Why is It Important?
A roux is a simple combination of flour and fat (usually butter) that forms the base for many sauces, including cheese sauces. The flour helps to thicken the sauce, while the fat (typically butter) prevents the flour from clumping together, creating a smooth consistency. When done correctly, a roux acts as a stabilizer, preventing your cheese sauce from becoming watery or separated.
Benefits of a Roux in Mac and Cheese
- Prevents lumps – Helps integrate the flour into the liquid without clumping.
- Thickens the sauce – Creates a creamy base that coats the pasta evenly.
- Enhances flavor – When cooked properly, it adds a subtle nutty flavor to the cheese sauce.
- Improves texture – Ensures the sauce has a silky, smooth finish.
2. How to Make the Perfect Roux
Making a roux may seem intimidating at first, but it’s a straightforward process if you follow these simple steps:
Step 1: Choose the Right Fat
- Butter is the most common fat used for a roux, and for mac and cheese, it’s the ideal choice for creating a rich, indulgent sauce.
- You can also use oil (vegetable or olive oil), but butter adds a richer flavor and smoother texture.
- For a healthier version, consider using olive oil or avocado oil, though they may slightly alter the flavor.
Step 2: Measure the Flour and Fat
A typical ratio for a roux is 1:1 by weight—1 tablespoon of flour for every tablespoon of fat. For mac and cheese, you’ll usually need about 4 tablespoons of butter and 4 tablespoons of flour to make the perfect amount of roux for a standard recipe.
- More flour will give you a thicker sauce, while less flour will yield a thinner sauce.
- If you want your sauce to be particularly silky and rich, you can increase the butter slightly.
Step 3: Cook the Roux
- Melt the butter over medium heat in a saucepan. Let it melt completely, but don’t let it brown.
- Add the flour and stir continuously with a wooden spoon or whisk. The mixture will look like a thick paste.
- Cook the roux for 2-3 minutes, stirring constantly to avoid burning. The flour should slightly puff up and turn a light golden color. This step is crucial because cooking the flour removes the raw taste and gives the sauce its desired consistency.
Note: If your roux starts to brown too much, reduce the heat to prevent it from turning into a darker color, which may affect the flavor of your cheese sauce.
Step 4: Add Liquid Gradually
Once your roux is ready, it’s time to add your milk (or cream) to create the cheese sauce.
- Gradually add warm or room-temperature milk in small splashes, not all at once, while whisking constantly.
- Whisking continuously helps to prevent lumps from forming.
- Once the mixture thickens and becomes smooth, increase the heat slightly and keep stirring until the sauce reaches your desired consistency.
Step 5: Seasoning and Cheese
Once the sauce is thick and smooth, it’s time to add your seasonings (such as salt, pepper, and mustard) and the cheese. Stir in your shredded cheese gradually, allowing it to melt evenly. This will create a smooth, cheesy sauce that perfectly coats your pasta.
Pro Tip: Add cheese in small handfuls and stir well between additions to avoid clumping. If your sauce is too thick, add a little more milk to reach your desired consistency.
3. Troubleshooting Roux Issues
Even if you follow the steps above, you may occasionally encounter some issues. Here’s how to troubleshoot and fix common problems:
Lumpy Sauce
- What’s happening: Lumps form when flour isn’t fully incorporated into the liquid or when the liquid is added too quickly.
- Solution: Whisk continuously and make sure your milk is warmed before adding. If lumps still form, use an immersion blender or transfer the sauce to a regular blender to smooth it out.
Grainy or Separated Sauce
- What’s happening: This can occur if the sauce is cooked at too high a temperature or if the cheese is added too quickly.
- Solution: Lower the heat and slowly stir in the cheese. If the sauce has already separated, whisk in a bit more milk or cream and reheat gently.
Too Thick or Too Thin
- What’s happening: If your roux is too thick, the sauce will be too dense, and if it’s too thin, it won’t coat the pasta properly.
- Solution: To fix a thick sauce, simply add more milk gradually until you reach the right consistency. To thicken a thin sauce, allow it to simmer for a few more minutes or add a bit more roux (flour and butter mixture).
4. Variations of Roux for Different Recipes
Though the basic roux for mac and cheese is made with butter and flour, you can make slight adjustments to suit your recipe preferences:
Cheese Roux
For a cheese-based roux, melt your cheese directly into the roux after adding the liquid. This makes for an extra creamy cheese sauce with an intense cheese flavor.
Vegan Roux
If you’re making a vegan mac and cheese, substitute the butter with vegan butter or olive oil, and use non-dairy milk such as oat milk or almond milk. The technique remains the same!
How to Properly Melt and Blend Cheese for the Creamiest Mac and Cheese
One of the most crucial steps in making the creamiest mac and cheese is ensuring that the cheese melts smoothly and blends seamlessly into your sauce. If done incorrectly, you could end up with a clumpy, oily mess instead of a silky, creamy cheese sauce. Here’s how to properly melt and blend cheese to achieve a smooth, luscious mac and cheese.
1. Choosing the Right Cheese for Melting
Not all cheeses are created equal when it comes to melting, and some are better suited for a creamy cheese sauce than others. For mac and cheese, you’ll want to choose cheeses that melt easily and create a smooth, velvety texture.
Best Melting Cheeses for Mac and Cheese:
- Cheddar – A classic choice for its flavor and meltability. Choose sharp or mild cheddar depending on your taste preference.
- Gruyère – A Swiss cheese that melts wonderfully and adds a rich, nutty flavor to your sauce.
- Fontina – This cheese melts like a dream, adding an extra creamy texture to the sauce.
- Monterey Jack – A mild and melty cheese that blends well with sharper cheeses like cheddar.
- Mozzarella – While it has a more elastic texture, mozzarella can add a lovely creaminess when combined with other cheeses.
Avoid Cheeses that Don’t Melt Well:
- Parmesan – While Parmesan is great for adding flavor, it doesn’t melt as well on its own and can create a gritty texture in the sauce. It’s best used in small quantities, blended with other cheeses.
- Cottage cheese – While it can add creaminess, cottage cheese has a curdled texture that can interfere with the smoothness of your sauce.
2. Grating the Cheese
Before you begin melting your cheese, it’s important to grate the cheese yourself rather than using pre-shredded cheese. Pre-shredded cheese contains anti-caking agents that can prevent the cheese from melting smoothly, leading to a lumpy or grainy sauce.
Tips for Grating Cheese:
- Use a box grater or a food processor to grate the cheese. Grating it into fine shreds ensures it melts more easily and evenly.
- Grate cheese right before use to get the freshest and most meltable result.
- Mix cheeses together to achieve the perfect balance of flavor and creaminess. A combination of sharp cheddar for flavor and a milder cheese like mozzarella or Monterey Jack for meltability works wonders.
3. Melting the Cheese Slowly
Once your cheese is grated and ready, it’s time to melt it. Slow and steady is the key when it comes to melting cheese for mac and cheese. High heat can cause cheese to become oily and separate, so it’s important to melt it gradually to ensure a smooth, even texture.
Steps for Properly Melting Cheese:
- Start with a base: Begin by making your béchamel sauce or cheese sauce with a roux (butter and flour mixture). Once your roux has thickened and your milk or cream has been added, bring the sauce to a gentle simmer.
- Add the cheese gradually: Reduce the heat to low and begin adding the grated cheese in small handfuls. Stir continuously while adding the cheese to ensure it melts evenly.
- Stir constantly: Stirring prevents the cheese from sticking to the bottom of the pot and ensures that it melts smoothly into the sauce. Be patient, as this process can take several minutes.
- Avoid high heat: Never add cheese over high heat or boil it, as this can cause it to become grainy and separate. Low and slow is the mantra here.Note: If your cheese sauce seems too thick after melting, you can add a little more milk or cream, a tablespoon at a time, to reach the desired consistency.
4. Creating a Smooth and Creamy Texture
To ensure that your cheese sauce has the perfect creamy texture, there are a few extra tips to keep in mind when blending and emulsifying the cheese.
Use a Double Boiler or Heatproof Bowl:
If you’re worried about overheating your cheese, a double boiler can help. The gentle heat from the steam will slowly melt the cheese, preventing it from separating or becoming grainy.
- Double Boiler Method: Set up a double boiler with a heatproof bowl over a pot of simmering water. Add your grated cheese to the bowl and stir gently until melted. Then add it to your prepared sauce.
Emulsification Tip:
To help the fat in the cheese blend smoothly with the liquid, you can use a pinch of cornstarch. When you toss your cheese with a small amount of cornstarch before adding it to the sauce, it helps to keep the cheese from separating. This step is optional but can add to the smoothness of your sauce.
5. Adding the Cheese to the Pasta
Once your cheese has melted smoothly into a creamy sauce, it’s time to combine it with the cooked pasta. Here’s how to do it for the best results:
- Add the cheese sauce to the pasta while it’s hot: Mix the cheese sauce with the hot pasta immediately after the cheese has melted. This allows the sauce to coat each piece of pasta evenly and ensures that the sauce doesn’t seize up.
- Stir well: Stir the pasta and sauce together thoroughly, ensuring that every noodle is coated with the creamy cheese sauce.
- Keep it warm: If you’re not serving the mac and cheese immediately, keep it warm on the stove over low heat, stirring occasionally, to maintain its creamy texture.
6. Troubleshooting: Fixing a Grainy or Separated Cheese Sauce
Sometimes, despite your best efforts, the cheese sauce might turn out grainy or separate. Here’s how to fix it:
- If the sauce is grainy: Add a small amount of cream cheese or a splash of milk and gently whisk it together until the sauce becomes smooth again. The cream cheese helps to emulsify the sauce and restore creaminess.
- If the sauce separates: Gently heat the sauce over low heat, stirring constantly, and add a little more milk or cream to help bring the sauce back together.
Final Thoughts on Melting and Blending Cheese
The process of properly melting and blending cheese is essential to creating the creamiest and most delicious mac and cheese. With the right cheese selection, slow melting process, and proper blending techniques, you’ll be able to craft a velvety cheese sauce that envelops your pasta in rich, creamy goodness. The key is to be patient, use moderate heat, and stir constantly to achieve that perfect, smooth texture. Happy cooking!
Stovetop vs. Baked Mac and Cheese: Which is Creamier?
When deciding between stovetop or baked mac and cheese, one of the key factors people consider is the creaminess of the dish. Both methods produce delicious results, but they achieve different textures and flavors. Let’s break down how each method affects the creaminess of your mac and cheese and which one may be the best choice for you.
1. Stovetop Mac and Cheese: Quick and Ultra-Creamy
Stovetop mac and cheese is typically the quicker of the two methods, making it a favorite for those looking for a creamy dish without the wait. The key to achieving ultra-creamy stovetop mac and cheese lies in the immediate blending of ingredients on the stovetop.
Why stovetop mac and cheese is creamier:
- Direct Heat and Continuous Stirring: Stovetop cooking allows you to melt the cheese directly into the sauce while maintaining control over the heat. You can continuously stir the sauce, ensuring that the cheese melts smoothly without separating, which is essential for creaminess.
- Creamy Sauce Consistency: By using a roux (butter and flour mixture) as a base, followed by milk or cream, you create a smooth, thick sauce that holds the cheese well. As you slowly add the cheese to the sauce, it melts into a smooth, velvety texture, which envelops the pasta evenly.
- Quick Addition of Cheese: Because stovetop mac and cheese cooks quickly, the cheese has less time to “firm up” or separate. The sauce remains silky, and you can often add extra dairy (like heavy cream or milk) to make the sauce even creamier, without worrying about it drying out.
- Less Evaporation: Since the dish isn’t exposed to high heat in the oven, there’s less evaporation of moisture. This helps maintain the creamy texture without the risk of the sauce drying out.
2. Baked Mac and Cheese: Crispy Top, Creamy Interior
Baked mac and cheese, on the other hand, produces a different texture due to the nature of the oven’s heat. While it may not always be as creamy on the surface, the inside can still retain a satisfying creamy texture, especially with the right ingredients and technique.
Why baked mac and cheese can still be creamy:
- Two-Stage Cooking Process: In the baked version, the cheese sauce is typically made stovetop first, then poured over the pasta and baked in the oven. This initial stovetop sauce gives you that creamy base before the baking process begins.
- Melty Cheese Interior: If you opt for a combination of cheeses that melt well, like cheddar, mozzarella, and Gruyère, you’ll still achieve a creamy interior despite the baking process. The key is to mix the cheese sauce thoroughly with the pasta before baking, so the noodles absorb the creamy sauce.
- Crispy, Golden Crust: While the top of the mac and cheese develops a crispy, golden crust from the baking process, many prefer this because it adds a contrast of texture. However, under the crust, the cheese remains relatively creamy as long as it is not over-baked.
- The Role of Additional Dairy: Some baked mac and cheese recipes include additional butter, cream, or even eggs to help keep the sauce creamy while the casserole bakes. The inclusion of egg or extra cream helps bind the cheese sauce and keep the overall dish moist and creamy.
Challenges with baked mac and cheese for creaminess:
- Moisture Loss: One challenge of baked mac and cheese is that the longer it bakes, the more moisture can evaporate. If baked for too long, the sauce may thicken too much, leading to a less creamy texture. To combat this, you can cover the dish with foil for the first part of the baking process, then uncover it to allow the top to brown.
- Possible Overcooking: If the baking time is too long or the oven temperature is too high, you may risk overcooking the cheese sauce, causing it to become oily or curdled. It’s important to monitor the dish closely during the baking phase.
3. Which is Creamier: Stovetop or Baked?
Ultimately, the answer to which method is creamier depends on personal preference and the desired texture you’re aiming for in your mac and cheese.
- For maximum creaminess, stovetop mac and cheese is often the go-to. The quick cooking process allows the cheese to melt into the sauce, creating a rich, smooth, and velvety texture that coats each noodle perfectly.
- For a creamier interior with a crispy crust, baked mac and cheese provides a nice balance. It gives you that contrast of crispy top and soft, creamy interior. If you love a baked dish but still want that creamy filling, you can experiment with adding extra milk or cream to the sauce or using a combination of cheeses that melt well.
Both methods have their merits, and adjusting the ingredients and techniques will help you achieve the desired level of creaminess no matter which method you choose. If you’re after a super creamy, quick, and easy dish, stovetop is the way to go. But if you love the contrast of textures with a golden top and creamy filling, baked mac and cheese will do the trick.
In Conclusion: Creamy Mac and Cheese, No Matter the Method
Both stovetop and baked mac and cheese can be creamy, but stovetop mac and cheese usually offers more consistent creaminess. However, if you like the appeal of a crispy, baked top with a creamy center, baked mac and cheese can be just as satisfying. The key to creaminess, regardless of the method, lies in using the right combination of ingredients (cheese, milk, cream, and butter) and cooking the dish with care.
Pro Tips to Avoid Grainy or Clumpy Cheese Sauce
One of the most frustrating experiences when making mac and cheese is when your cheese sauce turns out grainy or clumpy. This often happens if the cheese doesn’t melt properly or if the sauce breaks down. But don’t worry – with the right techniques and a few essential tips, you can ensure a smooth and velvety cheese sauce every time. Here’s how to avoid those pesky grains and lumps.
1. Choose the Right Cheese for Melting
Not all cheeses melt the same way. Some cheeses, especially aged ones, can separate and become grainy when melted. The key to a smooth, creamy cheese sauce is to choose cheeses that melt well.
Best cheeses for smooth cheese sauce:
- Cheddar: A classic cheese for mac and cheese. Opt for a medium or mild cheddar for the best meltability. Sharp cheddar can sometimes be a bit grainy if not handled carefully.
- Gruyère: This cheese melts beautifully and adds a rich, creamy texture to the sauce.
- Mozzarella: Known for its stretchiness and smooth texture when melted, mozzarella can create a silky sauce.
- Fontina: Another great melting cheese that adds creaminess without the risk of clumping.
Tip: Avoid cheeses that are overly dry or crumbly, like aged Parmesan or Pecorino Romano. While these cheeses are delicious, they can cause the sauce to become grainy if melted improperly.
2. Shred Your Cheese Yourself
Pre-shredded cheese might seem like a time-saver, but it often contains additives and anti-caking agents like cellulose that can prevent the cheese from melting smoothly. These additives can result in a grainy texture and prevent the cheese from blending well into the sauce.
Why fresh cheese works better:
- No Additives: Freshly shredded cheese melts more evenly and smoothly without the interference of anti-caking agents.
- Better Texture: Shredding the cheese yourself ensures a finer, more consistent melt. You can even grate it directly into the warm sauce for better control.
Tip: If you’re in a rush and using pre-shredded cheese, make sure to toss it with a little cornstarch before adding it to the sauce. This can help prevent clumping.
3. Don’t Overheat the Cheese
Overheating cheese can cause it to break down and become grainy. Cheese has proteins that can coagulate when exposed to high heat, leading to a separated, oily texture instead of a smooth and creamy sauce.
How to prevent overheating:
- Melt the cheese on low to medium heat: When adding cheese to your sauce, make sure the heat is low and gradually stir it in. This allows the cheese to melt gently and evenly.
- Remove from heat once cheese is melted: Once the cheese has melted into the sauce, remove the pan from the heat immediately to avoid overcooking.
Tip: If you notice the cheese starting to separate or become oily, add a splash of milk or cream and gently whisk it back together. This can help bring the sauce back to a smooth consistency.
4. Make a Smooth Roux (Butter and Flour Mixture)
A roux is the foundation of many cheese sauces. It’s a mixture of butter and flour cooked together to create a thick base that helps the cheese sauce come together smoothly. If your roux isn’t made correctly, it can lead to clumps in your cheese sauce.
How to make a perfect roux:
- Cook the flour long enough: Once you’ve added the flour to the melted butter, cook it for 1-2 minutes to eliminate the raw flour taste. It should form a smooth, paste-like consistency.
- Gradually add liquid: Slowly whisk in milk or cream while constantly stirring. This will help the mixture stay smooth and lump-free. Avoid adding too much liquid at once, as this can cause clumps to form.
Tip: If your roux becomes too thick or clumpy before adding the cheese, simply add a little more liquid to loosen it up before continuing.
5. Use a Double Boiler for Gentle Heat
Sometimes, the best way to melt cheese without risk of clumping is by using gentle heat. A double boiler is a great tool for melting cheese smoothly, as it allows for more control over the temperature.
How to use a double boiler:
- Fill the bottom pot with water and bring it to a simmer.
- Place the top pot or heatproof bowl over the simmering water (making sure the bowl doesn’t touch the water).
- Add the cheese to the top pot and stir gently as it melts.
Tip: The gentle, indirect heat from a double boiler reduces the risk of overheating or separating the cheese. If you don’t have a double boiler, you can use a makeshift one by placing a heatproof bowl over a pot of simmering water.
6. Add Acid for Balance
Sometimes, adding a small amount of acidic ingredient (like lemon juice, vinegar, or Dijon mustard) to your cheese sauce can help break down any proteins that might cause the sauce to curdle or become grainy. This doesn’t make the sauce tangy – rather, it balances the cheese and prevents it from becoming too oily or lumpy.
How to add acid without affecting flavor:
- Use a very small amount (about 1/2 teaspoon) and stir it into the sauce at the end of cooking.
- Dijon mustard can also act as a natural emulsifier, helping to bring together the cheese and liquid.
Tip: Adding acid is especially helpful when working with high-fat cheeses that may tend to separate under heat.
7. Avoid Overmixing the Cheese
Once you’ve melted your cheese into the sauce, it’s tempting to stir vigorously to incorporate everything, but too much mixing can cause the cheese to separate and become grainy. The key is to stir gently and just enough to incorporate the cheese into the sauce.
How to mix gently:
- Once the cheese is added to the sauce, use a silicone spatula or wooden spoon to stir slowly and carefully. Stir in a figure-eight motion to keep the cheese from clumping.
- If your sauce starts to become grainy, try whisking it gently for a smoother result.
In Conclusion:
By following these pro tips, you can easily avoid grainy or clumpy cheese sauce and achieve the perfect, smooth consistency every time you make mac and cheese. The right cheeses, a properly made roux, gentle heat, and a few key ingredients will all work together to create the rich, velvety texture you’re aiming for. With a little practice, you’ll be making flawless cheese sauce that will elevate your mac and cheese to the next level!
Customizing Your Mac and Cheese for Extra Flavor
Adding Proteins: Bacon, Chicken, or Lobster
One of the great ways to elevate your mac and cheese and transform it into a heartier, more flavorful meal is by adding proteins. Whether you’re craving a savory bite of crispy bacon, a juicy piece of chicken, or the luxurious touch of lobster, incorporating protein into your mac and cheese can add richness, texture, and depth of flavor. Let’s explore how each of these proteins can enhance your dish, and how to prepare them for the perfect mac and cheese.
1. Bacon: Crispy, Smoky, and Savory
Bacon is a classic protein choice that adds a savory, smoky, and crunchy element to mac and cheese. The richness of the cheese sauce pairs perfectly with the salty, crispy bacon, creating a delightful contrast of textures.
How to use bacon in mac and cheese:
- Cook the bacon until crispy: The key to using bacon is to cook it until it’s crispy and crunchy, which adds a pleasant texture to the dish. Use thick-cut bacon for extra flavor and a meatier bite. Once cooked, crumble or chop it into small pieces to distribute evenly throughout the dish.
- Add bacon grease for extra flavor: After cooking the bacon, save a little of the rendered bacon grease and use it in the roux (the butter-flour mixture) to bring even more flavor into the cheese sauce. It can add a subtle smoky note that enhances the overall profile of your mac and cheese.
- Layer the bacon: You can either stir the bacon directly into the cheese sauce or sprinkle it on top before serving. Some people also like to sprinkle bacon bits on top of baked mac and cheese, so they stay crispy and add an extra crunch.
Pro tip: If you’re using bacon in baked mac and cheese, consider adding the bacon bits just before the dish finishes baking, so they maintain their crispy texture.
2. Chicken: Tender, Juicy, and Protein-Packed
Chicken is another excellent protein choice that works well with mac and cheese, providing a mild, tender, and juicy complement to the creamy cheese sauce. It’s a great option for those who want to make their mac and cheese more substantial without overwhelming the flavors.
How to use chicken in mac and cheese:
- Grilled or Roasted Chicken: To add a depth of flavor, consider grilling or roasting chicken breasts or thighs before shredding or dicing them. Grilled chicken will add a slightly smoky flavor that pairs nicely with the richness of the cheese.
- Shredded Chicken: For a more uniform texture, shred or chop the chicken into small pieces, so it can be easily mixed into the mac and cheese. This ensures the chicken is well-distributed and every bite is flavorful.
- Season the chicken well: Since chicken can sometimes be a bit bland, season it with salt, pepper, garlic powder, or other seasonings before cooking. This way, it will add more flavor to the overall dish.
- Add the chicken after the cheese sauce: Once your cheese sauce is ready, mix in the cooked chicken. Make sure not to add the chicken too early to avoid overcooking it.
Pro tip: For a twist, try using rotisserie chicken for added convenience and flavor. It’s already cooked and can easily be shredded into your mac and cheese.
3. Lobster: Luxurious, Sweet, and Tender
For those looking to add a touch of luxury to their mac and cheese, lobster is an indulgent choice that takes this classic comfort food to the next level. The sweetness and tender texture of lobster combine beautifully with the creamy, cheesy sauce, making for an unforgettable dish.
How to use lobster in mac and cheese:
- Cook the lobster: If you’re starting with live lobster, you’ll need to cook it first. Boil or steam the lobster for about 8-10 minutes, then remove the meat from the shell. Chop it into bite-sized pieces for easy incorporation into the dish. If you’re using pre-cooked lobster tail or lobster meat, ensure it’s heated through before adding it to the mac and cheese.
- Incorporate lobster into the cheese sauce: Once the lobster is cooked, gently stir it into your cheese sauce. You want to be careful not to break the lobster pieces into tiny bits. Adding lobster to the sauce just before mixing it with the pasta ensures that the delicate meat stays tender.
- Balance the richness: Since lobster can be quite rich, you might want to adjust the amount of cheese or cream in your sauce. Adding lobster calls for a slightly lighter, more delicate cheese sauce so that the lobster’s natural sweetness isn’t overwhelmed by the heaviness of the cheese.
- Top the mac and cheese with lobster: For a visually striking presentation, you can layer the lobster on top of the mac and cheese just before serving. This not only adds a gourmet touch but also gives you a pop of color and flavor on each serving.
Pro tip: If you want a truly decadent dish, consider adding a touch of white wine to the cheese sauce while cooking. This pairs beautifully with the lobster’s delicate flavors and gives the dish a rich depth.
4. Combining Proteins: Customizing Your Mac and Cheese
Why settle for just one protein when you can have the best of both worlds? Combining bacon, chicken, and lobster can elevate your mac and cheese into a fully loaded dish that will impress even the most discerning guests. The smokiness of bacon, the tenderness of chicken, and the luxury of lobster create a unique and indulgent combination.
How to combine proteins effectively:
- Layering flavors: When combining proteins, it’s essential to layer the flavors rather than mixing everything in one go. For example, cook the bacon first for its smoky flavor, then add the chicken for texture, and finish with lobster to provide a rich, indulgent flavor profile.
- Balance the quantities: Make sure each protein is proportionate to the amount of mac and cheese you’re making. You don’t want one protein to overpower the others, so consider adding smaller amounts of each and tasting as you go. A little goes a long way with ingredients like lobster, while bacon and chicken can be more generous.
- Top the dish: Consider sprinkling bacon bits on top for crunch, adding chicken and lobster within the mac and cheese for texture, and using lobster chunks on top as a garnish to highlight the luxurious nature of the dish.
In Conclusion: Personalize Your Mac and Cheese with Protein
Adding proteins like bacon, chicken, or lobster to your mac and cheese can turn this simple comfort food into a gourmet experience. Each protein adds a unique flavor and texture that complements the creamy cheese sauce, creating a dish that’s both satisfying and indulgent. Whether you go for the smoky richness of bacon, the tender juiciness of chicken, or the luxurious sweetness of lobster, you can customize your mac and cheese to suit your taste preferences and create a dish that’s perfect for any occasion.
Mixing in Vegetables: Broccoli, Jalapeños, or Spinach
Incorporating vegetables into your mac and cheese not only adds extra nutrition but also enhances the flavor and texture of this beloved dish. Whether you’re looking to add a bit of crunch, a touch of spice, or some greenery to balance out the richness, vegetables are a fantastic way to customize your mac and cheese. Let’s explore three popular vegetable options—broccoli, jalapeños, and spinach—and how they can elevate your mac and cheese.
1. Broccoli: Fresh, Crunchy, and Nutritious
Broccoli is a classic vegetable to mix into mac and cheese. Its mild flavor and crunchy texture provide a perfect contrast to the creamy, cheesy sauce. Plus, it adds a boost of nutrition, as broccoli is rich in vitamins, fiber, and antioxidants, making it a healthy addition to your dish.
How to use broccoli in mac and cheese:
- Blanch or steam the broccoli: To keep the broccoli vibrant and tender, blanch or steam it before adding it to your mac and cheese. Blanching the broccoli in boiling water for about 2-3 minutes, then quickly submerging it in ice water, will preserve its bright green color and crunch. You can also steam it until tender, but be careful not to overcook it, as it can become mushy.
- Chop the broccoli into bite-sized pieces: After blanching or steaming, chop the broccoli into small florets to make it easier to incorporate into the pasta. This ensures each bite has a balance of cheese and vegetables.
- Stir it into the cheese sauce or mix into pasta: You can either mix the broccoli directly into the cheese sauce or stir it into the pasta before adding the sauce. This way, the broccoli will absorb some of the creamy sauce and take on a delicious cheesy flavor.
Pro tip: If you want to add even more flavor, try roasting the broccoli with olive oil, garlic, and a pinch of salt before mixing it into the mac and cheese. Roasting brings out the natural sweetness of the broccoli and adds a depth of flavor.
2. Jalapeños: Spicy, Bold, and Flavorful
If you like a little heat with your comfort food, jalapeños are the perfect way to spice up your mac and cheese. The fresh, tangy flavor of jalapeños adds a bold kick that contrasts beautifully with the creamy cheese sauce. Whether you prefer just a hint of spice or a fiery punch, jalapeños are easy to adjust to your personal taste.
How to use jalapeños in mac and cheese:
- Remove seeds for less heat: If you want a more controlled level of heat, remove the seeds and membranes from the jalapeños before using them. This will remove much of the spiciness while still giving you that signature jalapeño flavor.
- Sauté the jalapeños: For a softer, more mellow flavor, sauté the jalapeños in a little butter or oil before adding them to your mac and cheese. This helps to release their natural oils and reduces some of their raw heat.
- Use pickled jalapeños for a tangy twist: If you prefer a tangier flavor, try adding pickled jalapeños instead of fresh ones. The acidity from the pickling process can balance out the richness of the cheese sauce, adding another layer of flavor complexity.
- Add at the right time: You can either stir the jalapeños directly into the cheese sauce or mix them into the pasta before adding the sauce. If you like a stronger kick, layer them on top of the mac and cheese once it’s finished cooking.
Pro tip: To really enhance the flavor of jalapeños, try adding a small amount of chipotle chili powder or cayenne pepper to the cheese sauce. This will bring a smoky, spicy element to the dish without overwhelming the other flavors.
3. Spinach: Mild, Nutritious, and Creamy
Spinach is another great vegetable to add to mac and cheese, especially if you’re looking for a way to pack in some greens. Its mild flavor pairs wonderfully with the richness of the cheese, and it blends into the sauce seamlessly, making it a perfect option for adding nutrition without overpowering the dish.
How to use spinach in mac and cheese:
- Use fresh or frozen spinach: You can either use fresh spinach or frozen spinach. If using fresh spinach, wash and chop it into smaller pieces. If using frozen spinach, make sure to thaw it thoroughly and squeeze out any excess water before adding it to the dish. Excess moisture can dilute the cheese sauce, so make sure it’s well-drained.
- Sauté or wilt the spinach: For fresh spinach, sauté it in a little olive oil or butter until it wilts down, which should only take a couple of minutes. This reduces the volume and releases its water content, making it easy to incorporate into the mac and cheese.
- Mix into the cheese sauce or pasta: Once the spinach is prepped, you can stir it into the cheese sauce or mix it into the pasta. It will naturally absorb some of the cheesy goodness, giving you a creamy and nutritious bite with each forkful.
Pro tip: If you want to bring out even more flavor, try adding a little garlic or onion when sautéing the spinach. This will infuse it with extra savory notes that complement the richness of the cheese.
4. Combining Vegetables for Extra Flavor
Why choose just one vegetable when you can combine them for added flavor and texture? Mixing broccoli, jalapeños, and spinach together creates a diverse and delicious veggie-filled mac and cheese that’s both nutritious and bursting with flavor.
How to combine vegetables in mac and cheese:
- Balance textures and flavors: While broccoli provides crunch, spinach adds creaminess, and jalapeños give a spicy kick. Combining these elements creates a perfect balance, where each vegetable shines without overwhelming the others.
- Add vegetables at different stages: Since each vegetable has different cooking times, consider adding them at various stages of the mac and cheese-making process. For example, sauté the spinach early on, blanch the broccoli ahead of time, and stir in the jalapeños just before serving to maintain their fresh flavor and heat.
- Layer the vegetables: You can layer the vegetables in the mac and cheese in different ways. For a bold look, you might want to layer spinach at the bottom, sprinkle with broccoli, and top with jalapeños for added texture and color.
In Conclusion: Vegetables Can Transform Your Mac and Cheese
Adding vegetables like broccoli, jalapeños, and spinach to your mac and cheese not only makes the dish more exciting and flavorful but also boosts its nutritional value. The vegetables add new textures, vibrant colors, and complementary flavors that enhance the richness of the cheese sauce. Whether you prefer something crunchy, spicy, or creamy, mixing in vegetables allows you to personalize your mac and cheese and make it a well-rounded meal that everyone can enjoy. So, get creative and experiment with different vegetable combinations to elevate your mac and cheese to the next level!
Spices & Seasonings: Mustard Powder, Garlic, or Paprika
While mac and cheese is a comfort food beloved for its creamy, cheesy flavor, the right combination of spices and seasonings can elevate it to new heights. Adding a few well-chosen seasonings can deepen the richness of the cheese sauce, balance the flavors, and even introduce an unexpected zing. Mustard powder, garlic, and paprika are three versatile spices that can transform your mac and cheese, providing complexity and an extra burst of flavor.
1. Mustard Powder: A Tangy, Subtle Kick
One of the most underrated yet effective spices in mac and cheese is mustard powder. While it doesn’t dominate the flavor, mustard powder offers a mild tanginess that cuts through the richness of the cheese and adds a layer of depth and complexity. It balances the creaminess of the sauce, making it feel more vibrant and less heavy. Mustard powder is especially useful in sharp, aged cheeses, where it can enhance the cheese’s natural tang.
How to use mustard powder in mac and cheese:
- Add to the cheese sauce: Start by adding 1/2 teaspoon to 1 teaspoon of mustard powder to your cheese sauce while it’s heating up. The heat will activate the mustard, allowing it to blend perfectly with the cheese. You don’t want to add too much—just a small amount goes a long way in brightening the dish without overpowering the flavor.
- Pair with sharp cheeses: Mustard powder works particularly well with cheeses like cheddar or gruyere, which have a tangy flavor. The mustard enhances the sharpness while adding a slight acidic edge to balance the richness of the dish.
- Complement other tangy ingredients: If you’re already using ingredients like hot sauce, sour cream, or vinegar, mustard powder pairs beautifully with these, reinforcing the tangy elements of your mac and cheese.
Pro tip: For a more intense mustard flavor, combine mustard powder with Dijon mustard or yellow mustard. This combination will provide both a subtle tang and a more robust mustard presence in the dish.
2. Garlic: Savory, Pungent, and Flavorful
Garlic is a staple in nearly every savory dish, and mac and cheese is no exception. Whether you use fresh garlic, garlic powder, or garlic salt, this aromatic spice adds a depth of flavor that complements the creamy cheese sauce. Garlic’s savory, earthy notes cut through the richness of the cheese, creating a balanced flavor profile.
How to use garlic in mac and cheese:
- Fresh garlic: If using fresh garlic, mince or finely chop 2-3 cloves and sauté them in butter or oil at the beginning of your sauce-making process. This allows the garlic to release its aromatic oils, which infuses the sauce with a robust, savory flavor.
- Garlic powder or garlic salt: If you’re short on fresh garlic, garlic powder can work wonders in the sauce. Start with 1/2 teaspoon and add more to taste. If you’re using garlic salt, be cautious with your salt levels to avoid over-seasoning the dish.
- Pair with other herbs: Garlic pairs wonderfully with other savory herbs like oregano, thyme, or basil. Try adding a pinch of these to your sauce for an added layer of complexity.
Pro tip: For a more subtle garlic flavor, add garlic powder to the breadcrumbs or panko topping. This will provide a delicate garlic infusion in every crunchy bite while not overwhelming the cheese sauce itself.
3. Paprika: Smoky, Sweet, and Colorful
Paprika is a spice made from dried and ground peppers, and it comes in different varieties, such as sweet, smoked, and hot. Each type adds a unique flavor to your mac and cheese. Sweet paprika adds color and a mild peppery flavor, while smoked paprika introduces a rich, smoky undertone. For those who enjoy heat, hot paprika can lend a spicy kick.
How to use paprika in mac and cheese:
- Sweet paprika: This type of paprika provides a subtle peppery sweetness and beautiful red color. Sprinkle a small amount (around 1/2 teaspoon) into the cheese sauce to deepen its flavor profile and give it a warm, inviting appearance. You can also sprinkle it over the finished dish for a pop of color.
- Smoked paprika: For a more intense, smoky flavor, use smoked paprika. This spice works particularly well with cheese sauces that have a slightly tangy or sharp flavor, such as those made with cheddar or gouda. Smoked paprika will infuse your mac and cheese with a deep, earthy richness and bring a unique complexity that sets it apart from the typical creamy mac and cheese flavor.
- Hot paprika: If you like a bit of heat, hot paprika adds a subtle spicy kick. Use it sparingly to avoid overpowering the dish. Pair it with a milder cheese sauce and add it to the top of your mac and cheese just before serving.
Pro tip: To create a truly unique flavor, experiment with a blend of both smoked paprika and sweet paprika. The smokiness complements the creaminess of the cheese, while the sweetness balances out the richness.
4. Combining Spices for Maximum Flavor
One of the best ways to use spices like mustard powder, garlic, and paprika is to combine them for a complex and layered flavor profile. A combination of seasonings can balance out the richness of the cheese sauce while enhancing its depth. Here are some ideas for spice combinations:
- Mustard powder + garlic: This combo creates a savory, tangy base that cuts through the richness of the cheese and adds a satisfying depth of flavor. It’s perfect for sharp cheeses like cheddar or aged gouda.
- Garlic + paprika: If you want a more savory and smoky mac and cheese, combining garlic and smoked paprika provides a rich, earthy flavor that enhances the overall dish.
- Mustard powder + paprika: For an extra zesty twist, the tangy mustard powder pairs well with the warm, smoky notes of paprika. This combination works well in both stovetop and baked mac and cheese.
In Conclusion: Enhance Your Mac and Cheese with Bold Flavors
By incorporating mustard powder, garlic, and paprika, you can transform your mac and cheese from a basic comfort dish into a flavorful, complex meal that will delight the taste buds. Whether you prefer a tangy kick, savory depth, or a smoky richness, these spices are versatile enough to fit any flavor profile. Don’t be afraid to experiment with these spices and find the perfect balance that suits your personal taste. With the right seasonings, you can elevate your mac and cheese to something truly unforgettable.
Common Mistakes to Avoid When Making Mac and Cheese
Using Pre-Shredded Cheese (And Why It’s a Mistake!)
When making mac and cheese from scratch, one of the most crucial steps is selecting the right cheese. While it might be tempting to grab a bag of pre-shredded cheese for convenience, this choice can affect the texture, flavor, and overall creaminess of your dish. In fact, using pre-shredded cheese is a common mistake that many home cooks make when preparing mac and cheese. Here’s why:
1. Anti-Caking Agents: What’s Really in Pre-Shredded Cheese?
Pre-shredded cheese is convenient, but it often contains anti-caking agents to prevent the cheese from clumping together in the bag. These agents, such as cellulose (wood pulp) or potato starch, are added to keep the shreds separate, making it easier for manufacturers to package and distribute. While these additives help maintain the appearance of the cheese, they can interfere with the melting process and affect the texture of your cheese sauce.
How anti-caking agents affect your mac and cheese:
- Less smooth melting: Anti-caking agents coat the cheese, preventing it from melting smoothly into your sauce. This leads to a grainy or clumpy texture that can ruin the velvety consistency you’re aiming for in a perfect mac and cheese sauce.
- Altered flavor: The additives may also affect the flavor of the cheese, making it taste slightly more artificial or less rich than freshly shredded cheese.
- Difficulty achieving creaminess: For mac and cheese to achieve its signature creaminess, the cheese needs to melt into a smooth sauce without any lumps. Pre-shredded cheese, due to the added anti-caking agents, often doesn’t melt as seamlessly, which can cause the sauce to be less creamy and more oily or gritty.
2. The Importance of Freshly Shredded Cheese: Smooth, Creamy, and Flavorful
When you shred cheese at home, you get a cleaner, smoother melt that incorporates seamlessly into your sauce. Freshly shredded cheese does not have any anti-caking agents, allowing it to melt evenly and create a silky, cohesive sauce that’s rich and smooth. This is especially important when making mac and cheese, where the goal is to achieve the perfect, luscious cheese sauce.
Why freshly shredded cheese is better for mac and cheese:
- Better texture: Freshly shredded cheese melts faster and more evenly, resulting in a smoother, creamier sauce. There are no additives that disrupt the melting process, which means the cheese incorporates fully into the sauce and maintains its velvety consistency.
- Enhanced flavor: Fresh cheese retains its full, authentic flavor, as there are no preservatives or anti-caking agents dulling its taste. This results in a richer, more intense cheese flavor, which is essential for a flavorful mac and cheese.
- Customizable texture: By shredding your cheese yourself, you can choose the size of the shreds (fine or coarse), which allows you to customize how the cheese integrates into the sauce. Finer shreds melt more quickly, while coarser shreds provide a slightly chunkier texture if that’s what you prefer.
3. The Right Cheese to Shred: Cheddar, Gruyère, Gouda, and More
Another benefit of shredding your cheese at home is that you can select the perfect cheese varieties for your mac and cheese. Pre-shredded cheese often combines different types of cheese, which can lead to a blander flavor and a less nuanced sauce. By shredding your cheese fresh, you can experiment with different flavors and textures, mixing cheeses that complement each other beautifully.
Best cheeses to shred for mac and cheese:
- Sharp cheddar: Offers a rich, tangy flavor that provides the classic mac and cheese taste. It melts wonderfully, especially when freshly shredded.
- Gruyère: Known for its smooth, creamy melt and slightly nutty flavor, Gruyère adds complexity to your mac and cheese and pairs well with cheddar for an elevated dish.
- Gouda: When shredded fresh, Gouda has a mild, buttery flavor and smooth melt that enhances the creaminess of your cheese sauce.
- Fontina: A soft cheese that melts beautifully, Fontina adds a creamy texture and mild, savory flavor to your mac and cheese.
- Monterey Jack: This cheese has a mild flavor and melts well, contributing to a silky texture in the sauce.
By combining these fresh cheeses, you can create a cheese sauce that’s both rich in flavor and perfectly creamy—something that pre-shredded cheeses struggle to achieve.
4. Saving Time Without Sacrificing Quality
While shredding cheese may seem like an extra step, it doesn’t have to be a time-consuming process. Here are some tips to make it quicker and more efficient:
- Use a food processor: Instead of shredding cheese by hand, use a food processor to shred cheese quickly and uniformly. It’s an easy way to save time while still using the freshest cheese possible.
- Grate large batches: If you’re making mac and cheese for a crowd or want to prep ahead, you can shred large quantities of cheese and store it in an airtight container in the fridge. Just make sure to use it within a few days to preserve its freshness.
- Choose block cheese: When purchasing cheese for mac and cheese, buy it in block form rather than pre-shredded. Blocks of cheese are typically fresher and don’t have the additives found in pre-shredded versions.
5. Pre-Shredded Cheese in a Pinch
There are some cases where pre-shredded cheese can be a good option, especially if you’re in a rush or don’t mind compromising on texture and flavor for convenience. If you choose to use pre-shredded cheese, it’s best to use a high-quality brand and combine it with freshly shredded cheese for a better outcome. For example, you could use pre-shredded cheddar for the base and then mix in some freshly shredded Gruyère or Fontina to enhance the flavor and melt quality.
In Conclusion: Freshly Shredded Cheese for the Best Mac and Cheese
While pre-shredded cheese might seem like a time-saver, it’s ultimately a disservice to your mac and cheese. For the creamiest, smoothest cheese sauce and the best flavor, it’s worth the extra effort to shred your cheese fresh. By doing so, you’ll achieve the perfect balance of texture, flavor, and creaminess, ensuring that every bite of mac and cheese is as delicious as it can be. Don’t let convenience compromise the quality of your dish—take the time to shred your cheese and elevate your mac and cheese to a whole new level!
Overcooking the Pasta: Finding the Right Texture
The pasta is the base of any mac and cheese dish, and getting the texture just right is crucial for a perfectly creamy and satisfying result. While you might be tempted to cook your pasta until it’s extremely soft, overcooking it can lead to a mushy, unappetizing dish. In this section, we’ll explore why overcooking pasta is a common mistake in mac and cheese and how to avoid it to achieve the ideal texture for your comfort food.
1. Al Dente is Key: The Perfect Pasta Texture
To avoid overcooking your pasta, it’s important to cook it to al dente, which means the pasta is firm to the bite and slightly resistant, but not hard. Al dente pasta holds up better when mixed with the creamy cheese sauce and provides the perfect texture when combined with the rich, velvety sauce. Cooking your pasta too long can result in it becoming soft and mushy, which makes it lose its structural integrity and disrupts the balance of textures in the final dish.
Why al dente pasta is ideal for mac and cheese:
- Better texture in the final dish: Al dente pasta will maintain its shape and firmness, allowing it to hold up against the cheese sauce. This helps prevent the pasta from disintegrating into a mushy, unpleasant texture.
- Absorbing the sauce: Al dente pasta has a slightly rougher surface, which allows it to better absorb the cheese sauce. This helps the sauce cling to the pasta, creating a more cohesive and flavorful bite with every spoonful.
- Contrast in texture: The perfect mac and cheese should have a contrast in texture between the creamy, smooth sauce and the firm pasta. This contrast adds depth and makes each bite more satisfying. Overcooked pasta, on the other hand, can result in a lack of this textural distinction, making the dish feel bland and soggy.
2. Timing Matters: How Long to Cook the Pasta
To cook the pasta just right, follow the recommended cooking time on the pasta package but make sure to check it a minute or two earlier than the suggested time. Pasta can continue to cook even after you drain it, especially if you’re combining it with a hot cheese sauce. So, it’s essential to taste test your pasta as it nears the end of the recommended cooking time to ensure it’s firm, not soft.
How to avoid overcooking the pasta:
- Use a timer: Set a timer based on the recommended cooking time and check the pasta about 1-2 minutes before it’s done. Taste the pasta to check its texture—if it’s slightly firm to the bite, it’s ready.
- Reserve some pasta water: Before draining the pasta, save about 1 cup of pasta water. This water can be added to the cheese sauce to help adjust its consistency if needed. Pasta water contains starch, which helps the sauce adhere to the pasta better.
- Drain promptly: Once the pasta is al dente, immediately drain it to stop the cooking process. If you’re not combining it with the cheese sauce right away, rinse the pasta briefly with cold water to prevent it from cooking further.
3. The Danger of Overcooking: What Happens to the Pasta?
Overcooking pasta can have several negative effects on the texture of your mac and cheese:
- Mushy pasta: Overcooked pasta becomes soft and slimy, and it may start to fall apart when you mix it with the cheese sauce. This creates a lack of structure in the dish, making it less enjoyable to eat.
- Absorbing too much sauce: Overcooked pasta has a tendency to absorb excess sauce, causing the cheese sauce to become thick, dry, or sticky. This can make your mac and cheese feel too heavy and less creamy.
- Flavors becoming unbalanced: When pasta is overcooked, it can lose its natural flavor and sweetness. This results in a less vibrant overall taste, as the pasta will take on a mushy, flavorless texture that doesn’t complement the creamy cheese sauce.
4. Pasta Cooking Tips for Perfect Mac and Cheese
To make sure you achieve the best pasta texture for your mac and cheese, here are some expert tips to ensure the pasta stays firm and doesn’t overcook:
- Salt your pasta water: Adding salt to your boiling water helps enhance the pasta’s natural flavor and prevents the pasta from becoming bland. A general rule of thumb is to use about 1-2 tablespoons of salt per 4-6 quarts of water.
- Use plenty of water: Make sure the pot of water is large enough so that the pasta has plenty of room to cook evenly without sticking together. The pasta needs space to move around for the best texture.
- Don’t add oil to the water: While some people add oil to their pasta water to prevent the noodles from sticking, it can also make it difficult for the cheese sauce to adhere to the pasta. So, it’s best to skip the oil and stir the pasta occasionally while cooking.
- Avoid overcooking in the sauce: After draining the pasta, mix it with the cheese sauce promptly. If you let the pasta sit in the sauce for too long, it will continue to cook in the residual heat of the sauce, leading to a mushy texture. Make sure to combine the pasta and sauce right away for the best results.
5. Combining Pasta and Cheese Sauce: How to Keep the Texture Perfect
After cooking the pasta to the right level of doneness, the next step is to mix it with the cheese sauce. To maintain that perfect texture:
- Coat the pasta immediately: As soon as the pasta is drained, toss it with the cheese sauce while it’s still hot. This ensures the sauce clings to the pasta while it’s fresh and firm.
- Don’t let the sauce boil: When combining the pasta with the cheese sauce, avoid bringing the sauce to a rolling boil. Gentle heating will help ensure the pasta and cheese sauce come together without further cooking the pasta.
In Conclusion: Perfect Pasta Equals Perfect Mac and Cheese
To achieve the creamiest, most satisfying mac and cheese, cooking the pasta to the perfect al dente texture is key. Avoid overcooking it by keeping track of the timing and tasting as you go. Overcooked pasta can lead to a mushy texture that ruins the dish, while properly cooked pasta maintains its firmness and provides the perfect balance with the creamy cheese sauce. With just a few careful steps, you can enjoy a mac and cheese that has the ideal texture and is full of flavor from start to finish.
Why Your Cheese Sauce Might Be Too Thin or Too Thick
The cheese sauce is the heart of mac and cheese, and getting its consistency just right is key to achieving the perfect creamy texture. Whether it’s too thin, runny, or too thick, the cheese sauce can make or break your dish. In this section, we’ll explore why your cheese sauce might be too thin or too thick and provide tips on how to adjust it for the ideal consistency.
1. Why Your Cheese Sauce Might Be Too Thin
A cheese sauce that’s too thin can leave your mac and cheese feeling watery and unsatisfying. If your sauce isn’t thick enough to coat the pasta properly, it will lack the luxurious creaminess that makes mac and cheese so comforting. Here are some reasons why your sauce might be too thin and how to fix it:
Possible Causes:
- Too much liquid: If you’ve added too much milk or cream to your sauce, the liquid will dilute the cheese, preventing it from forming a rich, thick sauce. The key is to gradually add the liquid and allow it to reduce before adding more, which helps thicken it up naturally.
- Not enough roux: A roux (butter and flour mixture) acts as a thickening agent for the sauce. If the ratio of flour to butter is off or if there isn’t enough roux, the cheese sauce may not have enough structure to thicken properly. A lack of roux can lead to a sauce that’s too thin and watery.
- Low-fat dairy products: If you use low-fat milk or substitutes like almond or oat milk, the sauce may not thicken as well, as these options have lower fat content. Fat plays an important role in helping the cheese melt and blend into a smooth, creamy sauce. Stick with full-fat dairy products for the best results.
How to Fix It:
- Thicken with a roux: If your cheese sauce is too thin, make sure your roux is thick enough to support the sauce. For every 1 cup of liquid, use 1 tablespoon of flour and 1 tablespoon of butter. If your sauce is still too thin, you can make a little more roux and add it to the sauce.
- Reduce the sauce: Simmer your sauce on low heat to reduce the liquid and allow it to thicken. Be sure to stir often to prevent burning or separation. Reducing the sauce concentrates the flavors and thickens it naturally.
- Add cheese gradually: If you add cheese all at once, it can cause the sauce to break and become too runny. Instead, add cheese in small batches and stir continuously to ensure it melts evenly.
2. Why Your Cheese Sauce Might Be Too Thick
While a thick cheese sauce can create a rich, indulgent mac and cheese, too-thick sauce can make the dish feel dry and heavy. If your sauce is too thick, it won’t properly coat the pasta, making it difficult to get that creamy consistency that you crave. Here are some reasons your cheese sauce might be too thick and how to adjust it:
Possible Causes:
- Too much roux: If you’ve added too much flour to your roux, it can absorb more liquid than needed, resulting in a sauce that’s too thick. The flour ratio is critical to getting the right consistency, so be sure to follow the recipe’s recommended measurements.
- Overcooking the sauce: If you cook your sauce on too high a heat for too long, it can thicken too much or even curdle. Overheating can cause the proteins in the cheese and dairy to separate, leading to a lumpy, overly thick sauce.
- Too little liquid: If you’ve skimped on the amount of milk or cream you add to the sauce, it may become overly thick. Dairy is essential for creating the smooth, velvety texture that makes mac and cheese so comforting.
How to Fix It:
- Add more liquid: If your cheese sauce is too thick, gradually add a bit more milk or cream, a few tablespoons at a time, until you reach the desired consistency. Warm the liquid before adding it to the sauce to prevent sudden temperature changes, which could cause the cheese to seize up.
- Use pasta water: If you’re finding the cheese sauce too thick, try adding a bit of pasta water to thin it out. The starch in the pasta water helps to loosen the sauce without diluting the flavor.
- Avoid overcooking: Cook the sauce over medium-low heat and stir it constantly to prevent it from thickening too much. If you notice the sauce starting to thicken too quickly, reduce the heat and add a little liquid to loosen it up.
3. The Ideal Cheese Sauce Consistency
For the perfect mac and cheese, your cheese sauce should have a smooth, velvety texture that coats the pasta without being too runny or too thick. The sauce should flow easily but still hold its shape when you stir the pasta. Here are some signs of the ideal cheese sauce consistency:
- Coats the back of a spoon: When you dip a spoon into the sauce, it should coat the back of the spoon, and you should be able to draw a line through it with your finger. If the sauce drips off the spoon too quickly, it’s too thin; if it clings too much, it’s too thick.
- Smooth and creamy: The cheese sauce should be velvety and smooth, with no lumps. If the sauce is too thick or thin, it may have a grainy texture, which is not ideal for mac and cheese.
- Clings to pasta: The sauce should cling to the pasta, creating that creamy, luscious coating we all love. It should not slide off easily or pool at the bottom of the dish.
4. Troubleshooting Common Cheese Sauce Problems
Even with the best intentions, things can go wrong when making cheese sauce. Here are a few common problems and their solutions:
- Lumpy sauce: If your cheese sauce is lumpy, it may be due to adding the cheese too quickly or at the wrong temperature. To fix this, remove the sauce from the heat and whisk vigorously to smooth out the lumps. If the sauce is too thick, you can also add a bit of liquid to loosen it up.
- Grainy texture: A grainy cheese sauce is usually the result of overheated cheese or using the wrong kind of cheese. Cheese should always be added gradually to a warm sauce, not directly into boiling liquid. Avoid using low-fat or pre-shredded cheeses, which don’t melt as smoothly.
5. Conclusion: Achieving the Perfect Cheese Sauce Consistency
A great cheese sauce is the key to the creamiest mac and cheese. Whether your sauce is too thin or too thick, understanding the causes behind these issues and how to fix them will help you get the perfect consistency every time. By adjusting the liquid-to-roux ratio, adding cheese gradually, and being mindful of your cooking temperature, you can achieve a smooth, velvety cheese sauce that will make your mac and cheese truly irresistible.
Preventing Oily or Separated Cheese Sauce
An oily or separated cheese sauce is one of the most common issues people face when making mac and cheese. When your sauce separates, the cheese oils separate from the dairy or roux, creating an unappealing texture and appearance. This can result in a greasy, unappetizing dish that fails to deliver the rich, creamy texture you expect. Fortunately, there are several key techniques to prevent this from happening. Let’s explore the causes of a separated cheese sauce and how to ensure your sauce stays smooth and creamy.
1. Understanding the Cause of Separated or Oily Cheese Sauce
Why Cheese Separates:
- High heat: Cheese is made up of proteins and fats, and when exposed to high heat, the fats in cheese can separate from the protein structure, causing it to break and turn oily. When cheese melts too quickly or at a high temperature, the fat and proteins do not combine smoothly, leading to a separated or greasy sauce.
- Adding cheese too quickly: If you add cheese all at once, the heat can cause the cheese to clump or seize up, leading to an uneven texture. This can cause the fat to separate from the cheese, making the sauce oily or grainy.
- Low-fat cheese: Using cheese with low fat content can result in a sauce that doesn’t melt properly. Low-fat cheeses contain less fat, which is essential for creating the creamy texture of a cheese sauce. Without enough fat, the sauce may not emulsify correctly, leading to separation.
- Overcooking or over-stirring: When the cheese sauce is cooked too long or stirred too vigorously, it can break down and separate. The high heat can cause the fats to separate from the milk proteins, making the sauce oily and less smooth.
2. Techniques to Prevent Separation and Oiliness
Use Low to Medium Heat:
One of the most effective ways to prevent cheese from separating is to melt it slowly and over low to medium heat. High temperatures cause the fat in cheese to separate from the rest of the ingredients, so cooking your sauce on too high a heat will make it prone to oiliness.
- Gradually heat your cheese sauce: Start with a roux (butter and flour mixture) cooked over medium heat, then gradually add your milk or cream. Once the sauce is at a simmer, lower the heat further before adding the cheese, allowing it to melt slowly and evenly.
Add Cheese Gradually:
Instead of adding all the cheese at once, add it gradually and stir continuously. This will help ensure that the cheese melts evenly and incorporates into the sauce without clumping or separating.
- Small handfuls at a time: Add a small amount of cheese to the sauce at a time, stirring each addition in thoroughly before adding more. This allows each batch to melt completely before the next goes in, creating a smoother sauce.
- Grate the cheese finely: Finely grated cheese will melt much faster and more evenly than larger chunks. Using a box grater or food processor to shred your cheese ensures it melts without clumping.
Use Full-Fat Cheese:
Low-fat cheeses may seem like a healthier choice, but they do not melt as well and are more prone to separating. Full-fat cheeses, like sharp cheddar, Gruyère, or Fontina, have more fat content, which helps them melt smoothly and emulsify better into the sauce.
- Opt for the right cheeses: Stick with high-quality, full-fat cheeses such as sharp cheddar, Monterey Jack, or Gruyère for your mac and cheese. These cheeses are known for their excellent melting qualities and will give you a creamy, luscious sauce.
Avoid Overheating:
Once your cheese is added, avoid cooking the sauce at high temperatures. Once the cheese is fully melted, remove the sauce from the heat and let it sit briefly to allow the flavors to meld. Overheating will cause the fat to separate, leading to a greasy texture.
- Remove from heat promptly: Once the cheese has melted, take the pot off the heat immediately to prevent the sauce from getting too hot and separating.
Use an Emulsifier (Like Cornstarch):
Adding an emulsifier, such as cornstarch or flour, can help bind the fat and liquid in the cheese sauce, preventing separation. The starch will help the cheese blend smoothly with the dairy and create a more stable sauce.
- Cornstarch slurry: For extra stability, you can mix a small amount of cornstarch with cold milk or water and then stir it into your sauce. The cornstarch will help thicken and stabilize the sauce, preventing it from separating.
3. Troubleshooting Separated Cheese Sauce
If your cheese sauce has already separated, there are a few steps you can take to rescue it:
- Add an acid: Sometimes, adding a small amount of acid like lemon juice, white vinegar, or Dijon mustard can help re-emulsify the sauce. The acid helps break down the proteins and allows the cheese to recombine with the liquid. Be careful, though—too much acid can change the flavor of your sauce, so start with just a teaspoon.
- Whisk vigorously: If your sauce has separated, remove it from the heat and whisk vigorously to reincorporate the fat and liquid. This can help smooth out the sauce, but it may not work in every case.
- Add more liquid: If your sauce seems too greasy and thick, adding a bit more milk or cream can help thin it out and bring the components back together. Warm the liquid first and add it gradually while whisking.
4. Conclusion: Keeping Your Cheese Sauce Smooth and Creamy
Preventing oily or separated cheese sauce comes down to controlling the heat, using the right cheeses, and adding the ingredients gradually. By following these tips—such as using medium heat, adding cheese slowly, and choosing full-fat cheeses—you can ensure your sauce remains smooth and creamy. If separation does occur, there are several tricks to rescue your sauce, from adding an emulsifier to using a small amount of acid. With these techniques, you can enjoy a rich, velvety cheese sauce that elevates your mac and cheese to perfection.
Serving and Storing Mac and Cheese Like a Pro
Best Side Dishes to Serve with Mac and Cheese
Mac and cheese is a comforting, rich dish that can stand on its own, but pairing it with complementary side dishes can elevate your meal. Whether you’re serving it as a main course or a side dish, the right accompaniments can balance the creamy richness and enhance the flavors of your mac and cheese. Here are some of the best side dishes to serve with mac and cheese, creating a well-rounded meal that will satisfy all your taste buds.
1. Fresh and Zesty Salads
A crisp, refreshing salad is the perfect contrast to the creamy, cheesy texture of mac and cheese. The freshness and acidity of the salad help cut through the richness, adding balance to the meal. Here are a few options to consider:
Green Salad with Vinaigrette:
A simple green salad with a tangy vinaigrette is a great option. The acidity of the dressing will help balance out the heaviness of the cheese, while the fresh vegetables add texture and crunch. You can use mixed greens, arugula, spinach, or baby kale for variety. Toss with cherry tomatoes, cucumbers, and red onions for extra flavor.
Caesar Salad:
A classic Caesar salad adds a creamy yet slightly tangy dressing that complements mac and cheese perfectly. The crispy romaine lettuce, croutons, and Parmesan cheese provide a nice textural contrast to the soft, cheesy pasta. Plus, the bold flavor of the Caesar dressing helps cut through the richness of mac and cheese.
Coleslaw:
A sweet and tangy coleslaw with shredded cabbage, carrots, and a zesty dressing provides a wonderful crunchy contrast to the creamy mac and cheese. It also adds a refreshing bite, making it a great side dish, especially for BBQ-style mac and cheese.
2. Grilled or Roasted Vegetables
Grilled or roasted vegetables bring out deep, caramelized flavors that pair beautifully with the cheesy goodness of mac and cheese. Vegetables are a great way to add color, variety, and health benefits to the meal.
Roasted Brussels Sprouts:
Roasted Brussels sprouts with a bit of olive oil, salt, and pepper become crispy on the edges and tender in the middle, making them a fantastic side to mac and cheese. You can even drizzle balsamic glaze over the top to add a sweet and tangy contrast to the richness of the mac.
Grilled Asparagus:
Grilled asparagus, lightly seasoned with lemon and olive oil, offers a smoky flavor and tender texture that balances the heaviness of mac and cheese. The slight char from grilling enhances the natural flavors of the asparagus, creating a perfect accompaniment.
Roasted Carrots:
Roasted carrots with a honey glaze bring out natural sweetness and add a colorful contrast to your meal. The combination of sweetness and savory flavor is a great complement to the richness of the cheese.
3. Crispy Breads
A warm, crispy bread is always a welcome addition to mac and cheese. Whether used to scoop up the creamy pasta or to enjoy on its own, bread brings texture and a bit of crunch to the meal.
Garlic Bread:
Garlic bread, with its buttery, garlicky flavor and crispy exterior, is a perfect pairing with mac and cheese. The richness of the butter and garlic complements the creamy sauce, and the crunchy texture adds an enjoyable contrast to the softness of the pasta.
Soft Dinner Rolls:
For a softer option, dinner rolls or a crusty baguette are great choices. They provide a light, pillowy texture that can soak up some of the cheese sauce and provide a satisfying bite without overpowering the dish.
Cheddar Biscuits:
If you’re looking for a bread that enhances the cheesy flavor, cheddar biscuits are an excellent choice. These fluffy, cheesy biscuits pair wonderfully with mac and cheese, offering both a similar flavor profile and a delightful textural contrast.
4. Protein-Packed Sides
Pairing mac and cheese with proteins not only makes the meal more filling but also adds additional flavors to complement the cheese. Whether you’re in the mood for something meaty or plant-based, there are plenty of options to choose from.
Bacon or Sausage:
Crispy bacon or savory sausage is a fantastic addition to mac and cheese, adding a smoky, salty contrast to the creamy pasta. The crunchiness of the bacon or the tenderness of the sausage can also bring different textures to the dish, making it even more satisfying.
Grilled Chicken:
Grilled chicken, particularly when seasoned with a bit of rosemary, thyme, or garlic, pairs wonderfully with mac and cheese. The lean protein helps balance the richness of the cheese and adds a savory element to the meal.
Pulled Pork:
For a more indulgent pairing, try serving mac and cheese with tender pulled pork. The smoky, juicy pulled pork complements the creaminess of mac and cheese while adding a hearty, meaty component to the meal. This pairing is especially great for BBQ-style mac and cheese.
Lobster or Crab:
For a more luxurious twist, add lobster or crab to your mac and cheese. The delicate, sweet flavors of the seafood elevate the mac and cheese and give it a sophisticated touch. It’s a perfect option for special occasions or when you want to treat yourself to something extra indulgent.
5. Pickled or Tangy Sides
If you want to add an extra layer of contrast and freshness to your mac and cheese, try pairing it with pickled or tangy sides. These sides will add an acidic punch to balance out the richness of the cheese sauce.
Pickled Cucumbers:
Pickled cucumbers, with their bright acidity, are a fantastic way to cut through the richness of mac and cheese. The sharp vinegar flavor provides a nice contrast, and the cool, crunchy texture offers a refreshing bite.
Pickled Red Onions:
The tangy flavor of pickled red onions can be an excellent complement to the creamy and cheesy mac and cheese. Their sweetness and acidity help balance out the heaviness of the cheese, adding a burst of flavor with every bite.
Kimchi:
For something more adventurous, try serving kimchi alongside your mac and cheese. The spicy, fermented flavors of kimchi provide a bold contrast to the creamy dish, and the probiotics offer an added health benefit.
6. Fresh Fruits
If you prefer a lighter, more refreshing side dish, fresh fruits can be a great addition. Their natural sweetness helps balance out the rich, savory flavors of mac and cheese.
Apple Slices with Cinnamon:
Crisp apple slices with a sprinkle of cinnamon add a subtle sweetness that pairs well with the savory cheese. Apples also bring a satisfying crunch that contrasts nicely with the creamy mac and cheese.
Grapes or Berries:
Fresh grapes or berries, such as strawberries or blueberries, offer a burst of sweetness that complements the cheesy pasta. The natural juiciness and freshness of the fruit provide a nice balance to the heavy richness of mac and cheese.
7. Conclusion: Creating the Perfect Mac and Cheese Meal
While mac and cheese is delicious on its own, pairing it with the right sides can elevate the entire meal. From fresh salads and roasted vegetables to crispy breads and protein-packed sides, there are plenty of options to complement your mac and cheese. By balancing the richness of the cheese with tangy, crunchy, or light accompaniments, you can create a well-rounded meal that everyone will love.
How to Reheat Mac and Cheese Without Drying It Out
Reheating mac and cheese can be a challenge, as the creamy cheese sauce tends to thicken and dry out when reheated improperly. However, with the right techniques, you can restore your leftover mac and cheese to its original creamy, cheesy goodness. Below are some foolproof methods for reheating mac and cheese without sacrificing its texture and flavor:
1. Stovetop Method: Gently Heat with Extra Liquid
The stovetop is one of the best ways to reheat mac and cheese, as it allows you to control the heat and ensure that the dish heats evenly. The key to keeping mac and cheese from drying out on the stovetop is adding a bit of liquid and reheating it slowly. Here’s how to do it:
Step-by-Step Instructions:
- Step 1: Place your leftover mac and cheese in a large skillet or saucepan.
- Step 2: Add a small amount of liquid to the pan—milk, cream, or even a bit of butter can work wonders. Start with about 2-3 tablespoons per serving, depending on how much mac and cheese you are reheating. You can always add more as needed.
- Step 3: Heat over low to medium-low heat, stirring frequently. Be sure to scrape the sides of the pan to prevent the cheese from burning or sticking.
- Step 4: As the cheese sauce begins to loosen up, continue stirring gently. Add more liquid in small amounts if the mac and cheese seems too thick. This helps to restore the creamy texture.
- Step 5: Once it’s fully heated through and the sauce has become smooth and creamy again, remove from the heat and serve immediately.
Pro Tip:
If you want to add a little extra richness, consider adding a splash of heavy cream instead of milk. This will make your mac and cheese even more decadent and creamy.
2. Oven Method: Slow and Steady with Foil
If you’re reheating a larger batch of mac and cheese and want to preserve its texture without stirring it constantly, the oven is a great choice. The key here is to reheat it gently so the cheese doesn’t dry out or separate.
Step-by-Step Instructions:
- Step 1: Preheat your oven to 350°F (175°C).
- Step 2: Transfer your leftover mac and cheese to an oven-safe dish. If your mac and cheese is very thick, consider adding a little milk or cream to loosen it up. About 2-4 tablespoons should be enough for a standard serving.
- Step 3: Cover the dish tightly with aluminum foil to trap moisture and heat it evenly. This helps prevent the cheese from drying out during the reheating process.
- Step 4: Place the dish in the oven and bake for 15-20 minutes. After the initial time, check to see if it’s hot throughout. If necessary, uncover the dish and let it bake for an additional 5-10 minutes to allow the top to get slightly crispy.
- Step 5: Remove from the oven, stir to redistribute the creamy sauce, and serve immediately.
Pro Tip:
If you like a crispy top, remove the foil during the last few minutes of baking to allow the surface of the mac and cheese to get golden and bubbly.
3. Microwave Method: Quick and Convenient
If you’re short on time and need to reheat a small portion of mac and cheese, the microwave is the quickest option. However, since the microwave tends to heat unevenly and can dry out food, you’ll need to take extra care to keep the mac and cheese creamy.
Step-by-Step Instructions:
- Step 1: Place your mac and cheese in a microwave-safe bowl.
- Step 2: Add a splash of milk or cream to the bowl (about 1-2 tablespoons per serving), and stir to combine. The liquid helps keep the cheese from becoming too thick or dry.
- Step 3: Cover the bowl with a microwave-safe lid or damp paper towel to trap steam and retain moisture.
- Step 4: Microwave on low heat or at 50% power for 30-second intervals. Stir between intervals to ensure even heating. This will also help prevent the cheese from separating.
- Step 5: Once it’s heated to your desired temperature, stir again and serve.
Pro Tip:
Avoid reheating mac and cheese on high power, as it can cause the cheese to become rubbery. Heating on low power helps the dish warm up evenly without overcooking.
4. Double Boiler Method: Gentle Heat for Ultimate Creaminess
If you want to avoid using direct heat altogether, the double boiler method is a fantastic option. It uses indirect heat to gently reheat mac and cheese, keeping it creamy without the risk of burning the sauce.
Step-by-Step Instructions:
- Step 1: Fill a pot with a few inches of water and bring it to a gentle simmer over low heat.
- Step 2: Place your leftover mac and cheese in a heatproof bowl or another pot that fits comfortably over the simmering water. Make sure the bottom of the bowl doesn’t touch the water, as it will allow the heat to rise gently around the mac and cheese.
- Step 3: Stir occasionally and add a little liquid (milk, cream, or butter) as needed to keep the sauce smooth and creamy.
- Step 4: Heat the mac and cheese slowly, stirring frequently until it reaches the desired temperature.
Pro Tip:
The double boiler method works best for smaller amounts of mac and cheese, as it can take longer to heat through than the stovetop or microwave methods. Be patient, as the gentle heat preserves the sauce’s smoothness.
5. Adding Fresh Toppings for Extra Flavor
After reheating your mac and cheese, consider adding some fresh toppings to enhance the flavor and texture. Fresh ingredients such as chopped herbs, crispy bacon, or extra cheese can add a burst of flavor to your reheated dish.
Topping Ideas:
- Freshly grated Parmesan or sharp cheddar
- Chopped parsley or chives
- Crumbled crispy bacon
- A drizzle of truffle oil or hot sauce for an added kick
- Crumbled crackers or breadcrumbs for crunch
Conclusion: Ensuring the Creamiest Reheated Mac and Cheese
Reheating mac and cheese without drying it out can be easily achieved by using the right techniques. Whether you choose the stovetop, oven, microwave, or double boiler method, adding a little extra liquid and reheating slowly will help keep your mac and cheese creamy and delicious. With these tips, you can enjoy your leftovers just as much as the original dish!
Can You Freeze Mac and Cheese? Tips for Long-Term Storage
Mac and cheese is a beloved comfort food that many people wish they could enjoy at any time, which is why freezing it can be a great option for long-term storage. Whether you’re preparing a large batch to have leftovers or planning for future meals, freezing mac and cheese properly can preserve its creamy texture and rich flavor. However, there are some important factors to consider to ensure the dish remains just as delicious when reheated. Below are essential tips for freezing and storing mac and cheese:
1. Best Time to Freeze Mac and Cheese
The best time to freeze mac and cheese is when it’s freshly made. Freezing it soon after it’s cooked allows you to lock in the flavor and texture before it has a chance to dry out or become less creamy. If you plan to freeze leftovers, it’s crucial to store them as soon as they cool down to room temperature to avoid any bacterial growth.
Pro Tip:
If you’re freezing a batch for long-term storage, consider making an extra large portion to divide into smaller, meal-sized portions for convenience. This way, you can take out just the amount you need without having to defrost the entire batch.
2. How to Properly Freeze Mac and Cheese
Freezing mac and cheese requires a few simple steps to ensure it stays creamy and doesn’t become dry or separated when reheated. Here’s how to do it:
Step-by-Step Instructions:
- Step 1: Cool the Mac and Cheese: Before freezing, let your mac and cheese cool completely. Freezing hot or warm food can lead to ice crystals forming inside the dish, which can cause texture changes and make it soggy once thawed.
- Step 2: Portioning: Divide the mac and cheese into individual portions, especially if you plan to reheat smaller amounts at a time. Use airtight containers, freezer-safe plastic bags, or heavy-duty aluminum foil to store the portions.
- Step 3: Seal Properly: If using containers, make sure they are airtight to prevent freezer burn. If using freezer bags, remove as much air as possible before sealing to minimize exposure to air.
- Step 4: Label and Date: Label each container or bag with the date of freezing. While mac and cheese can typically be frozen for up to 3 months, it’s always a good idea to keep track of how long it’s been in the freezer to ensure the best quality.
3. Should You Freeze Mac and Cheese with or without Sauce?
When freezing mac and cheese, it’s important to decide whether to freeze it with the sauce already mixed in or to freeze the pasta and sauce separately.
- Freezing with the Sauce: It’s generally better to freeze mac and cheese with the sauce, as the pasta will absorb some of the cheese sauce during freezing, helping it retain moisture. If frozen separately, the sauce might break or separate upon reheating.
- Freezing the Sauce Separately: If you prefer, you can freeze the sauce separately from the pasta. This can be a good option if you want to ensure the sauce remains perfectly creamy when reheated, or if you’re using different types of pasta each time.
Pro Tip:
If you freeze both the pasta and sauce separately, you can easily mix them together once reheated to get that perfect mac and cheese consistency.
4. How to Reheat Frozen Mac and Cheese
Reheating frozen mac and cheese is a bit more involved than reheating fresh mac and cheese, but with the right method, you can restore the creamy texture and cheesy goodness. Here are a few ways to go about it:
Stovetop Method:
- Step 1: Thaw the mac and cheese in the refrigerator overnight for best results. If you’re in a hurry, you can reheat it from frozen, but the stovetop method will take a bit longer.
- Step 2: Once thawed or partially thawed, place the mac and cheese in a pan over low to medium heat. Add a little milk, cream, or butter to the dish to help loosen the sauce and ensure it remains creamy.
- Step 3: Stir occasionally and heat gently until it’s fully warmed through. Be careful not to overheat it, as this can cause the sauce to separate.
Oven Method:
- Step 1: Preheat your oven to 350°F (175°C). Place the frozen mac and cheese in an oven-safe dish.
- Step 2: Cover the dish with aluminum foil to retain moisture. Bake for 30-40 minutes or until the mac and cheese is heated through. If you’re reheating thawed mac and cheese, it may only take 20-25 minutes.
- Step 3: If you want a crispy top, uncover the dish during the last 5-10 minutes of baking.
Microwave Method:
- Step 1: Place the frozen mac and cheese in a microwave-safe bowl. If it’s frozen solid, you may want to microwave it on a low setting for a few minutes to thaw it slightly before continuing.
- Step 2: Add a splash of milk or cream to the mac and cheese to help restore its creaminess. Microwave on low power in 30-second intervals, stirring in between.
- Step 3: Continue until the mac and cheese is heated through and the sauce is smooth.
Pro Tip:
Always reheat mac and cheese gradually. Rapid reheating can cause the cheese sauce to break down and separate. Stirring frequently also helps maintain a smooth consistency.
5. Can You Freeze Mac and Cheese Twice?
It’s not recommended to refreeze mac and cheese after it has been thawed and reheated. Freezing and thawing multiple times can affect the texture of the pasta and the sauce, causing it to become grainy or watery. For the best results, only freeze mac and cheese once and consume it within a reasonable time frame to avoid any decline in quality.
Conclusion: Enjoy Mac and Cheese Anytime with Proper Freezing
Freezing mac and cheese is an excellent way to extend its shelf life and ensure you always have a comforting meal on hand. By following these tips for proper storage and reheating, you can enjoy mac and cheese with its creamy texture and rich flavor every time. Just remember to freeze it properly, store it for no more than 3 months, and reheat it carefully to maintain that ultimate cheesy goodness!
Making a Big Batch: Perfect for Meal Prepping
Mac and cheese is not only a comforting dish that’s easy to prepare, but it also makes for an excellent meal prep option. Making a big batch of mac and cheese can save time throughout the week, allowing you to have a delicious, ready-to-eat meal in your fridge whenever you need it. Whether you’re preparing meals for a busy workweek, planning to feed a crowd, or simply want to have leftovers for the next few days, making a large batch of mac and cheese is a smart and efficient strategy.
Here’s how to successfully make and store a large batch of mac and cheese for meal prepping, ensuring you maintain the creamy texture and mouthwatering flavor:
1. Choose a Large Recipe with Scaling in Mind
When preparing a big batch of mac and cheese, the first step is selecting the right recipe and scaling it accordingly. Most traditional recipes can be doubled or even tripled without altering the outcome too much. However, keep in mind that while the amount of pasta and cheese needs to increase, some ingredients, like seasonings and milk, should be adjusted carefully to avoid overpowering the dish.
Pro Tip:
If you’re not sure how to scale a recipe, start by multiplying the ingredients by 1.5 times. Taste as you go and make small adjustments for flavor and texture, especially with seasonings and creaminess. This allows you to tailor the mac and cheese to your preferred taste while ensuring it doesn’t become too dry or too cheesy.
2. Maximize Storage Efficiency with Meal-Sized Portions
Once you’ve made your big batch of mac and cheese, you’ll want to store it in a way that’s both convenient and efficient for meal prepping. Dividing the mac and cheese into meal-sized portions is a great strategy, especially if you’re preparing meals for multiple days or family members.
Storage Tips:
- Airtight Containers: Use airtight containers for easy portioning. Glass or BPA-free plastic containers are perfect for storing mac and cheese and ensure the dish stays fresh for longer. These containers also make it easy to heat up individual servings.
- Freezer-Safe Bags: If you plan to freeze some portions, freezer-safe bags are an excellent choice. Squeeze out as much air as possible from the bags before sealing to prevent freezer burn. Label each bag with the date to keep track of how long the mac and cheese has been stored.
- Individual Servings: For quick grab-and-go meals, store mac and cheese in smaller portions, which are easier to reheat and serve. You can use smaller containers or even muffin tins to create perfect, individual servings of mac and cheese.
3. How to Reheat Large Batches for Meal Prep
Reheating mac and cheese from a big batch for meal prep requires a bit of care to preserve the creamy texture. Here are some methods to make sure your mac and cheese stays just as good when reheated:
Oven Reheating Method:
- Preheat your oven to 350°F (175°C).
- Place the mac and cheese in an oven-safe dish and cover with aluminum foil to lock in moisture.
- Reheat for 20-30 minutes if it’s refrigerated or 40-50 minutes if it’s frozen. For a crispier top, uncover the dish during the last 5-10 minutes of reheating.
Stovetop Method:
- For smaller portions, the stovetop method works best. Place the mac and cheese in a pan over low to medium heat.
- Add a splash of milk or heavy cream to help loosen up the sauce. Stir frequently to prevent it from sticking and to maintain a smooth texture.
- Keep heating until the mac and cheese is hot and creamy. This method is perfect for ensuring that the dish doesn’t dry out.
Microwave Method:
- If you’re in a rush, the microwave is the fastest option for reheating individual servings.
- Place a portion of mac and cheese in a microwave-safe dish, and cover it with a microwave-safe lid or plastic wrap to prevent splattering.
- Reheat on medium power in 30-second intervals, stirring in between, until it’s hot. Add a little milk to keep the sauce creamy and prevent it from becoming dry.
4. Enhance the Flavor After Reheating
Mac and cheese can sometimes lose a little of its flavor after being stored and reheated. To restore its richness and prevent it from tasting flat, try adding some simple enhancements before serving:
- Add More Cheese: Sprinkle some fresh shredded cheese over the top before reheating to boost the cheesy flavor. Cheddar, Parmesan, or mozzarella work great for this.
- Fresh Herbs or Spices: A little sprinkle of freshly cracked black pepper, garlic powder, or paprika can help elevate the flavor of your mac and cheese. Fresh herbs, such as parsley or chives, can also add a burst of freshness.
- Dash of Cream or Milk: If the sauce has thickened too much, adding a bit of heavy cream, milk, or butter will help restore the creamy consistency and give it that fresh-cooked feel.

5. Use Leftover Mac and Cheese Creatively
Meal prepping mac and cheese doesn’t have to be limited to just reheating the same dish every day. Leftover mac and cheese can be used in creative ways for other meals. Here are some fun ideas:
- Mac and Cheese Muffins: Transform leftover mac and cheese into muffins by placing it in a muffin tin, topping it with extra cheese or breadcrumbs, and baking for a golden, crispy top.
- Mac and Cheese Casserole: Add some protein (like cooked chicken, bacon, or sausage) and vegetables (like peas or spinach) to the leftover mac and cheese to turn it into a hearty casserole. Top with breadcrumbs and bake until golden.
- Mac and Cheese Frittata: For a quick breakfast or brunch, beat some eggs and mix in the leftover mac and cheese. Pour it into a skillet and cook on low heat until the eggs are set. Finish under the broiler for a crispy top.
- Mac and Cheese Bites: Roll the leftover mac and cheese into balls, coat them in breadcrumbs, and fry or bake them for a fun snack or appetizer.
Conclusion: Big Batch Mac and Cheese for Hassle-Free Meals
Making a big batch of mac and cheese for meal prepping is a smart way to save time while enjoying a delicious and satisfying dish throughout the week. With proper storage techniques, reheating methods, and a few creative ideas for leftovers, your mac and cheese can remain just as creamy and flavorful as the day it was made. Whether you’re planning meals for the week or feeding a large group, a big batch of mac and cheese is sure to be a hit and make meal prepping a breeze!