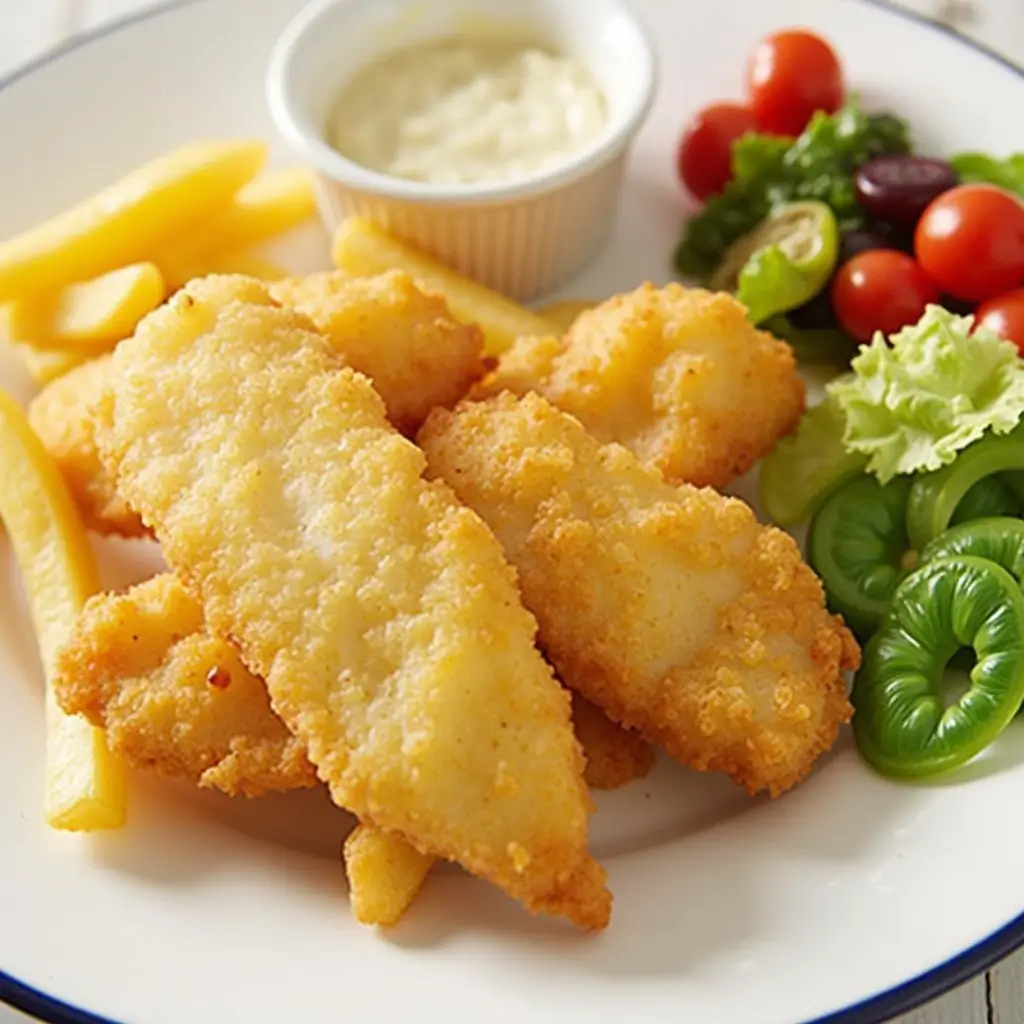
Fish and chips is a beloved classic, enjoyed for its perfect combination of crispy, golden-brown fish and soft, tender chips. While this dish is often associated with British pubs, there’s no reason why you can’t bring the experience into your own kitchen. Whether you’re craving a comforting meal or want to impress your friends and family, learning how to make the best fish and chips at home is easier than you might think.
In this step-by-step guide, we’ll show you how to create the ultimate fish and chips, starting with selecting the right fish like cod or haddock, preparing a light and crispy beer batter, and frying the perfect chips. Whether you prefer deep-frying, air-frying, or pan-frying, we’ve got you covered with tips and tricks for every method. By the end of this guide, you’ll be able to serve up this crispy, golden, and delicious dish just like the pros—right in the comfort of your own home.
Ready to make the best fish and chips ever? Let’s get cooking!
Choosing the Right Fish for Your Fish and Chips
Cod vs. Haddock: Compare These Classic Fish Options and Which Works Best for Frying
When it comes to making the perfect fish and chips, choosing the right fish is essential. Cod and haddock are the two most popular fish choices for this classic dish, each offering its own unique qualities that can impact the flavor, texture, and overall experience of your fish and chips.
Cod: The Classic Choice for Fish and Chips
Cod is often considered the quintessential fish for traditional fish and chips. Known for its mild flavor and flaky, white flesh, cod has a delicate texture that holds up well when fried. The firm, yet tender meat is perfect for creating large, hearty fillets that are ideal for battering and deep-frying.
The slightly sweet, clean taste of cod pairs beautifully with the crispy batter and golden chips. Cod’s mildness allows the seasoning in the batter and any accompanying sauces, such as tartar sauce or malt vinegar, to shine through without overpowering the fish itself. Its subtle flavor also makes it appealing to a wide variety of palates.
Pros of Cod:
- Mild, sweet flavor
- Flaky, tender texture
- Holds up well during frying
- Ideal for crispy batter
Haddock: A Slightly More Robust Option
Haddock is another popular choice, particularly in certain regions of the UK and other parts of the world. While similar to cod, haddock tends to have a slightly stronger flavor, with a more pronounced taste that some people prefer. The flesh of haddock is also white, but it is slightly firmer than cod, making it a great choice for those who prefer a bit more texture in their fish.
Haddock often has a more robust flavor, which makes it a perfect choice for people who enjoy a stronger fish taste. However, due to its firmer texture, haddock can sometimes be a bit less flaky than cod, though it still holds up beautifully in batter.
Pros of Haddock:
- More robust, savory flavor
- Firmer texture
- Great for a stronger fish taste
- Ideal for pairing with hearty sides or richer seasonings
Which Fish Works Best for Frying?
Both cod and haddock work excellently for frying, but the best choice for you depends on your personal taste preferences and the texture you’re after in your fish. If you prefer a delicate, flaky fillet that melts in your mouth, cod is likely your best bet. On the other hand, if you enjoy a firmer, more flavorful fish with a slightly stronger taste, haddock might be the better option.
In general, cod is often the traditional choice for fish and chips because it’s more universally available and tends to have a cleaner, milder flavor. However, haddock is equally delicious and offers a slightly bolder taste, making it a great alternative for those who want something a bit different.
Final Thoughts: For the best fish and chips, you can’t go wrong with either cod or haddock. Both offer unique benefits, so it might be fun to experiment with both to discover which one you prefer. Either way, both fish will give you the crispy, golden fish you crave when paired with the right batter and cooking method.
Freshness Matters: Importance of Using Fresh Fish for the Crispiest Texture
When it comes to making the best fish and chips, the freshness of the fish plays a crucial role in achieving that perfect crispy texture. While frozen fish can still be used, nothing beats the taste, texture, and overall quality of fresh fish. Here’s why fresh fish is key to achieving the crispiest, most delicious fish and chips:
1. Better Texture and Firmness
Fresh fish tends to have firmer flesh compared to frozen fish. This is especially important when you’re frying the fish. Firmer fish fillets hold their shape better during the frying process, preventing the fish from breaking apart or becoming mushy. This helps achieve a crispier, more satisfying crust on the outside while maintaining a tender, flaky interior. Fish like cod and haddock are especially great for this purpose because their flesh remains firm even when battered and deep-fried.
2. Crispier Batter
Fresh fish releases less water during cooking, which helps the batter adhere better and creates that crispy golden crust you want in your fish and chips. If the fish is too watery or has been frozen, the moisture can cause the batter to become soggy or unevenly crisp. Fresh fish allows for a more even fry and ensures the batter becomes perfectly golden and crunchy.
3. Enhanced Flavor
Fresh fish offers a cleaner, more vibrant taste compared to fish that has been frozen and stored for a while. The flavor of the fish is more delicate and subtle, allowing it to pair beautifully with the batter and seasonings used in fish and chips. This enhances the overall experience, as the fish itself has a natural sweetness and depth that frozen fish can sometimes lack. Fresh fish also retains more of its ocean-fresh aroma, giving your dish a better overall taste.
4. No Freezer Burn
When fish is frozen, it can sometimes suffer from freezer burn, which occurs when air gets trapped in the packaging, causing the fish to dry out and develop a tough, undesirable texture. This can affect both the taste and the texture of the fish. Fresh fish, on the other hand, hasn’t been subjected to these conditions and remains moist and tender, providing a much better frying result.
5. Cooking Efficiency
Fresh fish requires less cooking time than frozen fish. As frozen fish tends to retain moisture, it can cause more splattering during frying. The moisture content of frozen fish also requires more time to evaporate before the crust forms, while fresh fish crisps up faster, ensuring a quicker and more even fry. This results in less oil absorption and a healthier, crispier fish fillet.
Conclusion
In summary, using fresh fish for your fish and chips recipe is not just a preference—it’s essential for achieving that crispy, golden texture that’s the hallmark of a perfect fried fish fillet. The freshness of the fish ensures that the batter adheres well, the fish remains tender and flaky, and the overall flavor is unbeatable. So, whenever possible, opt for fresh fish to guarantee the best possible results in your homemade fish and chips.
Sustainable Choices: Suggest Eco-Friendly Fish Options for Environmentally-Conscious Cooks
When preparing a classic dish like fish and chips, it’s important to consider not only the taste and texture of the fish but also the environmental impact of your seafood choices. Overfishing and unsustainable fishing practices have put immense pressure on marine ecosystems, so selecting sustainable fish options is a responsible way to enjoy this beloved dish while minimizing harm to the planet.
Here are some eco-friendly fish options to consider for your fish and chips, along with some tips on making sustainable choices when buying seafood:
1. Alaskan Pollock
Alaskan Pollock is one of the most sustainable fish options available, and it’s frequently used in dishes like fish sticks and fish fillets due to its mild flavor and flaky texture. This fish is certified by the Marine Stewardship Council (MSC), meaning it comes from well-managed fisheries that ensure healthy fish populations and minimal environmental impact. Pollock is also abundant, so it’s a great alternative to fish that are becoming endangered.
Why it’s sustainable:
- Caught in well-regulated waters in Alaska
- Often MSC-certified for sustainability
- Mild flavor that works well in fish and chips
2. Pacific Halibut
Pacific Halibut is another excellent choice for sustainable fish and chips. This fish is not only delicious with its firm, slightly sweet flesh, but it’s also caught using methods that avoid harm to other marine life. Halibut fisheries in the Pacific Ocean have stringent regulations in place to ensure the species isn’t overfished, with many fisheries adopting sustainable practices that protect the environment.
Why it’s sustainable:
- Caught in the Pacific with sustainable methods like trap fishing and long-lining
- Often certified by the MSC
- Has a firm, meaty texture ideal for frying
3. Farmed Rainbow Trout
When it comes to farmed fish, Rainbow Trout is a much more eco-friendly option compared to other farmed fish, especially those that are intensively farmed in environmentally harmful conditions. Sustainable rainbow trout farms often focus on minimizing pollution and using non-GMO feed. Look for certified sustainable farms, like those approved by the Aquaculture Stewardship Council (ASC), to ensure you’re making an environmentally responsible choice.
Why it’s sustainable:
- Farmed in eco-friendly conditions
- ASC-certified farms ensure responsible practices
- Mild, slightly nutty flavor works well for fish and chips
4. Mahi-Mahi
Mahi-Mahi, also known as dolphin fish, has a firm, meaty texture with a slightly sweet taste. It’s an excellent choice for fish and chips, and when sourced sustainably, it can be an eco-conscious option. Look for Mahi-Mahi that is caught using line-caught methods, which reduce bycatch (the unintentional capture of non-target species) and have less impact on marine habitats.
Why it’s sustainable:
- Line-caught and caught using responsible methods
- A popular choice for sustainable fish dishes
- Firm, sweet meat perfect for frying
5. Catfish
Farmed catfish, particularly U.S. farmed catfish, is another sustainable option. American catfish farms are typically regulated and use responsible farming techniques that minimize the environmental impact, such as controlling water quality and using sustainable feed. As catfish is mild in flavor with a firm texture, it’s great for frying and serves as a budget-friendly alternative to other fish.
Why it’s sustainable:
- Farmed in regulated U.S. systems with responsible practices
- Known for its mild flavor and firm texture
- More affordable and eco-friendly compared to other farmed species
6. Barramundi
Barramundi is an increasingly popular sustainable seafood choice that offers a firm, flaky texture with a mild, slightly buttery taste. It’s farmed in closed-loop systems, meaning it’s raised in environments that are less harmful to the ecosystem. These systems prevent fish from interacting with wild populations and help ensure the fish are free from disease. Barramundi is also high in omega-3 fatty acids, making it a healthy, sustainable option.
Why it’s sustainable:
- Closed-loop farming systems reduce environmental impact
- Omega-3 rich and nutritious
- Grows quickly, making it more sustainable than some other fish
How to Make More Sustainable Choices
- Look for certification labels: Always check for certifications like the Marine Stewardship Council (MSC) or Aquaculture Stewardship Council (ASC) to ensure the fish is sourced responsibly.
- Opt for wild-caught fish: When possible, choose wild-caught fish that is sustainably harvested using responsible fishing methods such as line-caught or trap-caught techniques.
- Support local fisheries: Buying from local, small-scale fisheries can often mean fresher fish that is caught or farmed responsibly.
Conclusion
Making sustainable choices when it comes to fish for your fish and chips doesn’t only benefit the environment—it also enhances the quality of the dish. By selecting eco-friendly options like Alaskan Pollock, Pacific Halibut, or farm-raised Rainbow Trout, you’re ensuring a crispy, delicious fish while contributing to the health of our oceans and fish populations. As an environmentally-conscious cook, you can feel good about the choices you make and enjoy your fish and chips guilt-free.
Preparing the Perfect Crispy Fish Batter
Beer Batter vs. Other Batters: Why Beer Batter Gives the Best Results (Texture, Crunch)
When making the perfect fish and chips, one of the most important factors that contribute to its success is the batter. The batter is what gives the fried fish its crispy golden crust, and while there are various types of batters you can use, beer batter is often considered the best choice. Here’s why beer batter outshines other batter types in terms of texture, crunch, and overall flavor:
1. Lighter and Airier Texture
Beer batter is made with a combination of flour, baking powder, and beer. The beer plays a crucial role by introducing carbon dioxide into the batter, which creates air bubbles during the frying process. These bubbles give the batter a light, airy texture that doesn’t feel heavy or greasy, even after frying. This results in a crispier, more delicate crust that doesn’t overpower the fish. Compared to traditional batters made only with flour and water, beer batter tends to produce a fluffier, less dense texture.
2. Crispiness and Crunch
The carbonation from the beer helps the batter to puff up as it fries, forming a super-crisp outer layer. This creates the perfect balance: a crispy exterior that encases the tender, moist fish inside. The carbonation also prevents the batter from becoming too greasy, making the final result lighter and less oily than batters made with water or eggs. In comparison, batters that lack carbonation can end up being thick or soggy, as they don’t allow enough air to fry off the moisture properly.
3. Flavor Profile
Beer batter has a distinct flavor that elevates the taste of the fish. The maltiness and slight bitterness of the beer provide a savory depth that complements the mild taste of the fish. While the flavor is subtle, it adds an extra layer of complexity to the overall dish, unlike plain flour-based batters, which tend to be neutral in flavor. The beer also contributes to the crispy texture and slightly earthy undertones, which are perfect for balancing the richness of the deep-fried coating. Additionally, beer batter tends to be less oily, so it doesn’t overshadow the natural flavor of the fish.
4. Beer’s Role in the Frying Process
The alcohol content in the beer also plays a role in the batter’s effectiveness. When frying beer batter, the alcohol evaporates, but it also helps the batter form a uniform, smooth coating on the fish. This gives it a crisp and crunchy finish without absorbing excess oil. The beer’s acidity can also help break down proteins in the fish, improving the overall tenderness.
5. Versatility with Beer Varieties
One of the key advantages of using beer batter is the ability to choose from a variety of beer types, each influencing the flavor and texture of the batter. For instance:
- Lighter beers (like lagers or pilsners) will give you a crispier, airier batter with a more neutral flavor.
- Darker beers (such as stouts or porters) will provide a richer, deeper flavor with a slightly heavier texture.
- Amber ales offer a balance between lightness and depth, producing a nice combination of both crispness and flavor.
This flexibility allows you to tailor the batter to match the type of fish you’re using, the flavors you enjoy, and even the overall style of your dish.
6. Comparing to Other Batters
Let’s compare beer batter to other common batter types used for fish and chips:
- Plain Flour Batter: A basic flour batter made with water, it lacks the lightness that beer provides. While it can still produce a decent crust, it often turns out heavier and more dough-like, absorbing more oil and making the fish feel greasy.
- Tempura Batter: Originating from Japan, tempura batter is light and crispy but often uses cold water or sparkling water. While it creates a delicate crunch, it can be more fragile and less sturdy than beer batter, and it doesn’t have the same flavor complexity.
- Cornstarch Batter: Some batters use cornstarch to achieve a crunchy finish, but it often results in a thicker, less airy batter. Cornstarch batters also tend to be more prone to breaking apart compared to beer batter.
Beer batter is unique because of the carbonation from the beer, which not only creates a crisp, flaky texture but also ensures the batter is well-balanced in terms of flavor and crunch. Unlike other batters that can be too thick or too thin, beer batter strikes the perfect balance, allowing for a crispy golden crust that isn’t too heavy.
7. Why Beer Batter is the Ultimate Choice
Beer batter offers perfect texture, crunch, and flavor that other batters simply can’t match. It’s the ideal coating for frying fish, creating a beautiful golden exterior while allowing the fish to remain moist and tender inside. Whether you’re using cod, haddock, or another fish, beer batter enhances the natural taste and delivers the crispy, crunchy bite that makes fish and chips a favorite meal.
Conclusion
In summary, beer batter stands out as the best choice for creating crispy, golden fish in your homemade fish and chips. Its light, airy texture, delicious flavor, and crunchy coating make it the preferred batter for achieving that perfect fried fish experience. If you want the ultimate crispy fish, beer batter is your go-to option, offering the best texture, crunch, and flavor that’s hard to beat!
How to Make the Batter: Step-by-Step Instructions for Creating a Light and Crispy Batter
The batter is the key to achieving that perfect crispy coating for your fish and chips. The right batter not only gives your fish a golden crunch but also enhances the overall texture and flavor. Here’s a step-by-step guide for making a light and crispy batter that will turn your fish into a restaurant-quality dish.
Step 1: Gather Your Ingredients
To create a light and crispy batter, you’ll need the following ingredients:
- All-purpose flour: This forms the base of the batter and helps with the crispiness.
- Cornstarch: This ingredient adds lightness and helps create a delicate crunch. It also contributes to a less greasy texture.
- Baking powder: The secret to a fluffy, airy batter. Baking powder helps the batter puff up when fried, creating that crunchy yet light texture.
- Salt: A small amount enhances the flavor of the batter and helps to bring out the natural taste of the fish.
- Beer: The most important ingredient! Beer adds carbonation, which creates air bubbles that make the batter crispy and light. The beer’s acidity also helps tenderize the fish and ensures a golden crust. A lager or a light beer works best for a crisp texture, but you can experiment with different beer types for varying flavors.
- Optional: A pinch of cayenne pepper or paprika for a subtle flavor kick, or garlic powder for extra savory depth.
Step 2: Mix the Dry Ingredients
Start by mixing your dry ingredients in a large bowl:
- Combine flour, cornstarch, baking powder, and a pinch of salt.
- For an added kick, sprinkle in cayenne pepper or paprika if you want to give your batter a bit of heat and depth of flavor.
- Whisk the dry ingredients together to ensure they are evenly combined. This will help create a consistent texture for the batter.
Step 3: Add the Beer
Now it’s time to add the beer. The amount of beer you use will depend on the consistency of your batter:
- Start by pouring in about 1 cup of cold beer (or more if needed). The colder the beer, the lighter and crispier the batter will be. You can even chill the beer before use for best results.
- Stir the beer into the dry ingredients gently with a whisk or spoon. Be careful not to overmix—lumps are okay, and in fact, they can help create a more textured and crispy batter when frying. Overmixing could lead to a dense batter.
- Aim for a smooth consistency that’s not too thick or runny. It should coat the back of a spoon but still drip off easily. If the batter seems too thick, add more beer, a little at a time, to thin it out.
Step 4: Let the Batter Rest (Optional)
Although optional, letting your batter rest for 10-15 minutes can improve the texture. Resting allows the flour to fully hydrate and the gluten to relax, which can make for an even lighter and crispier result when frying. It also allows the flavors to meld together.
Step 5: Test the Consistency
Before dipping your fish into the batter, test it by dipping a spoon or a small piece of fish into the mixture. The batter should coat the fish evenly without dripping off too quickly. If it’s too thin, add a bit more flour or cornstarch to thicken it. If it’s too thick, add a splash more beer to loosen it.
Step 6: Fry the Fish
Now that your batter is ready, it’s time to fry:
- Heat your oil to around 350°F (175°C). Use a deep-fryer or a heavy pot with enough oil to submerge the fish pieces. Ensure the oil temperature is correct, as too hot of oil can burn the batter, and too cool of oil can make the fish greasy.
- Dip each piece of fish into the batter, making sure it’s fully coated, then carefully lower it into the hot oil. Fry the fish in batches, depending on the size of your fryer or pot. Overcrowding can cause the oil temperature to drop and result in soggy fish.
- Fry for about 4-6 minutes or until the batter is golden brown and crispy. The fish should float to the top when done.
- Once fried, remove the fish and place it on a paper towel-lined plate to drain any excess oil.
Step 7: Enjoy
Now you’re ready to serve your crispy battered fish alongside golden chips (fries) for the ultimate fish and chips meal! The batter should be crisp, light, and crunchy, perfectly complementing the tender fish inside.
Why Beer Batter Works So Well
The key to why beer batter produces such a light, crispy texture lies in the carbonation from the beer. When the beer hits the hot oil, the carbonation bubbles burst, puffing up the batter and creating a crisp crust. The beer’s acidity helps break down proteins in the fish, allowing for a more tender, juicy interior. Finally, the slightly bitter taste from the beer enhances the savory flavor of the fish without overwhelming it.
Tips for Perfecting the Batter:
- Use ice-cold beer to keep the batter light and airy.
- If you prefer, try adding a bit of cornmeal to the flour mixture for an extra crunch.
- Don’t overmix the batter; a few lumps will ensure a crispier result.
- Test the batter before dipping by frying a small piece first to check if it crisps up properly.
- For a slightly different take, try using sparkling water or club soda instead of beer for a crisp, light batter without the added flavor from alcohol.
By following these steps, you can make a light, crispy batter that will elevate your homemade fish and chips to perfection. The texture should be crunchy and golden, allowing the fish to remain tender and flavorful on the inside.
Seasoning Tips: Key Spices Like Salt, Pepper, and Paprika to Enhance the Flavor
The seasoning you choose plays a pivotal role in taking your homemade fish and chips to the next level. While the batter provides the crunch, the seasonings bring the flavors to life, enhancing the natural taste of the fish and adding depth to every bite. Here’s a closer look at some key spices and seasoning tips to ensure your dish is flavorful and balanced.
1. Salt: The Essential Flavor Enhancer
Salt is often referred to as the king of seasonings, and for good reason. It helps enhance and bring out the natural flavors of the fish while also making the batter crispier. A pinch of salt in the batter will go a long way in seasoning the fish, but you can also lightly sprinkle some over the fish and chips once they’re fried for an extra layer of flavor. Kosher salt or sea salt is often preferred for its coarser texture and more balanced flavor, but you can use whatever you have on hand.
2. Black Pepper: The Perfect Complement to Salt
Black pepper is a must-have seasoning for your fish and chips. It adds just the right amount of heat and depth, balancing the richness of the fried fish and batter. Freshly cracked black pepper will provide the most vibrant flavor, so it’s a good idea to grind your pepper just before using it. While you can mix pepper into the batter, a light sprinkle on top of the fish right before serving will give it an extra zesty kick. Don’t be afraid to experiment with freshly ground white pepper for a slightly milder flavor profile.
3. Paprika: Adds Warmth and a Smoky Touch
Paprika is an excellent seasoning that adds a subtle smokiness and warmth to your fish and chips. This mild, vibrant red spice works particularly well in the batter, contributing to the color and flavor. Sweet paprika adds a delicate smokiness without overwhelming the dish, while smoked paprika brings a deeper, richer smoky flavor. For an extra layer of complexity, you can use paprika as a finishing touch on your fried fish and chips, sprinkling it lightly over the crispy exterior for a pop of color and flavor.
4. Garlic Powder: A Savory Addition
Garlic powder adds a wonderful savory depth to your seasoning mix. It pairs well with the natural taste of the fish, complementing the crispy batter. While garlic powder is a bit milder than fresh garlic, it’s perfect for infusing the batter with a subtle garlic flavor. Add a teaspoon of garlic powder to your flour mixture or sprinkle a little over the fried fish for that garlicky warmth. You can also pair it with other herbs and spices for a more complex seasoning blend.
5. Cayenne Pepper: A Kick of Heat
If you like a little heat in your fish and chips, cayenne pepper is an excellent option. Just a pinch of cayenne will add a spicy kick without overpowering the dish. You can mix it directly into the batter for an even heat or sprinkle it over the finished fish to get an extra punch of spice. Cayenne is especially great for those who enjoy the contrast between the rich, crispy batter and the spicy undertones. If you’re not a fan of heat, start with a very small amount or leave it out altogether.
6. Onion Powder: A Sweet Savory Flavor
Onion powder is another savory seasoning that pairs beautifully with fish and chips. It adds a mild onion flavor without the sharpness of fresh onions. You can mix onion powder into the batter for a more uniform flavor or dust it over the fish once fried to enhance its overall richness. This spice works well alongside garlic powder and paprika to give the batter a well-rounded flavor profile.
7. Herbs: Parsley or Dill for Freshness
While herbs are not the traditional choice for battering fish, they can still add a touch of freshness to your dish. Fresh parsley or dill can be finely chopped and sprinkled over your fish after frying for a burst of brightness. These herbs add a layer of herbal freshness that helps balance the richness of the fried fish. They’re especially great when served with a side of tangy dipping sauces like tartar sauce or a fresh squeeze of lemon.
8. Lemon Zest or Lemon Juice: A Tangy Finish
For a bright, zesty kick, adding a bit of lemon zest or fresh lemon juice as a garnish can elevate your fish and chips. Lemon zest provides a subtle citrus aroma that complements the fried fish and chips perfectly. You can add a sprinkle of zest right before serving, or squeeze a little lemon juice over the fish to cut through the richness of the batter and add a fresh tang.
Seasoning Tips for the Best Fish and Chips:
- Balance is Key: Make sure the seasoning isn’t overwhelming the dish. Fish should still taste like fish, with the seasoning complementing it rather than masking it.
- Season at Multiple Stages: Season the batter, fish, and the fried fish itself. Each layer of seasoning adds depth to the flavor.
- Experiment with Unique Spices: Don’t be afraid to try new spices like turmeric or cumin for an interesting twist.
- Keep it Simple: While it’s tempting to use a wide array of spices, sometimes less is more. Classic seasonings like salt, pepper, and paprika often provide the best results.
- Use Fresh Spices: Ground spices lose their potency over time. Ensure your spices are fresh for the most vibrant flavor.
By using these key spices and following these seasoning tips, you’ll create a well-balanced, flavorful fish and chips dish that’s crispy on the outside, tender on the inside, and packed with rich, savory flavors. The right combination of spices can truly elevate this classic dish and make it your own.
Making Golden, Crispy Chips
Choosing the Right Potatoes: Why Russet or Yukon Gold Potatoes Are Ideal for Chips
The choice of potatoes is crucial when making the perfect fish and chips. Different varieties of potatoes offer different textures and flavors, and selecting the right kind can make all the difference in achieving the ideal chip. Russet potatoes and Yukon Gold potatoes are widely considered the best choices for making chips due to their unique properties, which help to create the ultimate crispy and tender fries. Here’s a closer look at why these two varieties shine in this dish:
1. Russet Potatoes: The Classic Choice for Chips
Russet potatoes, often referred to as Idaho potatoes, are perhaps the most popular variety for making chips, particularly in fish and chips recipes. Here’s why they’re an excellent choice:
- High Starch Content: Russet potatoes have a high starch content, which gives them a fluffy interior when fried. This makes them ideal for creating crispy exteriors and soft, tender interiors that melt in your mouth. The higher the starch content, the better the potato will crisp up when fried.
- Low Moisture: Russets have low moisture content, which is crucial for achieving crispy fries. The low moisture ensures that the fries crisp up quickly when they hit the hot oil, forming a golden, crunchy exterior while keeping the inside soft and airy.
- Bigger Size and Shape: Russets are typically large and oblong in shape, which makes them easy to cut into thick, hearty fries that can withstand the frying process. Their size allows for more uniform cooking, which results in chips that cook evenly and have a satisfying bite.
- Neutral Flavor: The slightly earthy and neutral flavor of russets allows the fries to absorb the seasoning and sauces without overwhelming the taste of the fish. This makes them versatile and perfect for pairing with the rich flavors of fried fish.
2. Yukon Gold Potatoes: A Creamy and Flavorful Alternative
While Russets are the go-to choice for most traditional chips, Yukon Gold potatoes bring a slightly different profile to the table. Here’s why they’re also a great option:
- Creamy Texture: Yukon Gold potatoes are known for their creamier texture compared to Russets. When fried, they create a slightly denser, yet still crispy, chip with a smooth interior. This makes them ideal for those who prefer a softer, creamier bite with their crispy fries.
- Balanced Starch and Moisture: Yukon Golds have a more balanced starch and moisture content compared to Russets. While they don’t have quite as much starch, they still fry up nicely and achieve a crispy golden exterior with a softer middle. This balance can be perfect for people who enjoy chips that aren’t too fluffy but still have a satisfying crunch.
- Rich Flavor: One of the standout features of Yukon Gold potatoes is their rich, buttery flavor. This potato variety is slightly sweeter than Russets and adds a distinctive richness to the fries. Yukon Golds pair exceptionally well with savory dishes like fish and chips, as they offer a subtle contrast to the fried fish’s savory notes.
- Versatility: Yukon Gold potatoes are versatile and can be used for other types of fries, like shoestring fries or wedge fries. Their flavor and texture make them a great choice for those who want fries with a bit more complexity and depth.
3. Why Russets and Yukon Golds Work Best Together
For the perfect fish and chips, some chefs recommend a combination of Russet and Yukon Gold potatoes. This blend allows you to benefit from both worlds: the crispy exterior of the Russet and the creamy interior of the Yukon Gold. Here’s how this blend can elevate your dish:
- Crispy and Creamy Contrast: The contrasting textures of the two potatoes will create a more dynamic fry. You’ll get the best of both worlds: crispy on the outside and soft on the inside. This makes each bite more interesting and satisfying.
- Flavored Layers: The flavor profile of the two potato varieties also creates more complexity. The Russet’s neutral flavor allows the seasoning to shine, while the Yukon Gold’s buttery flavor enhances the overall taste, giving the fries a more robust and layered flavor.
4. How to Prepare Russet and Yukon Gold Potatoes for Chips
No matter which potato you choose, the key to making the perfect fish and chips is proper preparation. Here are a few tips for preparing Russet and Yukon Gold potatoes:
- Peel or Leave the Skin On: Both Russets and Yukon Golds can be prepared with or without the skin. Leaving the skin on adds an additional layer of texture and flavor, particularly with Yukon Golds, whose skins are thinner and more flavorful. However, if you prefer a smoother texture, you can peel them before cutting them into fries.
- Cut Uniformly: For even cooking, make sure to cut the potatoes into uniform-sized pieces. Whether you prefer thick-cut fries or thinner ones, ensuring that they’re all the same size will help them cook evenly in the hot oil.
- Soak the Potatoes: Soaking the cut potatoes in cold water for at least 30 minutes (or up to overnight) removes excess starch and helps prevent the fries from becoming soggy. This step is particularly important for Russets, as their high starch content can lead to uneven cooking if not soaked.
- Dry Thoroughly: Before frying, make sure to dry the soaked potatoes thoroughly with a towel. This will prevent oil splattering and help the potatoes crisp up when frying.
5. Other Potato Varieties to Consider
While Russets and Yukon Gold potatoes are the best options for chips, other varieties can also be used, though they may not produce the same ideal results:
- Red Potatoes: Red potatoes are waxy and have less starch, making them better suited for boiling or roasting. They don’t crisp up as well in frying and may result in a softer texture.
- Sweet Potatoes: While delicious in their own right, sweet potatoes have a different starch composition, making them best suited for baking, roasting, or frying on their own. Sweet potato fries offer a unique flavor profile but are not typically used in traditional fish and chips.
In Conclusion
Choosing the right potato is fundamental to making perfect fish and chips. Russet potatoes provide the crispy texture and neutral flavor that form the classic fish and chips experience, while Yukon Gold potatoes offer a creamy, buttery flavor and slightly denser texture. Whether you stick to the traditional Russet or mix in some Yukon Golds, both varieties will give you the best results for a satisfying, crispy fry.
Cutting and Preparing the Potatoes: Techniques for Cutting Perfect Chips and Soaking Them
When it comes to making the perfect fish and chips, the preparation of the potatoes plays a critical role in achieving the ideal texture, flavor, and crispiness. Properly cutting and preparing your potatoes is essential for ensuring even cooking and maximizing the potato’s natural qualities. Here’s a deeper dive into the techniques for cutting potatoes into perfect chips and soaking them for the best results.
1. Choosing the Right Cut: French Fries vs. Chips
Before diving into the preparation process, it’s important to decide how you want your chips to be cut. Fish and chips are traditionally made with thick, hearty chips that provide a satisfying bite. However, you can also opt for thinner, crispier fries depending on your preference. Here are the main options for cutting:
- Thick-cut chips: This classic cut is about 1/2 inch to 3/4 inch thick, perfect for a hearty bite. They offer a nice balance between the crisp exterior and a soft, fluffy interior, which is ideal for soaking up seasonings and accompanying the fried fish.
- Thin-cut fries: If you prefer your chips extra crispy, thin-cut fries (around 1/4 inch thick) will give you the crunch you crave. While they cook faster, they may not hold as much moisture as the thick-cut variety, so they’ll be more crispy throughout.
- Wedge fries: Another option is to cut the potatoes into wedges. This cut offers a unique texture and appearance, with a crispy exterior and a thick, starchy interior. Wedges can be great for a rustic presentation.
2. Techniques for Cutting Potatoes Into Chips
Cutting the potatoes correctly ensures even cooking and uniform texture. Here’s how to do it properly:
- Peel or Leave the Skin On: You can peel the potatoes if you prefer a smoother finish, but leaving the skin on adds extra texture and flavor. Russet and Yukon Gold potatoes both have thin skins that crisp up beautifully when fried, so keeping the skin on is often a great choice.
- Cut Into Even Pieces: Using a sharp knife, begin by trimming both ends of the potato to create a flat surface. From there, slice the potato into uniform pieces. If you’re going for thick-cut chips, cut the potato lengthwise into 1/2 inch planks. Then, cut the planks into sticks. For thinner fries, slice them into 1/4 inch planks before cutting them into thinner sticks. Consistency is key—try to ensure each piece is about the same size for even frying.
- Use a Mandoline for Precision: For the most consistent cuts, you can use a mandoline slicer, which allows you to cut the potatoes into perfectly even slices or strips. This is particularly helpful when aiming for thin fries that need to cook quickly and evenly.
3. The Soaking Process: Why It’s Crucial for Crispy Chips
Soaking the potato slices is an often-overlooked step that makes all the difference in achieving crispy, golden fries. Soaking removes excess starch from the potatoes, which can otherwise cause the fries to become soggy or sticky when frying. Here’s why soaking matters:
- Removes Excess Starch: Potatoes are naturally high in starch, which can cause fries to stick together during frying and lead to a soggy texture. Soaking potatoes in cold water for at least 30 minutes (or up to 24 hours in the fridge) helps draw out excess starch, making the fries less likely to clump and allowing them to crisp up beautifully.
- Prevents Browning: If you’re preparing the potatoes in advance, soaking them in water also prevents them from turning brown or oxidizing. The cold water helps to keep the fries looking fresh and vibrant until you’re ready to fry them.
- Helps Achieve Even Cooking: Soaking ensures the potatoes cook evenly by hydrating the surface and softening the outer layer. This means that when you fry them, they’ll cook more uniformly and achieve that perfect balance of crispy exterior and fluffy interior.
4. Drying the Potatoes Before Frying
After soaking the potatoes, it’s crucial to dry them thoroughly. Moisture on the surface of the potatoes can cause the oil to splatter and interfere with the frying process. Here’s how to dry them properly:
- Use a Clean Kitchen Towel: After draining the soaked potatoes, spread them out on a clean kitchen towel or paper towels. Pat them dry with a towel to remove as much moisture as possible.
- Air Dry for Extra Crispiness: For even crispier fries, you can let the potatoes sit out on a towel for a few minutes to air dry. This will help eliminate any remaining moisture, ensuring that the fries fry up crisp and golden.
5. Why Cutting and Soaking Are Key to Perfect Chips
The combination of proper cutting techniques and the soaking process is what gives your fish and chips the ideal texture and flavor. Here’s why these steps are so critical:
- Even Frying: Uniformly cut fries cook more evenly, resulting in crispy fries that are golden brown on the outside but soft and tender on the inside. Uneven cuts can lead to undercooked or burnt pieces, which can affect the overall quality of your dish.
- Crispiness: Soaking the potatoes removes excess starch, which promotes the formation of a crispy, non-greasy crust when frying. This step also reduces the risk of sogginess, making your fries light and crispy.
- Flavor Absorption: Soaked and properly dried fries absorb seasonings better, allowing you to achieve a more flavorful end result. Whether you sprinkle them with salt, paprika, or other spices, soaking and drying will help the seasonings adhere better.
6. Final Thoughts on Cutting and Preparing Potatoes
Cutting and preparing your potatoes properly may take a bit more time, but it is the secret to achieving the perfect fish and chips. The right cut, soaking method, and drying process will elevate your fries from basic to restaurant-quality. Whether you prefer thick chips, thin fries, or wedges, the key is ensuring that the potatoes are uniform in size and moisture-free before frying. With these techniques, your fish and chips will have a crisp, golden exterior and a soft, fluffy interior that’s sure to impress.
Frying Tips for Crispy Chips: How to Fry Chips in Stages for the Perfect Crispiness
Achieving the perfect crispy fish and chips requires more than just cutting and soaking the potatoes. The frying process is equally crucial and can make or break the texture of your chips. One key technique for achieving the ideal crispiness is frying in stages, a method that allows you to get that coveted golden, crispy exterior while maintaining a soft, fluffy interior. Let’s dive into the process and tips for frying chips in stages to perfection.
1. Why Fry in Stages?
Frying in stages is an essential technique for achieving the perfect crispy fish and chips. It involves frying the potatoes twice—first at a lower temperature to cook them through and then at a higher temperature to give them that crispy, golden finish. This two-step process ensures that the chips are cooked all the way through without being too greasy or soggy.
- Stage 1: Cooking the Potatoes Through: The first fry is all about cooking the potatoes until they’re tender on the inside, but not yet crisped on the outside. Frying at a lower temperature (around 325°F / 165°C) allows the potatoes to cook through without browning too quickly. This ensures that the center of the chip is soft and fluffy, ready to be crisped up in the next step.
- Stage 2: Crisping and Browning: The second fry, which takes place at a higher temperature (around 375°F / 190°C), gives the potatoes that golden, crispy exterior. This step happens quickly, locking in that delicious crunch while preserving the soft interior.
2. Frying Process: Stage One
The first fry is crucial for ensuring the potatoes cook evenly and thoroughly. Here’s how to do it:
- Heat the Oil to 325°F (165°C): Use a thermometer to make sure the oil is at the right temperature before adding the potatoes. If the oil is too hot, the chips will brown too quickly on the outside while remaining raw in the middle. Too low, and they’ll become greasy.
- Add the Potatoes in Batches: To avoid overcrowding the pot, fry the potatoes in batches. Overcrowding causes the temperature of the oil to drop, resulting in greasy, soggy chips. Add the chips gently to the hot oil and cook for around 4-5 minutes, or until they’re tender and slightly pale.
- Remove and Drain: Once the potatoes are cooked through but not yet golden, remove them from the oil with a slotted spoon and place them on a plate lined with paper towels to drain any excess oil. Allow them to rest while you prepare for the second fry.
3. Frying Process: Stage Two
Now that the chips have been cooked through in the first stage, it’s time to focus on achieving the crispy, golden exterior that defines perfect fish and chips. Here’s how to proceed:
- Increase the Oil Temperature to 375°F (190°C): Bring the oil back up to a higher temperature, about 375°F, for the second fry. This step ensures that the potatoes fry up quickly and get that crispiness without absorbing too much oil.
- Fry the Chips Until Golden and Crispy: Add the pre-cooked chips back into the hot oil in small batches. Fry them for an additional 2-4 minutes, or until they reach a crispy golden-brown color. Keep an eye on them to prevent overcooking.
- Drain Excess Oil: Once the chips are golden and crispy, remove them from the oil and drain them on a paper towel-lined plate to remove any excess oil. For extra crispiness, let them rest for a minute or two to allow the exterior to set and harden.
4. Tips for Perfectly Crispy Chips Every Time
While the two-stage frying process is the key to achieving crispy chips, there are a few additional tips to keep in mind to ensure success:
- Use the Right Oil: The type of oil you use for frying also plays a role in achieving crispy chips. Choose a high-heat oil such as vegetable oil, canola oil, or peanut oil, which can withstand the high temperatures required for frying without smoking or burning.
- Maintain Consistent Oil Temperature: It’s crucial to monitor the oil temperature throughout the frying process. If the oil is too cool, the chips will absorb excess oil and become greasy. If it’s too hot, they may burn on the outside while still being raw on the inside. Use a thermometer to keep the oil at a consistent temperature and avoid fluctuations.
- Don’t Skip the Resting Period: After the first fry, let the potatoes rest before frying them again. This brief rest allows the surface of the potatoes to cool and set, which helps them become crispier when you fry them a second time.
- Test for Crispiness: Before finishing the frying process, you can always test a single chip by removing it from the oil and letting it cool for a minute. If it’s crispy enough, you’re ready for the final batch of frying. If not, give it a few more seconds in the hot oil.
5. Serving the Crispy Chips
Once the chips are fried to perfection, it’s time to serve them alongside your crispy fried fish. These chips will have the perfect balance of a crispy, crunchy exterior with a soft, fluffy interior, just the way classic fish and chips should be. Serve them piping hot with your favorite dips, like tartar sauce, malt vinegar, or a side of pickled onions to enhance the meal.
6. Why Frying in Stages is the Secret to Perfect Chips
The key to perfectly crispy chips lies in the two-stage frying method, which helps achieve that unbeatable texture. The first fry ensures the chips cook evenly inside, while the second fry crisps them up to golden perfection. This technique locks in the flavor and moisture, making the chips light, crispy, and irresistible. By following this method, you’ll be able to serve up the crispiest fish and chips every time, with the perfect balance of texture and flavor.
Cooking Methods: Deep-Frying, Air-Frying, or Pan-Frying?
Traditional Deep-Frying: Why Deep-Frying Yields the Crispiest Results
When it comes to making fish and chips, deep-frying is the traditional method that has stood the test of time. While there are alternative cooking methods such as pan-frying or air frying, deep-frying remains the gold standard for achieving the perfect texture and flavor. Let’s explore why deep-frying is the preferred method for making crispy, golden fish and chips.
1. Consistent Heat for Even Cooking
One of the key reasons deep-frying yields the crispiest results is its ability to maintain a consistent temperature. When you immerse food in hot oil, the temperature of the oil doesn’t drop significantly, even as food is added. This ensures that the food cooks evenly from all sides.
- Even Heat Distribution: The high temperature of the oil cooks the food quickly and evenly, creating a uniform crispiness. The result is an exterior that is crispy and golden, while the interior stays soft, tender, and fully cooked.
- Sealing the Food’s Exterior: When food hits hot oil, the surface of the food immediately forms a barrier, which helps to lock in moisture and prevent it from becoming soggy. This is especially important for fish, which can dry out quickly if not cooked properly. The crispy batter created in the deep-frying process keeps the fish moist and tender inside.
2. The High Temperature Locks in Crispiness
The secret to deep-frying lies in the high oil temperature—typically 350°F to 375°F (175°C to 190°C)—which ensures the crispiest texture possible. At this temperature, the batter or breading on the fish and chips cooks rapidly, forming a crunchy, golden exterior.
- Rapid Cooking Time: Because deep-frying cooks food so quickly, it doesn’t allow the oil to penetrate the food too deeply. This means the fish and chips retain their shape and texture. The batter crisps up quickly, forming a solid crust that gives you that satisfying crunch with each bite.
- Perfectly Golden Brown: The high temperature of the oil ensures that the batter doesn’t stay greasy, but instead turns to a crispy golden brown. This exterior is what makes deep-fried fish and chips so irresistible—crispy, crunchy, and flavorful.
3. Uniform Crispiness Across the Entire Surface
In deep-frying, the food is submerged in hot oil, ensuring that the entire surface of the food is cooked evenly. Unlike pan-frying, where only the sides in contact with the pan cook at a time, deep-frying provides full coverage.
- No Need for Turning: Because the food is fully submerged, you don’t need to flip it halfway through cooking. The result is an even, uniform crispiness on all sides. This consistency is key for a truly satisfying texture, especially for delicate items like fish fillets, which can break apart or lose their coating in other cooking methods.
- Crisp All Around: In deep-frying, you can be sure that every bite will have that crunchy exterior, no matter which part of the food you’re eating. Whether you’re enjoying crispy fish fillets or golden chips, deep-frying ensures that each bite is as satisfying as the last.
4. The Benefits of Deep-Frying for Fish and Chips
When making fish and chips, deep-frying offers several advantages that help deliver the perfect result:
- Crispy Yet Tender: Deep-frying creates a beautifully crisp exterior while keeping the inside of the fish moist and tender. Fish, especially delicate white fish like cod or haddock, benefits from the high heat, which seals in moisture and prevents the fish from drying out.
- Better Retention of Seasonings: Deep-frying creates a golden, crispy batter that holds onto seasonings better than other methods. The batter acts as a shield, locking in the flavor and making each bite more flavorful. With seasonings like salt, pepper, garlic powder, and paprika, deep-frying helps to bring out the best in your fish and chips.
- Crispy Chips: The oil in deep-frying not only cooks the fish to perfection but also crisps the chips. The hot oil rapidly cooks the potatoes, creating a perfectly golden exterior while keeping the interior fluffy and soft.
5. Ideal for Battered Foods
Deep-frying is especially well-suited for battered foods, like the fish used in fish and chips. When you dip fish fillets in batter and place them in hot oil, the batter immediately starts to crisp up, creating a crunchy coating. Here’s why deep-frying works so well for battered food:
- Batter Adheres Better: The quick cooking time helps the batter set immediately, ensuring that it sticks to the fish and forms a crisp shell. This is harder to achieve with other methods like pan-frying, where the batter can easily slide off the food.
- Crispier Texture: The high temperature ensures that the batter gets incredibly crisp and light. The result is a crispy, crunchy outer shell that contrasts perfectly with the tender, flaky fish inside.
6. Flavor Development
Deep-frying not only crisps up the batter and chips but also contributes to the overall flavor development. The hot oil caramelizes the sugars in the batter and chips, enhancing their natural flavors and adding a rich depth to the dish.
- Flavor Boost: The hot oil gives a slightly nutty, toasted flavor to the batter, making it even more delicious. The crispy batter provides a wonderful contrast to the soft fish inside, while the chips pick up a savory, satisfying flavor.
- Golden Crust: The golden-brown crust developed during deep-frying has a slight sweetness and savory flavor that is synonymous with perfectly fried fish and chips. It also helps to bring out the best in the seasonings, adding depth to the overall flavor profile.
7. Traditional Deep-Frying vs. Other Methods
While other cooking methods like air-frying, pan-frying, or oven-baking can produce decent results, none can match the crispiness of deep-frying. Here’s how deep-frying compares:
- Pan-Frying: In pan-frying, only the portions of the food in contact with the pan are cooked at a time, making it harder to achieve an even crisp. The oil also tends to soak into the food more than it would in deep-frying.
- Air-Frying: Air fryers are an excellent alternative for a lower-fat version, but they don’t provide the same level of crispiness as deep-frying. The hot air circulates around the food, but it doesn’t create the same level of crunch as deep-frying, which provides direct immersion in hot oil.
- Oven-Baking: While oven-baked fish and chips can be convenient, the lack of direct heat makes it difficult to achieve that ideal crispy texture. Baked chips tend to be drier and less crispy, as the moisture in the food doesn’t evaporate as effectively as it does in oil.
Conclusion: Deep-Frying Is the Best Method for Crispy Fish and Chips
In conclusion, deep-frying remains the ideal method for making crispy fish and chips due to its ability to evenly cook food, provide a consistent temperature, and create a golden, crunchy exterior. The high heat of the oil ensures that the batter crisps quickly, locking in moisture and flavor while giving the fish and chips a perfectly golden color. Whether you’re making classic fish and chips or experimenting with different coatings, deep-frying remains the tried-and-true method for achieving the crispiest, most delicious results.
Air-Frying Option: How to Use an Air Fryer for a Healthier Version
Air-frying has become an increasingly popular method for preparing traditionally deep-fried foods, like fish and chips, in a healthier way. While deep-frying yields a crispy, golden exterior, it involves submerging food in hot oil, which adds significant calories and fat. Air-frying, on the other hand, uses hot air circulation to cook food, resulting in a similar crispy texture without the need for as much oil. Here’s how to make fish and chips using an air fryer for a lighter, healthier version without compromising on flavor or texture.
1. What is Air-Frying?
Air-frying is a cooking method that uses rapid hot air circulation to cook food, mimicking the effects of deep-frying. The air fryer has a heating element and a fan that circulates hot air around the food, creating a crispy, golden exterior. It requires very little oil—sometimes just a light spray—while still achieving a crispy texture similar to deep-frying.
- Hot Air Circulation: The air fryer’s fan helps evenly distribute hot air around the food, which creates the crispy crust you’re looking for.
- Less Oil: Air-frying uses only a fraction of the oil compared to deep-frying, making it a healthier choice for cooking your favorite crispy dishes.
2. Health Benefits of Air-Frying
The primary reason people opt for air-frying over traditional deep-frying is that it significantly reduces the amount of added fat and calories in the food. Here’s how air-frying can benefit your health:
- Lower Fat Content: Traditional deep-frying requires submerging food in oil, which leads to it absorbing a lot of fat. With an air fryer, you only need a light spray of oil, drastically cutting the overall fat content.
- Fewer Calories: Because air-frying uses minimal oil, your fish and chips will have far fewer calories than if they were deep-fried, making it a healthier choice without sacrificing taste.
- Less Greasy: Air-frying helps prevent the food from becoming soggy and greasy, which often happens with deep-frying. The result is a crispy, light texture that retains the flavor but with less of the greasy heaviness.
3. How to Make Fish and Chips Using an Air Fryer
Making fish and chips in an air fryer requires some adjustments compared to deep-frying, but it’s just as simple and easy. Here’s a step-by-step guide to creating a healthier version of this classic dish using an air fryer.
- Prepare the Fish: Use your choice of fish, such as cod or haddock. Start by coating the fish fillets with a light layer of batter. For an even healthier version, you can use whole wheat flour or a gluten-free flour blend. Lightly mist the fish with cooking spray to help achieve the crispy texture.
- Prepare the Chips: Cut your Russet potatoes into thick strips to make chips. Soak the potatoes in water for at least 30 minutes before cooking to remove excess starch, which helps the chips become crispier when cooked. Pat them dry with a paper towel to remove any remaining moisture.
- Seasoning: For both the fish and chips, season with your choice of salt, pepper, paprika, and garlic powder for a balanced, flavorful taste. The seasoning helps to enhance the natural flavors while still keeping the calorie count low.
- Air Frying the Fish: Preheat your air fryer to about 375°F (190°C). Place the fish fillets in the air fryer basket, ensuring they are not overcrowded. Air fry for about 8 to 10 minutes, flipping halfway through to ensure even cooking. The fish should be golden and crispy on the outside and tender on the inside.
- Air Frying the Chips: Preheat your air fryer to 380°F (193°C). Place the potato strips in the basket, making sure they are spread out in a single layer for optimal crispiness. Air fry the chips for about 15 to 20 minutes, shaking the basket halfway through for even cooking. The chips should be golden and crispy on the outside with a soft, fluffy interior.
4. Achieving the Best Texture in the Air Fryer
While air-frying produces a healthier alternative to deep-frying, achieving the crispy texture and golden color that we love in traditional fish and chips can require a little attention to detail.
- Use the Right Amount of Oil: A light mist of cooking spray on both the fish and chips will help promote crispiness without the need for excessive oil. Avoid drowning the food in oil, as it defeats the purpose of air-frying.
- Avoid Overcrowding: One of the key factors to getting crispy results in the air fryer is giving your food space. If the fish fillets or chips are overcrowded, they won’t cook evenly and will become soggy. Air-frying requires air to circulate around the food to achieve that crispy texture.
- Flip During Cooking: Since air-frying relies on hot air circulation, it’s important to flip the food halfway through cooking to ensure an even crispiness. Flip your fish fillets and chips halfway through their cooking time to achieve golden-brown perfection on both sides.
- Use Parchment Paper or a Silicone Liner: To prevent sticking and make cleanup easier, consider using parchment paper or a silicone liner designed for air fryers. These tools also help ensure the food cooks evenly without sticking to the basket.
5. Flavor Variations for Air-Fried Fish and Chips
While the classic seasoning of salt, pepper, and paprika works perfectly for a traditional fish and chips dish, air-fried versions offer the opportunity to get creative with flavors.
- Herbs and Spices: Add dried herbs such as thyme, oregano, or dill to your seasoning mix for an extra flavor boost.
- Citrus Zest: For a zesty twist, sprinkle some lemon zest or drizzle fresh lemon juice over the air-fried fish before serving.
- Spicy Kick: If you enjoy a bit of heat, mix some cayenne pepper or chili powder into the batter for the fish or chips to give them a spicy edge. You can also drizzle hot honey or sriracha sauce over the finished dish.
6. Benefits of Using an Air Fryer for Fish and Chips
- Lower Fat and Calorie Intake: By cutting down on oil usage, air-frying helps you enjoy the crispy, golden texture of fish and chips without the extra calories and fat from traditional frying methods.
- Quick and Easy: Air-frying is a fast cooking method that cuts down on prep time and reduces the need for stovetop supervision. Simply prep your fish and chips, set the air fryer, and let it do the work.
- Crispy, Less Greasy Result: Air-frying ensures that the fish and chips come out crispy without the greasy heaviness associated with deep-fried foods. The result is a lighter, yet satisfying, dish.
Conclusion: Healthier Fish and Chips with Air-Frying
Air-frying provides an excellent alternative to traditional deep-frying, allowing you to enjoy crispy fish and chips with less fat and fewer calories. By following the simple steps outlined above, you can create a healthier version of this classic dish without compromising on taste or texture. Whether you’re looking to reduce your calorie intake or simply want a quicker cooking method, air-frying is the perfect solution for making delicious fish and chips at home.
Serving and Enjoying Your Fish and Chips
Pan-Frying: An Alternative Method for Those Without Deep Fryers
While deep-frying is often the preferred method for achieving crispy, golden fish and chips, it’s not the only option. For those who don’t have access to a deep fryer, pan-frying is a highly effective and convenient alternative that can still produce a deliciously crispy exterior and a tender, flaky interior. Pan-frying allows you to control the temperature more easily, and it can be done with fewer materials, making it a perfect option for home cooks without a deep fryer.
1. Why Pan-Frying Works for Fish and Chips
Pan-frying uses a relatively small amount of oil, making it a more accessible and less wasteful alternative to deep-frying. By heating oil in a skillet or frying pan, you can still achieve a crispy coating for both the fish and the chips.
- Even Heating: When pan-frying, the oil is heated directly in a pan, allowing the food to cook evenly on all sides. With careful attention to temperature, you can avoid burning the food or undercooking it.
- Controlled Oil Usage: Pan-frying uses less oil than deep-frying, which can be a major advantage if you want to reduce the overall fat content of your fish and chips. You can adjust the amount of oil based on the size of the pan and the amount of food you’re cooking.
- Crispy Texture: Just like deep-frying, pan-frying allows the batter to crisp up quickly, ensuring that the fish and chips have that satisfying crunch. The key is to make sure the oil is hot enough to instantly seal the batter without soaking into the food.
2. Step-by-Step Process for Pan-Frying Fish and Chips
Here’s how you can achieve the perfect crispy fish and chips without a deep fryer:
- Prepare the Fish: Choose your preferred fish fillets, such as cod, haddock, or pollock. Coat the fish in your prepared batter, ensuring it is evenly covered. Be careful not to overload the fish with batter, as it can become too thick. For extra crispiness, lightly dust the fish in a layer of flour or cornstarch before dipping it into the batter.
- Prepare the Chips: Slice the Russet potatoes into even strips to make chips. Soak the potato strips in water for at least 30 minutes to remove excess starch, which helps them become crispy. Dry them thoroughly before frying to prevent splattering. Season the chips with salt and pepper to taste.
- Heat the Oil: Pour enough oil into a heavy skillet or frying pan to cover the bottom. Canola oil, vegetable oil, or peanut oil are excellent choices for pan-frying due to their high smoke points and neutral flavors. Heat the oil over medium-high heat until it reaches around 350°F (175°C). You can test the temperature by dropping a small piece of batter into the oil. If it bubbles and rises to the surface, the oil is ready.
- Fry the Fish: Place the battered fish fillets gently into the hot oil, being careful not to overcrowd the pan. Fry the fish in batches if necessary. Cook for about 3-4 minutes per side, flipping once the batter turns golden brown. The fish should be cooked through and have a crispy crust. Remove the fish and drain it on paper towels to absorb any excess oil.
- Fry the Chips: Add the potato strips to the same pan or a separate pan, making sure the oil is hot enough to prevent the chips from becoming soggy. Fry the chips in batches, turning them occasionally to ensure even cooking. The chips should be golden brown and crispy after about 6-8 minutes. Like the fish, drain the chips on paper towels to remove excess oil.
3. Tips for Perfect Pan-Fried Fish and Chips
- Maintain Oil Temperature: The key to achieving a crispy, non-greasy result is to ensure that the oil stays hot during cooking. If the oil cools down too much after adding the fish or chips, the food will absorb more oil and become soggy. To prevent this, fry in smaller batches and allow the oil to come back to temperature between batches.
- Don’t Overcrowd the Pan: Whether you’re frying fish or chips, avoid overcrowding the pan. Overcrowding can cause the oil temperature to drop, resulting in less crispy food. Give each piece enough space to cook evenly.
- Use a Cast Iron Skillet: For best results, consider using a cast iron skillet for pan-frying. Cast iron holds heat more effectively than other types of pans and provides an even cooking surface, making it ideal for achieving a crispy finish.
- Draining the Food: After frying, it’s important to drain the fish and chips on paper towels or a wire rack to remove excess oil. This step helps the food stay crisp rather than becoming soggy from sitting in excess oil.
- Season Immediately: Season your fish and chips immediately after frying. The batter and potato strips will absorb the seasoning better while they’re still hot, giving them more flavor.
4. Flavor Variations for Pan-Fried Fish and Chips
Just like deep-frying, pan-frying provides plenty of opportunities to add unique flavors to your fish and chips. Some options include:
- Herb-Infused Oil: Add a few sprigs of rosemary or thyme to the frying oil for an aromatic infusion. The herbs will impart a subtle flavor to the food without overpowering the dish.
- Spicy Seasoning: If you enjoy a bit of heat, mix cayenne pepper, paprika, or chili powder into your batter for an added kick. You can also drizzle some hot sauce over the fish after frying.
- Garlic Butter: For a richer flavor, toss the crispy chips in melted garlic butter immediately after frying. This adds a savory depth to the dish.
5. The Benefits of Pan-Frying Fish and Chips
- Control Over Cooking: Pan-frying allows you to monitor the temperature of the oil more easily, which helps prevent burning and ensures even cooking. You also have more flexibility to cook smaller batches of food, which can be important when making fish and chips for one or two people.
- Less Oil: Compared to deep-frying, pan-frying uses less oil, which means the food absorbs fewer calories and fat. It’s a great way to enjoy crispy fish and chips with a slightly lighter touch.
- Crispy without the Grease: Pan-frying can achieve the same crispy texture that deep-frying does, but with the added benefit of less oil. By following the right technique, you can create crispy, golden fish and chips with a deliciously satisfying crunch.
Conclusion: Pan-Frying as an Easy and Effective Alternative
If you don’t have a deep fryer, pan-frying is an excellent alternative for making crispy and flavorful fish and chips. By following the right steps, you can achieve a golden-brown crust with minimal oil and effort. It’s a great method for home cooks who want to enjoy this classic dish without investing in special equipment. Whether you’re making fish and chips for a casual dinner or a special occasion, pan-frying ensures a crispy, satisfying result every time.
Serving and Enjoying Your Fish and Chips
Serving Suggestions: Pairing with Classic Sides Like Tartar Sauce, Vinegar, and Lemon Wedges
The perfect fish and chips dish is not just about the crispy golden fish and the crunchy chips – it’s also about the accompaniments that enhance the flavors and complete the meal. Classic sides, such as tartar sauce, vinegar, and lemon wedges, play a crucial role in elevating the dish, offering balance, acidity, and a touch of freshness that cuts through the richness of the fried fish and chips. Here’s how to pair these sides with your homemade fish and chips for the best experience:
1. Tartar Sauce: The Creamy Companion
Tartar sauce is a staple when it comes to serving fish and chips. Its creamy texture and tangy flavor are the perfect contrast to the crispy, savory fish, adding a layer of richness and a slight tartness to balance the flavors.
- Why It Works: The mayonnaise-based sauce typically includes ingredients like pickles, capers, onions, lemon juice, and sometimes mustard, which complement the delicate flavor of the fish while enhancing the overall dish. The acidity from the lemon and the crunch from the pickles add dimension to the creamy sauce, making it an ideal dip.
- How to Serve: Tartar sauce is traditionally served on the side in a small bowl or ramekin, allowing diners to dip their fish fillets into the sauce as they please. You can also drizzle it over the fish for added flavor and a touch of elegance.
- Variations: You can make your own tartar sauce at home by mixing mayonnaise, chopped pickles, lemon juice, and a dash of mustard or Worcestershire sauce. For a twist, try adding dill, fresh herbs, or a bit of hot sauce for a spicy kick.
2. Vinegar: A Tangy Hit of Acidity
Another classic pairing for fish and chips is vinegar. While it may seem simple, the acidity of vinegar cuts through the richness of the fried batter, enhancing the flavor of the fish and refreshing the palate between bites.
- Why It Works: The sharp acidity from the vinegar contrasts beautifully with the crispy batter, helping to balance out the oiliness of the fried food. Malt vinegar is the traditional choice for fish and chips, offering a slightly sweet and earthy flavor that complements the fish perfectly. However, you can experiment with white wine vinegar, apple cider vinegar, or even lemon vinegar for a lighter or more unique flavor.
- How to Serve: Vinegar is typically poured over the chips right before serving, or served in a small container for individual dipping. A light drizzle of vinegar over the fish is also a traditional option.
- Additional Flavors: If you prefer a more complex flavor, try infusing your vinegar with herbs or spices like garlic, bay leaves, or chili flakes for a zesty twist that will bring an extra layer of excitement to the dish.
3. Lemon Wedges: Freshness and Zesty Flavor
Lemon wedges are a must-have side for fish and chips. The bright, refreshing flavor of freshly squeezed lemon juice cuts through the richness of the batter and fried food, brightening up the overall dish and adding a touch of citrusy zing.
- Why It Works: Lemon’s acidity balances the deep-fried components, while its fresh, tangy flavor enhances the delicate taste of the fish. Squeezing a wedge of lemon over your fish just before taking a bite helps lift the flavor profile and adds an extra layer of freshness.
- How to Serve: Lemon wedges are typically served on the side, allowing diners to squeeze as much or as little as they want over their fish and chips. For added presentation, place the wedges on the side of the plate next to the fish, ensuring they are easy to access.
- Other Citrus Options: While lemon is the most common choice, you can also try serving your fish and chips with lime wedges for a more exotic twist, or even a grapefruit wedge for a unique, slightly sweeter citrus experience.
4. Combining Sides for the Ultimate Fish and Chips Experience
The beauty of pairing tartar sauce, vinegar, and lemon wedges with fish and chips is that each of these sides serves a different purpose, adding its own layer of flavor and texture to the meal:
- Tartar sauce provides a creamy and tangy contrast, enriching the dish.
- Vinegar adds a sharp, acidic punch that refreshes the palate and cuts through the richness of the fried food.
- Lemon wedges offer a burst of fresh citrus, enhancing the fish’s natural flavor while brightening the overall taste.
For the ultimate fish and chips experience, don’t hesitate to experiment with different amounts of each side and find your preferred combination. Some people love to drizzle vinegar and lemon over the fish, while others may prefer to dip the fish into the tartar sauce or simply squeeze the lemon for a more subtle flavor.
5. Additional Sides for a Well-Rounded Meal
While tartar sauce, vinegar, and lemon wedges are the traditional accompaniments for fish and chips, there are other side dishes that can enhance your meal:
- Mushy peas: This classic British side dish made from mashed peas with butter and mint is a flavorful and comforting addition to your fish and chips.
- Coleslaw: A creamy, crunchy coleslaw adds a refreshing contrast to the richness of the fried fish and chips, with its tangy dressing offering additional acidity.
- Pickles: Serving pickled vegetables, such as pickled onions or gherkins, provides a tangy crunch that complements the flavors of the fish.
- Roasted Vegetables: For a slightly healthier alternative, roasted carrots, parsnips, or brussels sprouts can add a savory note and enhance the overall dish.
Conclusion: Perfecting Your Fish and Chips Meal with Classic Sides
Pairing your fish and chips with the right sides, like tartar sauce, vinegar, and lemon wedges, is an essential part of creating a balanced and flavorful dish. These classic accompaniments enhance the flavors, add freshness, and offer a delightful contrast to the crispy fish and golden chips. By experimenting with different sides, you can create a fish and chips meal that’s truly unforgettable, whether you’re enjoying it for a casual dinner or a special treat.
Unique Toppings: How to Add Flair with Optional Toppings Like Hot Sauce or Malt Vinegar
When it comes to fish and chips, while the traditional toppings like tartar sauce, vinegar, and lemon wedges are always classic, adding a little creative flair with unique toppings can take your dish to the next level. These special additions can bring new flavors and textures, allowing you to customize your meal to suit your preferences. Here are some fun and flavorful options to elevate your fish and chips experience:
1. Hot Sauce: A Spicy Kick
Hot sauce is a fantastic way to introduce some heat to your fish and chips. The spicy, tangy notes of hot sauce add depth and excitement, perfectly complementing the mild flavor of the fish and crispy texture of the chips. Whether you like your food spicy or just want a subtle kick, hot sauce is an excellent topping to consider.
- Why It Works: The vinegar-based tanginess of most hot sauces pairs well with the rich, fried batter of the fish, cutting through the grease and enhancing the overall flavor profile. The heat adds an extra layer of intensity that balances the crispy texture of the chips and the delicate fish.
- How to Serve: You can drizzle hot sauce directly onto the fish or serve it on the side for dipping. Sriracha, Tabasco, or Frank’s RedHot are popular options, but you can also experiment with habanero sauce, jalapeño hot sauce, or even a sweet chili sauce for a sweet-and-spicy twist.
- Flavors to Experiment With: Try adding a smoky chipotle hot sauce for a rich, smoky flavor or a garlic-based hot sauce for an extra punch of savory heat. For those who love a bit of sweetness with their spice, a mango habanero or pineapple hot sauce could add a delicious tropical touch.
2. Malt Vinegar: A Tangy Tradition
For those who enjoy a more traditional take on fish and chips, malt vinegar is a quintessential topping. This deeply flavorful vinegar adds a sharp, acidic punch that helps to cut through the richness of the fried batter while enhancing the flavors of the fish.
- Why It Works: The malty, slightly sweet flavor of malt vinegar complements the crispy fish and chips, providing a contrast to the deep-fried elements. Its acidity also helps balance the oiliness of the dish, creating a well-rounded taste experience. In fact, malt vinegar is often the preferred choice in British-style fish and chips.
- How to Serve: Pour malt vinegar lightly over the chips or drizzle it over the fish for a more intense flavor. You can also offer it in a small bowl on the side, allowing diners to choose how much they’d like to add. For a touch of nostalgia, a classic paper cone of fish and chips served with a splash of malt vinegar is always a winner.
- Alternative Vinegars: While malt vinegar is traditional, you can also try apple cider vinegar for a milder taste or white wine vinegar for a more delicate, fruity acidity. Each type of vinegar will impart a slightly different flavor profile to the dish, so experiment to see which one you prefer.
3. Garlic Butter: Rich and Savory
For those who enjoy indulgent flavors, garlic butter is an amazing topping to pair with fish and chips. The rich, garlicky goodness combined with the silky smooth texture of butter adds a decadent twist to the traditional dish, creating a more luxurious experience.
- Why It Works: Garlic butter complements the crispy fish and chips by adding a rich, savory layer of flavor that contrasts beautifully with the light, crispy batter. The butter adds a comforting richness, while the garlic provides a savory depth of flavor.
- How to Serve: Pour a small amount of melted garlic butter over the fish and chips or serve it on the side as a dipping sauce. You can also mix in some fresh parsley, chives, or a dash of lemon juice to elevate the flavor even more.
- Variations: If you like a little heat with your garlic butter, add some crushed red pepper flakes or chili powder for an extra kick. For a slightly smoky flavor, try adding a bit of smoked paprika to the butter.
4. Parmesan Cheese: A Savory, Umami Touch
If you’re looking to add an extra layer of savory flavor to your fish and chips, Parmesan cheese can be an excellent topping. Its salty, umami richness adds a whole new dimension to the dish, making it more satisfying and complex.
- Why It Works: Parmesan melts slightly when sprinkled over hot fish and chips, offering a rich, nutty flavor that blends beautifully with the crispy texture of the fries and the delicate fish. The saltiness of the cheese helps enhance the overall taste of the dish.
- How to Serve: Grated Parmesan can be sprinkled over the fish and chips just before serving. For an extra layer of flavor, try mixing it with herbs like oregano, basil, or thyme to add a fragrant touch.
- Flavors to Experiment With: For a bolder flavor, you can try using Pecorino Romano or a smoked cheese instead of Parmesan to create a unique, savory topping.
5. Fresh Herbs: A Fresh, Fragrant Finish
Adding a sprinkle of fresh herbs can bring brightness and an aromatic kick to your fish and chips. Herbs like parsley, dill, and chives enhance the flavor and bring freshness to the dish.
- Why It Works: The freshness of the herbs balances out the rich, fried elements of the fish and chips. They also help introduce herbal, grassy notes that make the dish feel lighter and more vibrant.
- How to Serve: Chop the herbs finely and sprinkle them over the fish and chips just before serving. Dill pairs particularly well with fish, while parsley and chives offer fresh, aromatic notes.
- Other Herbs to Try: If you want to try something a little different, consider using cilantro for a citrusy, exotic flavor or rosemary for a more earthy, pine-like taste.
6. Sweet Chili Sauce: For a Sweet and Spicy Twist
For those who like a fusion of flavors, sweet chili sauce is a perfect topping. The combination of sweet and spicy flavors enhances the fried fish and chips, providing a unique contrast to the traditional savory elements of the dish.
- Why It Works: Sweet chili sauce is tangy with a slight sweetness, complemented by a subtle heat. It adds excitement to the dish while keeping the flavors fresh and vibrant. It also makes for a great dipping sauce if you prefer a more controlled level of spice.
- How to Serve: Serve sweet chili sauce in a small bowl on the side or drizzle it lightly over the fish and chips for a flavorful, bold twist.
Conclusion: Customizing Your Fish and Chips with Unique Toppings
By experimenting with these unique toppings like hot sauce, malt vinegar, and garlic butter, you can transform the classic fish and chips into a personalized and flavorful meal. Whether you prefer a spicy, savory, or tangy addition, these toppings offer endless opportunities for creativity, allowing you to create a meal that reflects your tastes. Don’t hesitate to mix and match different toppings to find the perfect combination for your ideal fish and chips experience!
Sides and Garnishes: Ideas for Coleslaw, Peas, or Roasted Vegetables as Side Dishes
When preparing fish and chips, the sides and garnishes play a crucial role in enhancing the overall meal experience. While the crispy fish and golden chips are the stars of the show, adding flavorful and complementary sides can elevate the dish to a whole new level. Here are some great ideas for side dishes and garnishes that pair perfectly with fish and chips, creating a well-rounded, satisfying meal:
1. Coleslaw: Creamy and Crunchy
Coleslaw is a classic side dish for fish and chips, offering a refreshing and crunchy contrast to the fried elements of the meal. The cool, creamy texture of coleslaw balances the heat and richness of the fried fish and chips, while its tangy dressing adds a zesty touch to the dish.
- Why It Works: The crunchiness of coleslaw complements the crispy texture of the fried fish and chips. The creaminess of the dressing helps cut through the richness of the fried batter, while the tangy flavor of the vinegar-based dressing provides a contrast to the savory fish.
- How to Make: To make a simple coleslaw, combine shredded cabbage, carrots, and red onions with a dressing made from mayonnaise, vinegar, mustard, sugar, and salt. For added flavor, you can incorporate celery seeds, dijon mustard, or lemon juice into the dressing. If you prefer a lighter version, you can swap the mayonnaise for Greek yogurt or a vinaigrette.
- Variations: Experiment with different ingredients to create variations of coleslaw. Add apples, raisins, or pineapple for a hint of sweetness, or incorporate cilantro, jalapeños, or lime for a spicier twist.
2. Peas: Classic, Simple, and Tasty
Another traditional side dish that pairs beautifully with fish and chips is peas. While mushy peas are especially popular in the UK, you can also serve fresh or frozen peas in a variety of ways. Whether you prefer them simply steamed or enhanced with herbs, peas provide a mild, sweet flavor that balances the richness of the fried fish and chips.
- Why It Works: Peas offer a gentle, slightly sweet flavor that contrasts with the savory, salty fish and chips. They also provide a nice texture variation, giving your meal some tenderness after the crispiness of the fried elements.
- How to Make: To make classic mushy peas, cook frozen peas until tender, then mash them with a bit of butter, mint, and salt. You can also add a touch of lemon zest or garlic for added flavor. For a variation, you can stir in some cream or cheese to make them richer, or even add a handful of bacon bits for extra savoriness.
- Alternative Variations: If you want to try something different, serve the peas in a buttery sauce with a sprinkle of parsley, or pair them with garlic butter for a more indulgent side dish. For a more rustic touch, try roasting peas with olive oil and lemon for a slightly caramelized, deeper flavor.
3. Roasted Vegetables: A Flavorful and Colorful Option
For a more robust and colorful side dish, consider serving roasted vegetables alongside your fish and chips. Roasted vegetables add an earthy, savory flavor and a bit of natural sweetness, offering a healthy and tasty contrast to the fried elements of the meal. Roasting vegetables caramelizes their natural sugars, bringing out deep, rich flavors that enhance the overall dish.
- Why It Works: Roasted vegetables like carrots, parsnips, and zucchini bring a comforting, earthy sweetness that contrasts the fried fish. They also add variety and texture to the meal, giving a heartier, more balanced experience. Vegetables like broccoli or brussels sprouts can add a slightly bitter, charred flavor, which complements the crispy fish beautifully.
- How to Make: Cut vegetables into uniform pieces, toss with olive oil, salt, and your favorite herbs (like thyme, rosemary, or garlic), and roast in the oven at 400°F (200°C) for 20-30 minutes, until tender and caramelized. You can also add a squeeze of lemon juice or a drizzle of balsamic vinegar for extra flavor.
- Flavor Variations: Mix different root vegetables, such as sweet potatoes, beets, or butternut squash, for a colorful, vibrant side dish. To enhance the flavor, sprinkle with parmesan cheese or crushed red pepper flakes before roasting for an added layer of depth.
4. Salad: A Light and Fresh Addition
A green salad can also serve as a great contrast to the richness of fish and chips. The freshness of the greens and the crunchy texture of the vegetables can provide a refreshing balance to the fried food, while adding a lightness to the overall meal.
- Why It Works: A fresh salad adds a much-needed contrast to the fried elements, bringing a bright, crisp flavor that lightens up the dish. The tangy dressing can balance the oiliness of the fish and chips, making for a more satisfying, well-rounded meal.
- How to Make: Choose a mix of lettuce, arugula, and spinach for a fresh base, and add cucumbers, tomatoes, and red onions for extra crunch. A simple vinaigrette with olive oil, lemon juice, and mustard works well, or you can create a richer dressing using Greek yogurt or avocado.
- Flavor Variations: Try adding avocado slices for creaminess, walnuts or almonds for crunch, and goat cheese or feta for tanginess. Herbs like basil or parsley can give the salad an aromatic lift, while pomegranate seeds can add a burst of sweetness.
5. Additional Garnishes: Enhancing the Visual Appeal
To elevate the presentation and enhance the flavor of your fish and chips, consider adding simple garnishes. Garnishes not only enhance the visual appeal of the dish but also add a layer of flavor that can tie everything together.
- Lemon Wedges: A classic garnish, lemon wedges offer a fresh, tangy kick to balance the richness of the fried fish and chips. Simply squeeze the lemon over the fish for a burst of citrusy brightness.
- Fresh Herbs: A light sprinkle of chopped parsley, dill, or chives can bring an extra touch of freshness to the plate, complementing the savory flavors and enhancing the overall aesthetic.
- Pickles or Gherkins: For those who love a bit of tang and crunch, serving pickled vegetables, such as gherkin pickles or pickled onions, can add an additional layer of flavor that contrasts well with the rich, fried fish and chips.
Conclusion: Perfect Pairings for a Well-Rounded Meal
Serving your fish and chips with sides like coleslaw, peas, or roasted vegetables not only enhances the flavor but also adds variety and texture to the meal. These classic and simple side dishes offer the right balance of crunchiness, richness, and freshness, creating a satisfying, well-rounded dining experience. By incorporating different sides and garnishes, you can tailor the meal to your taste preferences and take your fish and chips to the next level.