
Grilled chicken doesn’t need a marinade to be juicy, flavorful, and perfectly cooked. Professional chefs know that the right techniques—like proper seasoning, controlled grilling temperatures, and expert cooking methods—can bring out the best in chicken without the extra step of marinating. Whether you’re in a hurry or prefer a more natural taste, this guide will show you how to achieve restaurant-quality grilled chicken with simple yet effective techniques. Get ready to master the art of grilling chicken like a pro—without the marinade!
Why Grilled Chicken Doesn’t Need a Marinade
The Science Behind Flavor Absorption
Many people assume that marinating is the best way to infuse chicken with flavor, but professional chefs know that dry seasoning and proper cooking techniques can be just as effective—if not better. Understanding the science behind flavor absorption can help you maximize taste without relying on a marinade.
1. Why Marinades Don’t Penetrate Deeply
Contrary to popular belief, marinades don’t actually soak deep into the meat. This is because:
- Chicken muscle structure is dense, meaning that liquid marinades only penetrate about 1–2 millimeters into the surface.
- Most marinades contain water-based ingredients, which don’t absorb well into proteins compared to fats or dry seasonings.
- Acidic marinades (like lemon juice or vinegar) primarily affect the outermost layer of the chicken, slightly breaking down proteins for tenderness but not deeply infusing flavor.
2. How Dry Seasonings and Salt Work Better
Instead of relying on a liquid marinade, professionals use dry rubs and proper seasoning techniques to enhance flavor:
- Salt plays a crucial role in flavor absorption. It draws moisture out of the meat, then reabsorbs it along with spices, carrying flavor deeper.
- Fat-based ingredients (like olive oil or butter) help flavors stick to the surface and promote a golden-brown crust.
- Cooking with direct heat (like grilling) enhances the Maillard reaction—a process that creates rich, caramelized flavors on the surface of the chicken.
3. Maximizing Flavor Without Marinade
To get the best-tasting grilled chicken without marinade, professionals recommend:
- Seasoning the chicken at least 30 minutes before grilling to allow the salt to work its magic.
- Using dry rubs with bold spices like smoked paprika, garlic powder, and black pepper to create a flavorful crust.
- Pairing the right cooking method (direct vs. indirect heat) to maximize juiciness while ensuring a crispy, well-seasoned surface.
By understanding the science behind how flavors interact with chicken, you can create restaurant-quality grilled chicken without the need for a marinade. 🔥🍗
Benefits of Skipping the Marinade
While marinades are a common go-to for adding flavor to chicken, skipping the marinade can actually offer several advantages—especially when using professional grilling techniques. Here’s why grilling chicken without a marinade can lead to better texture, faster preparation, and enhanced flavor.
1. Faster and More Efficient Cooking
One of the biggest benefits of skipping the marinade is that it saves time.
- No waiting required: Marinades typically require at least a few hours—sometimes overnight—for minimal absorption, but dry seasoning works almost instantly.
- Immediate cooking: You can season your chicken and throw it directly on the grill, making it perfect for quick meals.
- Even cooking: Without excess moisture from a marinade, the chicken cooks evenly and develops a better sear.
2. Better Texture and Crispy Skin
Marinades often contain water-based ingredients, which can affect the texture of grilled chicken.
- Less moisture retention: Excess liquid on the surface of the chicken from marinades can create steaming instead of grilling, leading to a soggy texture rather than a crisp crust.
- Golden-brown crust: Without a marinade, the chicken’s surface stays dry enough to undergo the Maillard reaction, a chemical process that enhances browning and deepens flavor.
- Crispier skin: For cuts like chicken thighs and drumsticks, skipping the marinade ensures crispy, golden skin instead of a soft, rubbery texture.
3. More Intense and Balanced Flavor
Marinades often dilute flavors rather than enhance them. Here’s why dry seasoning works better:
- Stronger seasoning impact: Dry rubs allow the spices to stick directly to the chicken’s surface, concentrating the flavors.
- Salt absorption: Salt naturally draws moisture from the chicken, helping the seasonings penetrate the meat more effectively than a marinade.
- More control over taste: With a marinade, the flavors can become too mild or unbalanced, but dry seasoning lets you adjust the intensity to your preference.
4. No Risk of Over-Tenderizing
Many marinades contain acidic ingredients like vinegar, lemon juice, or yogurt, which can sometimes backfire.
- Acids break down proteins too much, leading to a mushy or mealy texture, especially if left too long.
- Skipping the marinade prevents over-tenderizing, keeping the chicken firm and juicy with the right level of tenderness.
5. Works Better with Professional Grilling Techniques
Grilling without a marinade aligns perfectly with pro cooking methods:
- Direct and indirect heat grilling ensures better control over how the chicken cooks.
- Dry seasoning combined with oil helps create a beautiful charred exterior while keeping the inside juicy.
- More caramelization occurs when chicken is not coated in excess liquid, leading to deep, smoky, and complex grilled flavors.
Final Thoughts
While marinades can add some flavor, skipping them saves time, enhances texture, and delivers richer flavors when using the right grilling techniques. By focusing on proper seasoning, controlled heat, and expert cooking methods, you can achieve juicy, flavorful grilled chicken without the hassle of marinating.
🔥 Try it yourself and taste the difference! 🍗🔥
How Dry Rubs and Seasonings Enhance Taste
Dry rubs and seasonings are key components in achieving perfectly grilled chicken without the need for a marinade. By carefully selecting the right mix of herbs, spices, and salt, you can significantly enhance the flavor and texture of your grilled chicken. Here’s how dry rubs and seasonings work to bring out the best in your chicken:
1. Creating a Flavorful Crust
One of the most immediate effects of using dry rubs is the flavorful crust that forms on the chicken during grilling.
- Maillard reaction: When the dry rub is applied to the surface of the chicken and exposed to high heat, it triggers the Maillard reaction. This is a chemical process that creates rich, brown, and caramelized flavors, leading to a mouth-watering crust.
- Flavor intensification: The dry rubs lock in the flavors on the surface of the meat, concentrating the seasoning and preventing it from dissipating during the cooking process. This creates a bold, well-seasoned exterior without overpowering the natural taste of the chicken.
- Crunch and texture: A perfectly applied dry rub can also give the skin a desirable crispiness, which adds texture to every bite.
2. Versatility in Flavor Profiles
Dry rubs are incredibly versatile and can be customized to fit any flavor profile you prefer. Whether you like smoky, spicy, savory, or sweet, a well-chosen dry rub can transform your grilled chicken. Some common flavor profiles include:
- Smoky: Ingredients like paprika, chipotle, and cumin give the chicken a smoky, deep flavor that mimics slow-cooked barbecue.
- Spicy: Cayenne pepper, chili powder, and black pepper add heat, giving your chicken a kick that pairs well with cooling side dishes like coleslaw.
- Herbaceous: A blend of rosemary, thyme, oregano, and garlic powder can elevate the chicken with fresh, earthy flavors.
- Sweet: A touch of brown sugar or cinnamon can balance savory and spicy flavors for a slightly sweet and savory finish.
The beauty of dry rubs is that you have complete control over the intensity and balance of flavors. You can experiment and adjust the seasoning mix to match your personal preferences or the desired style of cuisine.
3. Drawing Out Natural Juiciness
Dry rubs and seasonings don’t just enhance the flavor; they also help maintain the juiciness of the chicken.
- Salt’s role: Salt is a crucial ingredient in any dry rub. It not only contributes to the flavor but also helps the chicken retain moisture. Salt draws out some moisture from the meat initially, but as the chicken rests, the salt reabsorbs the juices along with the seasoning, creating a more moist and flavorful interior.
- Oil and fat for moisture: Adding a small amount of oil (like olive oil or butter) in your dry rub allows the spices to adhere to the chicken while also helping the skin retain its crispiness. This extra layer of fat also prevents the chicken from drying out during grilling.
4. Fewer Ingredients, More Flavor
One of the biggest advantages of dry rubs is that they typically require fewer ingredients than a marinade, but they still pack a punch when it comes to flavor.
- Simple seasoning: A basic rub of salt, pepper, and garlic powder can be incredibly effective, allowing the natural flavors of the chicken to shine without overwhelming it.
- No excess liquid: Unlike marinades, dry rubs don’t add any unwanted liquid that could dilute the chicken’s flavor or affect its texture. Instead, the seasonings stay concentrated on the surface of the meat, creating a flavor-packed bite from the very first bite to the last.
5. Enhancing the Chicken’s Natural Flavor
Dry rubs are flavor enhancers, not overpowering agents. They allow the natural taste of the chicken to come through while elevating it with complementary spices.
- Balanced flavor: A well-balanced rub highlights the mild, savory flavor of the chicken without masking it. It also adds layers of complexity by enhancing specific taste notes like smokiness, spiciness, or herbal freshness.
- Less reliance on sauce: With the right dry rub, your grilled chicken might not need extra sauces or condiments to boost flavor. The seasoning works in harmony with the chicken, making each bite more enjoyable on its own.
Final Thoughts
Using dry rubs and seasonings is an excellent way to enhance the taste of your grilled chicken without a marinade. By carefully selecting the right spices, you can create a delicious, crispy crust, lock in moisture, and bring out the natural flavors of the chicken. Whether you go for bold, smoky flavors or fresh, herby notes, dry rubs offer a versatile, quick, and effective way to achieve restaurant-quality grilled chicken.
🔥 Get ready to experiment and create your own signature dry rub! 🍗
Essential Ingredients and Seasonings for Flavorful Grilled Chicken
Best Spices and Herbs for Grilling (Paprika, Black Pepper, Garlic Powder)
When it comes to grilling chicken without a marinade, the key to achieving vibrant, bold flavors lies in selecting the right spices and herbs. A well-curated spice blend enhances the natural flavors of the chicken and creates a mouth-watering aroma and taste. Here are some of the best spices and herbs to use when grilling chicken, focusing on paprika, black pepper, and garlic powder—three classic options that work wonders on grilled chicken.
1. Paprika – A Smoky Touch for Depth of Flavor
Paprika is one of the most versatile spices for grilling, offering a balance of smoky richness and earthy undertones that complement the mild flavor of chicken. There are several types of paprika, each with unique characteristics:
- Sweet Paprika: This variety adds a mild, sweet heat that enhances the chicken’s natural flavor without overpowering it. It pairs well with chicken breasts and lighter cuts, offering a subtle yet flavorful crust.
- Smoked Paprika: This variety is ideal for grilled chicken, imparting a deep, smoky flavor that mimics the taste of slow-cooked barbecue. It’s perfect when you want that charcoal-grilled taste, even if you’re using a gas or pellet grill. Smoked paprika is especially useful for dark meat chicken, like thighs or drumsticks, as it adds complexity to the flavor.
- Hot Paprika: For those who love a little kick, hot paprika brings a spicy punch to your grilled chicken. It’s great for chicken thighs or wings, adding both color and a warming heat.
How it enhances taste:
Paprika brings out the savory qualities of chicken while deepening the overall flavor profile. It also adds vibrant color to the chicken’s crust, making the dish as visually appealing as it is flavorful.
2. Black Pepper – The Essential Flavor Booster
Black pepper is a staple in almost every dry rub, and for good reason. It adds a sharp, spicy note that balances out the richness of grilled chicken and enhances the overall flavor. Here’s why black pepper is a must-have:
- Pepper’s versatility: It’s perfect for any cut of chicken, from grilled chicken breasts to wings. Its bold, slightly bitter flavor enhances the taste without overwhelming the other spices in the rub.
- Freshly ground for best results: Using freshly ground black pepper instead of pre-ground offers a more intense and aromatic flavor. The fresh grind releases the essential oils in the peppercorns, giving you that bright, peppery heat.
- Pairs well with almost everything: Whether you’re using garlic, smoked paprika, or thyme, black pepper provides the perfect base and ties the spices together for a balanced flavor profile.
How it enhances taste:
Black pepper stimulates the taste buds, helping to amplify the flavors of other ingredients in the rub. It adds complexity and depth to your seasoning while balancing out the richness of grilled chicken.
3. Garlic Powder – A Savory, Aromatic Addition
Garlic powder is one of the most aromatic and savory seasonings you can use in grilling. It’s an essential spice for grilled chicken and enhances its flavor in several ways:
- Subtle sweetness and depth: Garlic powder doesn’t overpower the chicken but rather adds a mild, slightly sweet, savory depth that makes the chicken taste more complex. It’s especially great for boneless, skinless chicken breasts, where the chicken can sometimes lack richness.
- Even distribution: Unlike fresh garlic, garlic powder is more evenly distributed across the chicken, ensuring that every bite has a uniform garlicky flavor.
- Easy to blend: Garlic powder is the perfect match for other spices like paprika, oregano, and onion powder, making it easy to create a cohesive rub that enhances all the flavors of the grilled chicken.
How it enhances taste:
Garlic powder enhances the savory umami flavor of chicken, making it taste fuller and more complex. It’s a go-to seasoning for people who want a mild garlic flavor that doesn’t overpower the other spices or ingredients.
4. Combining Paprika, Black Pepper, and Garlic Powder
When used together, paprika, black pepper, and garlic powder create a harmonious balance of smoky, spicy, and savory flavors that take your grilled chicken to the next level. Here’s how these spices work together:
- Paprika and garlic powder create a balanced, flavorful crust that is both aromatic and rich. The smoky undertones from the paprika pair perfectly with the savory, slightly sweet garlic notes, creating a mouth-watering base.
- Black pepper adds a bold kick that cuts through the richness of the paprika and garlic, providing just the right amount of heat to complement the flavors. The combination of smokiness, savoriness, and heat makes each bite of grilled chicken a delicious experience.
5. Tips for Using These Spices Effectively
To get the most out of these spices and create the perfect grilled chicken, keep these tips in mind:
- Use fresh spices: For maximum flavor, always use freshly ground black pepper and fresh paprika. The oils in fresh spices have more aromatic intensity than pre-ground versions.
- Coat evenly: When applying dry rubs, make sure the chicken is evenly coated with spices for a balanced flavor in every bite. Rub the seasoning into the chicken to ensure it sticks well and penetrates the meat during grilling.
- Adjust to taste: Feel free to adjust the amount of paprika, black pepper, or garlic powder based on your flavor preferences. For example, use extra paprika for a more smoky flavor or more black pepper for a spicy kick.
Final Thoughts
Paprika, black pepper, and garlic powder are essential spices for grilling chicken without a marinade. Their combined smoky, savory, and spicy flavors work together to create a mouthwatering, flavorful chicken that is crispy on the outside and juicy on the inside. Experiment with different amounts to find your ideal flavor balance, and get ready to enjoy some of the best-grilled chicken you’ve ever made!
🔥 Time to fire up the grill and get cooking! 🍗
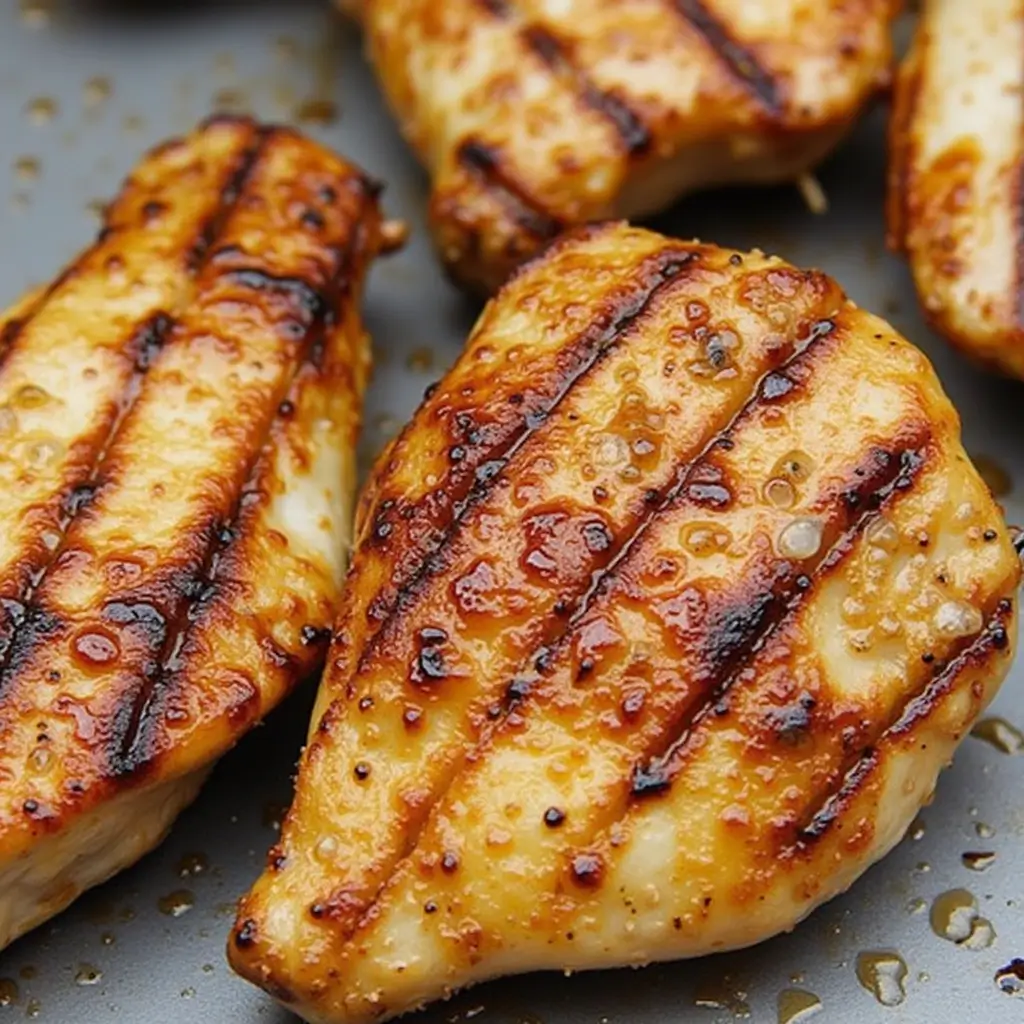
The Importance of Salt for a Perfect Crust
Salt is one of the most essential ingredients when it comes to grilling chicken, especially if you’re looking to achieve that crispy, flavorful crust. While often overlooked, salt plays a pivotal role in both the texture and flavor of your grilled chicken. Here’s why salt is key to creating that golden, crispy crust and how it elevates your grilled chicken to the next level:
1. Enhancing Flavor and Balancing the Seasoning
One of the main reasons salt is so crucial to grilling chicken is its ability to enhance flavor. Salt is known as a flavor enhancer that balances and amplifies the natural flavors of chicken. Here’s how salt improves the taste:
- Bringing out natural flavors: Salt works by drawing out the inherent flavors in the chicken, making the meat taste more savory and delicious. It helps to highlight the natural umami in the meat and pairs well with other spices and seasonings. Without salt, the chicken can taste flat or one-dimensional.
- Balancing other ingredients: In dry rubs, marinades, and spice mixes, salt helps to balance out other stronger flavors, like spices, herbs, and sugars. A pinch of salt can make other ingredients like paprika, garlic powder, or black pepper pop, ensuring a well-rounded flavor profile on your grilled chicken.
How it enhances taste:
Salt brings out the savory richness of the chicken while balancing the flavors of the spices. It makes the meat taste fuller, more intense, and more satisfying, ensuring that each bite is flavorful and enjoyable.
2. Salt Draws Out Moisture, Creating a Crispy Crust
While salt is often used to enhance flavor, it also plays a critical role in the texture of your grilled chicken by helping create a crispy crust. This is one of the reasons why salt is used in so many grilling techniques, especially when grilling without a marinade. Here’s how it works:
- Drawing moisture to the surface: Salt draws out the chicken’s natural moisture, which is initially released onto the surface of the meat. Once the moisture is on the surface, it forms a layer that, when exposed to high heat on the grill, begins to evaporate and caramelize. This process helps to form a crust that is both crispy and flavorful.
- Concentrating flavor: As the salt draws moisture to the surface, it also concentrates the chicken’s flavor, which intensifies as it cooks. The salt interacts with the meat’s proteins, helping to create a tender interior while maintaining a crispy exterior.
- Crispiness through evaporation: When the moisture on the surface evaporates, the salt itself becomes a key factor in drying the outer layer of chicken, promoting the crisping of the skin. This is particularly effective on skin-on chicken pieces like wings, thighs, or drumsticks, where the skin is meant to get crispy and golden brown.
How it enhances taste:
By drawing moisture to the surface and creating that crispy texture, salt helps to ensure that the grilled chicken not only tastes better but also has a satisfying contrast between the tender meat inside and the crispy, flavorful crust on the outside.
3. How Salt Creates a Flavorful Crust When Grilling
The texture and flavor of the chicken’s crust are incredibly important when grilling, and salt plays an integral part in forming this crust. Salt doesn’t just add flavor—it also contributes to the crispiness and golden-brown color that you see on perfectly grilled chicken. Here’s how it achieves this:
- Maillard reaction: When the salt pulls moisture to the surface of the chicken, this moisture evaporates and aids in the Maillard reaction—a chemical reaction between amino acids and reducing sugars that occurs at high heat. This is the reaction responsible for the browning and development of complex, savory flavors on the chicken’s surface.
- Golden, crispy skin: Salt contributes directly to the golden-brown color of the chicken by facilitating even browning. The moisture pulled to the surface forms a crispy outer layer, while the internal temperature of the chicken rises, cooking the meat to perfection.
- Textural contrast: The salt ensures that the crispy skin remains intact while the interior of the chicken stays juicy and moist. This contrast between the tender, juicy interior and the crispy, flavorful crust is a hallmark of great grilled chicken.
How it enhances taste:
By aiding in the Maillard reaction and forming a crispy, golden crust, salt elevates the chicken’s flavor profile and texture, resulting in a more satisfying eating experience. The savory outer crust enhances the tender, juicy interior, making every bite more enjoyable.
4. Salt Timing: When to Apply for the Best Results
The timing of salt application is essential for achieving the best crust. Too early or too late, and you may miss out on the crispy texture or flavor balance you’re hoping to achieve. Here’s how to get the most out of salt:
- Before grilling (dry brining): Applying salt to the chicken before grilling allows it to penetrate the meat over time, creating a more intense flavor and better texture. You can salt the chicken 15-30 minutes before grilling to draw out moisture and help form the crust. This technique is particularly effective when using skin-on cuts of chicken.
- Just before grilling (for crispiness): If you’re looking for a crispy crust and don’t have time for dry brining, salting just before grilling works well. This will allow the chicken to sear quickly on the grill and start the process of forming a golden-brown crust immediately.
- After grilling (seasoning the crust): Some chefs also suggest a final sprinkle of salt after the chicken is grilled to add a last burst of flavor and enhance the final texture of the crust. This can be especially effective when using coarse sea salt or kosher salt for extra crunch.
How it enhances taste:
Applying salt at the right time can enhance the chicken’s crust and flavor, ensuring that you get a juicy interior with a crispy, flavorful outer layer. Proper timing makes all the difference when achieving that perfect balance of textures.
5. The Role of Salt in Healthy Grilling
Salt, when used in moderation, can be part of a healthy grilling process. While it’s important not to overuse salt, the right amount can have several benefits:
- Boosting flavor without extra calories: Salt adds intense flavor to grilled chicken, meaning you don’t have to rely on heavy sauces or marinades that can add unwanted calories or sugar. This makes it a great option for anyone looking to maintain a healthy diet while still enjoying flavorful meals.
- Improved hydration: When used correctly, salt helps to retain moisture in the chicken, which can prevent it from becoming overly dry, especially during the grilling process. This leads to a more satisfying and hydrating meal.
How it enhances taste:
Moderate use of salt enhances the overall taste and texture of grilled chicken, allowing for a flavor-packed meal that still supports health-conscious eating.
Final Thoughts
Salt is a critical ingredient in achieving that perfect, flavorful, and crispy crust on your grilled chicken. By drawing out moisture, enhancing natural flavors, and creating a golden-brown exterior, salt is essential to grilling success. Whether you apply it before grilling for a deeper flavor or just before grilling for a crispy finish, the right amount of salt will elevate your grilled chicken to new heights.
🔥 Salt the chicken, fire up the grill, and get ready to enjoy a perfect crust every time! 🍗
Professional Grilling Techniques for Juicy Chicken
Direct vs. Indirect Heat Cooking Methods
Understanding the difference between direct and indirect heat is essential for mastering the art of grilling, especially when preparing dishes like grilled chicken. These two cooking techniques are the backbone of effective grilling, each providing distinct advantages depending on what you’re aiming to achieve with your meal. Here’s an in-depth breakdown of direct and indirect heat and how to use them for the perfect grilled chicken:
1. Direct Heat: High-Temperature Cooking for Quick Searing
Direct heat grilling refers to cooking food directly over the flame or heat source, which means that the heat radiates from below the food. This method is best used for foods that cook quickly, such as chicken breasts, wings, or thighs with skin-on.
How Direct Heat Works
- Quick, high heat: The food is placed directly over the grates above the heat source, exposing it to high temperatures that result in fast cooking. The high heat quickly caramelizes the exterior, creating a golden-brown, crispy crust.
- Ideal for searing: When grilling without marinades, direct heat is excellent for searing the chicken, giving it a flavorful, crispy texture. The outer layer gets that desirable crust while the inside remains tender and juicy.
When to Use Direct Heat
- Quick-cooking cuts: Use direct heat when cooking chicken cuts that take less time to cook, like boneless chicken breasts, wings, or chicken tenders.
- For crispy skin: If you’re looking to achieve that crispy, charred skin on chicken, direct heat is your best option. The skin crisps up quickly, and you get those signature grill marks.
- For grilling small cuts or thin pieces: Direct heat is effective for smaller or thinner pieces of chicken that don’t need a long cooking time.
Advantages of Direct Heat
- Quick cooking time: Direct heat is fast, so your chicken cooks quickly, making it ideal for weeknight dinners or when you’re short on time.
- Grill marks and crust: Direct heat gives your chicken that signature crispy, golden-brown crust and grill marks, which contribute to both texture and flavor.
2. Indirect Heat: Slow, Even Cooking for Juicy, Tender Results
Indirect heat is the opposite of direct heat. Instead of placing the chicken directly over the flame, the chicken is cooked beside or around the heat source, with the lid closed to trap heat and cook the chicken more evenly. This method works best for thicker cuts of chicken, like whole chickens, bone-in thighs, or larger chicken pieces.
How Indirect Heat Works
- Lower temperature, longer cooking time: With indirect heat, the chicken is placed away from the direct flame but still inside the grill. The heat circulates around the food, cooking it slowly and evenly. This method results in a moist, tender interior.
- Lid closed for even heat distribution: The grill lid is typically kept closed, ensuring that the heat is distributed evenly across the chicken. This results in thorough cooking without burning the outside of the chicken before the inside is done.
When to Use Indirect Heat
- Thicker cuts or bone-in chicken: Indirect heat is ideal for cuts that need more time to cook, like bone-in thighs, leg quarters, or a whole chicken.
- Cooking large batches: If you’re grilling larger quantities or bigger cuts of chicken, indirect heat ensures that everything is cooked through evenly without burning the exterior.
- For a tender and juicy result: If you’re not concerned with getting a crispy outer crust and are more focused on achieving a tender, juicy interior, indirect heat is your go-to method.
Advantages of Indirect Heat
- Even cooking: Indirect heat provides consistent temperature throughout the grill, ensuring that the chicken cooks evenly. This is especially useful for larger pieces or thicker cuts that need more time to reach the correct internal temperature.
- Less risk of burning: Since the chicken is not directly exposed to high flames, there’s less risk of burning the outside while the inside remains raw. Indirect heat helps to avoid the dreaded dry, overcooked chicken.
- Great for smoky flavors: When cooking with indirect heat, you can incorporate wood chips or chunks for smoking, adding depth and flavor to your chicken.
3. Combining Direct and Indirect Heat: The Two-Zone Method
For the ultimate grilled chicken, you can use a combination of both direct and indirect heat in a two-zone setup. This method allows you to achieve the best of both worlds—a crispy outer layer and a tender, juicy interior. Here’s how you can do it:
How to Set Up a Two-Zone Grill
- Direct heat side: On one side of the grill, create a high heat zone by piling the charcoal or turning up the burner on a gas grill. This side is for searing the chicken and creating that crispy, caramelized crust.
- Indirect heat side: On the other side of the grill, create a low-to-medium heat zone where the chicken can cook through slowly and evenly without burning.
- Sear and move: Start by placing your chicken over the direct heat for a few minutes to get the crispy, golden-brown crust. Once the desired level of searing is achieved, move the chicken to the indirect heat side to finish cooking until it reaches the proper internal temperature.
Why Use the Two-Zone Method?
- Crispy and juicy: This method ensures that the outside of your chicken is crispy and perfectly charred, while the inside remains tender, juicy, and fully cooked.
- Flexible for different cuts: The two-zone method allows you to cook a variety of chicken cuts with different thicknesses at the same time, ensuring even cooking for each piece.
- Great for control: You have more control over the grilling process. If the chicken starts to brown too quickly, you can move it to the indirect heat side to prevent burning.
4. How to Choose Between Direct and Indirect Heat for Chicken
Choosing the right method depends on a few key factors, such as the cut of chicken, how crispy you want the skin to be, and how much time you have. Here’s a quick guide:
- Use direct heat if:
- You’re cooking boneless, skinless chicken breasts, wings, or chicken tenders.
- You want a crispy skin and grill marks.
- You’re looking for a quick cook time.
- You prefer charred flavors and textures.
- Use indirect heat if:
- You’re cooking thicker cuts like bone-in thighs, leg quarters, or a whole chicken.
- You prefer juicy, tender meat with a slower cooking process.
- You’re smoking the chicken or cooking larger batches.
Conclusion: Mastering the Art of Direct and Indirect Heat
Mastering both direct and indirect heat methods is the key to creating perfectly grilled chicken. Each technique has its own strengths and can be used in combination to ensure that your chicken is crispy on the outside and juicy on the inside. Whether you’re cooking small, quick-cooking cuts with direct heat or slow-cooking larger, thicker pieces with indirect heat, understanding how to use both methods will elevate your grilling game to the next level.
With these two grilling techniques in your arsenal, you’ll be able to create restaurant-quality grilled chicken in your own backyard every time. 🔥🍗
Best Grilling Temperatures for Different Cuts (Breasts, Thighs, Drumsticks)
When grilling chicken, the cooking temperature is crucial to ensure each cut is cooked to perfection—tender, juicy, and with the right level of crispiness. Different cuts of chicken require slightly different grilling temperatures to achieve the best results. Here’s a detailed guide on the ideal grilling temperatures for chicken breasts, thighs, and drumsticks:
1. Chicken Breasts: Grilled to Perfection at Medium-High Heat
Chicken breasts are one of the most popular cuts, but they can be tricky to grill without drying out. Since they’re lean and don’t have much fat, they can easily become overcooked, resulting in a tough and dry texture. To avoid this, you need to cook them over the right temperature and be mindful of the grilling time.
Best Grilling Temperature: 375°F – 450°F (Medium-High Heat)
- Direct heat method: Chicken breasts benefit from medium-high heat, which allows them to cook quickly without drying out. This temperature range ensures the surface sears and caramelizes while the interior stays moist.
- Grill temperature tips: If you’re using a gas grill, preheat it to 375°F – 450°F. For a charcoal grill, wait until the coals are glowing red with a moderate amount of heat.
Why This Temperature Works for Chicken Breasts
- Quick cooking, tender results: Since chicken breasts are relatively thin, they cook quickly. The medium-high heat helps sear the exterior while locking in the juices, leaving the chicken tender and moist.
- Optimal grill marks: The high heat creates those perfect grill marks while giving the chicken a slightly crispy outer layer.
- Avoid overcooking: Cooking at too high a temperature can cause the breasts to dry out, so keep the temperature steady within this range.
Internal Temperature to Aim For: 165°F
- Tip: Use a meat thermometer to check the internal temperature. Once it reaches 165°F in the thickest part of the breast, remove it from the grill.
2. Chicken Thighs: Grilled to Juicy, Flavorful Perfection at Medium Heat
Chicken thighs are rich in flavor and have a higher fat content than chicken breasts, which helps keep them moist during grilling. Thighs are forgiving, making them a great choice for beginners or anyone looking for a flavorful, tender chicken option.
Best Grilling Temperature: 350°F – 400°F (Medium Heat)
- Indirect heat method: Thighs should be grilled at medium heat, which allows them to cook through without charring or drying out. This temperature range ensures the thighs cook evenly while maintaining their juiciness.
- Grill temperature tips: Set your gas grill to 350°F – 400°F, or for charcoal, spread the coals to one side, using indirect heat to allow the thighs to cook more slowly.
Why This Temperature Works for Chicken Thighs
- Fat helps with moisture retention: The fat content in thighs helps keep them moist and juicy, and grilling at a medium temperature ensures that the fat renders out without burning. This results in a tender texture.
- Crispy skin: Chicken thighs often come with skin, which can become beautifully crispy when grilled properly at medium heat. The skin crisps up while the meat remains moist inside.
- Flavored interior: The moderate temperature allows the chicken thighs to cook slowly, helping them retain more of their natural flavors.
Internal Temperature to Aim For: 165°F
- Tip: Similar to chicken breasts, ensure the internal temperature reaches 165°F. The higher fat content in thighs can make them more forgiving, but it’s important to get the internal temperature right to ensure safety.
3. Chicken Drumsticks: Grilled to Tender, Crispy Perfection with Indirect Heat
Drumsticks are a favorite for their flavor, tenderness, and ability to hold up well on the grill. Like thighs, they have more fat than breasts, which makes them more forgiving and less likely to dry out. Drumsticks benefit from slower, indirect grilling to fully cook through and crisp up without burning.
Best Grilling Temperature: 350°F – 375°F (Medium Heat)
- Indirect heat method: Chicken drumsticks benefit most from indirect heat, which ensures they cook evenly and stay tender on the inside. The temperature range of 350°F – 375°F is perfect for getting that nice crisp on the outside while allowing the drumstick to cook through.
- Grill temperature tips: Set your grill to 350°F – 375°F and place the drumsticks on the cooler side (indirect heat side) to prevent burning. Close the lid and let the chicken cook slowly.
Why This Temperature Works for Chicken Drumsticks
- Slow, even cooking: Drumsticks are thicker and take longer to cook than breasts. Grilling at medium heat allows the meat to cook evenly without burning the skin, resulting in juicy meat and crispy skin.
- Crispy skin and tender meat: The indirect heat allows for the skin to crisp up beautifully while the internal temperature gradually rises, making the meat inside juicy and tender.
- Enhancing flavor: As the drumsticks cook at a moderate temperature, the rendered fat infuses into the meat, helping to enhance the overall flavor and texture.
Internal Temperature to Aim For: 165°F
- Tip: Just like with breasts and thighs, check the internal temperature with a meat thermometer. Drumsticks are more forgiving due to their higher fat content, but reaching 165°F ensures that they are fully cooked and safe to eat.
4. General Grilling Tips for All Cuts of Chicken
While each cut has its own ideal temperature, here are a few universal tips for grilling chicken:
- Rest your chicken: After grilling, let the chicken rest for about 5-10 minutes before cutting into it. This helps redistribute the juices and results in a more tender, flavorful piece of chicken.
- Use a meat thermometer: To avoid overcooking or undercooking, always use a meat thermometer. This ensures you hit the 165°F mark, the USDA recommended temperature for safe chicken consumption.
- Grill with the lid down: Keeping the grill lid down helps maintain the temperature, especially when grilling with indirect heat. It also prevents flare-ups that can burn your chicken.
Conclusion: The Right Temperature is Key to Perfect Grilled Chicken
Understanding the ideal grilling temperatures for different chicken cuts is the secret to achieving tender, juicy, and flavorful chicken every time. Whether you’re grilling chicken breasts, thighs, or drumsticks, choosing the right temperature and cooking method makes all the difference. By using medium-high heat for breasts, medium heat for thighs, and a mix of indirect heat for drumsticks, you’ll be able to create restaurant-quality grilled chicken with ease. So, fire up the grill, adjust your temperatures accordingly, and get ready to enjoy perfectly cooked chicken in every bite. 🍗🔥
Using a Cast Iron Grill vs. Gas or Charcoal Grilling
When it comes to grilling chicken, the choice of grill can significantly impact the flavor, texture, and overall result. While gas grills and charcoal grills are the most common grilling tools, cast iron grills have become increasingly popular for certain applications due to their unique properties. Below is a detailed comparison of the pros and cons of cast iron grills versus gas and charcoal grills, particularly when grilling chicken:
1. Cast Iron Grill: Unleashing the Power of Even Heat Distribution
A cast iron grill is typically a heavy, metal surface that retains and distributes heat efficiently, often used on both stovetop grills and outdoor grills. Cast iron is a favorite among chefs and home cooks because of its ability to maintain high temperatures and deliver consistent results.
Pros of Using Cast Iron for Grilling Chicken:
- Excellent Heat Retention: One of the most notable benefits of using a cast iron grill is its ability to retain heat for extended periods. Once the grill surface heats up, it remains hot, ensuring even heat distribution and uniform cooking. This is particularly useful when grilling chicken as it can help prevent cold spots, ensuring that each piece of chicken is cooked to perfection.
- Creates a Perfect Crust: The high heat retention and excellent searing ability of cast iron help create a crispy, golden-brown crust on your chicken, particularly on cuts like chicken thighs or breasts with skin. The sizzling effect gives the chicken a caramelized texture that many people love.
- Versatility: Cast iron grills are versatile and can be used on both indoor stovetops or outdoor grills. If you’re grilling in the winter or on a rainy day, a cast iron grill allows you to recreate that authentic grilled flavor indoors. It’s also perfect for those who enjoy cooking on griddles or cast iron skillets in their kitchen.
Cons of Using Cast Iron for Grilling Chicken:
- Heavy: Cast iron is considerably heavier than other grilling surfaces, so it may not be as portable as a gas or charcoal grill. If you plan to move your grill frequently or want to take it on the go, this can be a disadvantage.
- Requires Seasoning and Maintenance: To maintain its non-stick surface, cast iron needs to be seasoned regularly with oil to prevent rusting and ensure that food doesn’t stick. This maintenance process can be more labor-intensive compared to using gas or charcoal grills.
- Less Smoky Flavor: While cast iron provides excellent heat, it doesn’t add as much smoky flavor as a charcoal grill does, which is something some grill enthusiasts prefer.
2. Gas Grilling: Convenience and Control with Clean Burning
Gas grills are the modern go-to for many grillers because of their convenience and ease of use. They operate by burning propane or natural gas to produce flames that heat the grill’s cooking surface.
Pros of Gas Grilling for Chicken:
- Precise Temperature Control: Gas grills allow for precise temperature control. With adjustable knobs, you can easily set the grill to the perfect cooking temperature, making it ideal for grilling chicken, especially when you need to monitor cooking times closely for each cut (e.g., breasts, thighs, or drumsticks).
- Quick Heating: Unlike charcoal grills, gas grills heat up quickly. You can get started grilling your chicken in just a few minutes without having to wait for coals to reach the right temperature.
- Convenience: Gas grills are much easier to use and clean compared to charcoal or cast iron grills. With a push of a button or twist of a knob, you can start grilling without much setup or cleanup afterward.
Cons of Gas Grilling for Chicken:
- Lack of Smoky Flavor: While gas grills provide a clean and even heat, they generally don’t impart as much smoky flavor to your chicken as charcoal grilling does. This can be a downside if you are looking for that traditional smoky, charred taste.
- Potentially Less Searing Power: Gas grills often have lower maximum temperatures compared to charcoal or cast iron, meaning they may not sear your chicken as deeply. This can affect the crispiness and texture of the skin, particularly for skin-on chicken cuts.
3. Charcoal Grilling: The Traditional Smoky Flavor
Charcoal grilling has been the traditional method of grilling for generations. Using charcoal briquettes or lump charcoal, this method imparts a distinctive smoky flavor and creates a sear that’s difficult to replicate with gas or cast iron.
Pros of Charcoal Grilling for Chicken:
- Authentic Smoky Flavor: One of the biggest advantages of grilling with charcoal is the smoky flavor it imparts to the meat. This is especially great for chicken, as it helps create the classic grilled chicken taste you might associate with outdoor barbecues.
- Higher Temperatures: Charcoal grills tend to reach higher temperatures than gas grills, which is ideal for achieving a crispy skin on your chicken. The direct flames from the charcoal can caramelize and sear the chicken’s surface quickly.
- Enhanced Flavor from Drippings: As the chicken cooks, fat drips onto the hot charcoal, creating smoke that adds extra layers of flavor to your chicken. The fat that renders off your chicken also contributes to that rich, barbecue taste.
Cons of Charcoal Grilling for Chicken:
- Inconsistent Heat: One of the biggest challenges with charcoal grilling is achieving even heat distribution. It can be difficult to control the temperature of the grill, and hot spots can cause uneven cooking, especially when grilling delicate cuts like chicken breasts.
- Longer Setup and Cleanup: Charcoal grilling requires more time to set up and clean up. You need to light the charcoal and wait for it to reach the right temperature, and after grilling, you must dispose of the used charcoal. The process can be more time-consuming compared to gas or cast iron grills.
- Potentially More Messy: Charcoal grilling can be a bit messier than gas grilling due to ash and leftover charcoal residue. If you want a cleaner experience, gas or cast iron may be a better option.
4. Conclusion: Which Grill is Best for Your Chicken?
Each type of grill has its advantages, and your choice depends largely on what you’re looking for in terms of flavor, ease of use, and convenience.
- If you want consistent heat and a perfect crust on your chicken, a cast iron grill is an excellent choice, especially for indoor grilling.
- For convenience and precision, gas grills are ideal, giving you temperature control at the push of a button.
- For authentic smoky flavors and a true grilled barbecue experience, charcoal grills offer an unmatched flavor profile that’s perfect for outdoor grilling.
Ultimately, whether you use a cast iron grill, gas grill, or charcoal grill, each method can deliver delicious grilled chicken—it’s all about the technique and getting the right balance of heat, seasoning, and time!
The Best Grilled Chicken Recipes Without Marinade
Simple Salt and Pepper Grilled Chicken
When it comes to grilling chicken, sometimes less is more. Simple salt and pepper grilled chicken is a timeless recipe that lets the natural flavors of the chicken shine through without the need for complex marinades or heavy seasoning. This straightforward approach to grilling is not only easy but also delicious when done correctly. Let’s break down why salt and pepper are all you need for a flavorful, juicy grilled chicken.
1. The Power of Salt in Simple Grilled Chicken
Salt is the foundation of all great seasonings. It enhances the natural flavors of meat and helps retain moisture, which is crucial when grilling chicken. Here’s how salt works its magic:
- Flavor Enhancement: Salt does more than just make food taste salty—it helps to bring out the natural flavors of the chicken. When salt is applied to chicken, it draws out moisture from the surface, then reabsorbs it back into the meat along with the seasonings, creating a deep, savory flavor that penetrates the chicken.
- Moisture Retention: Salt helps the chicken retain moisture during the grilling process. As the heat of the grill works to cook the chicken, the salt creates a barrier on the surface that helps keep the meat juicy, preventing it from drying out.
- Balance: Salt provides balance to the other components in the dish, whether you’re serving the chicken with a side of grilled vegetables or a fresh salad. It provides a savory contrast that works beautifully with the more delicate flavors of chicken.
2. The Role of Pepper in Simple Grilled Chicken
Black pepper is another essential seasoning that plays a key role in simple salt and pepper grilled chicken. While it may seem understated, pepper adds the perfect punch of heat and complexity that complements the saltiness of the chicken:
- Mild Heat: Pepper gives the chicken a slight kick without overpowering the other flavors. The heat from the pepper enhances the savory taste of the chicken and helps to balance the saltiness, creating a well-rounded flavor profile.
- Aromatic: Freshly ground black pepper has a fragrant quality that adds an aromatic element to the chicken. Its earthy, woody notes bring out the richness of the grilled meat and make each bite more flavorful.
- Versatility: The beauty of using pepper in grilled chicken is its versatility. You can adjust the amount of pepper based on your personal heat preference. If you want a milder chicken, use a light sprinkle, or for more spice, go heavier on the pepper.
3. The Simplicity of Grilling with Salt and Pepper
One of the most attractive features of this grilled chicken recipe is its simplicity. With just salt, pepper, and chicken, you have a basic yet flavor-packed dish. Here’s how to make the most of this minimalist approach:
- Preparation: Start by seasoning your chicken with salt and freshly ground black pepper on both sides. Be generous but not excessive. Let the chicken sit for a few minutes to allow the salt to draw out moisture, then reabsorb it into the meat.
- Grilling Technique: Preheat your grill to medium-high heat. Place the chicken on the grill and cook for 5-7 minutes per side, depending on the cut and thickness of the chicken. Keep an eye on the chicken to prevent it from overcooking or burning, as this can dry out the meat.
- Searing for Flavor: As you grill the chicken, let the natural sugars in the meat caramelize and form a slight crust. This creates a beautiful sear that adds texture and flavor to the chicken while locking in moisture.
- Finishing Touch: Once the chicken is fully cooked, let it rest for a few minutes. This allows the juices to redistribute within the meat, ensuring a moist and flavorful bite. You can add a final light sprinkle of salt and pepper if desired, or even a squeeze of lemon for brightness.
4. Why Simple Salt and Pepper Grilled Chicken Works
The appeal of simple salt and pepper grilled chicken lies in its purity. By focusing on just two seasonings, you’re allowing the chicken to be the star of the dish, rather than masking its natural flavors. This recipe works particularly well with high-quality chicken, such as organic, free-range, or pasture-raised chicken, as it lets the flavor of the meat truly shine.
- Minimalist Approach: Sometimes the best things in life are the simplest. With no complicated marinades or fancy ingredients, you’re left with a dish that highlights the essence of grilled chicken. It’s a perfect choice for anyone who wants a quick and delicious meal without the fuss.
- Perfect for Any Occasion: Simple salt and pepper grilled chicken is a great option for a wide variety of occasions, from weeknight dinners to barbecues and family gatherings. It pairs well with a wide array of sides and sauces, making it an ideal base for a more customized meal.
5. Enhancing Simple Grilled Chicken: Optional Add-Ins
While salt and pepper may be all you need, there are plenty of ways to customize this basic recipe to suit your tastes:
- Herbs: Fresh herbs like rosemary, thyme, or oregano can be sprinkled on top of the chicken before or after grilling to add a fresh, aromatic flavor. You can also add dried herbs to your seasoning mix for a more intense flavor.
- Garlic: A little bit of garlic powder or fresh garlic can add an additional layer of depth to the chicken. Garlic and pepper work particularly well together to create a savory flavor profile.
- Lemon: A squeeze of fresh lemon juice before or after grilling adds a refreshing citrus kick that complements the salty seasoning and brings out the chicken’s natural sweetness.
6. Conclusion
Simple salt and pepper grilled chicken may be a basic recipe, but its simplicity is part of its beauty. With just two key ingredients—salt and pepper—you can create a flavorful, juicy chicken that is perfect for any occasion. Whether you’re grilling on a gas grill, charcoal, or cast iron, this method allows you to focus on the natural taste of the chicken while still adding the right amount of seasoning. With a few simple techniques, you can enjoy a delicious, no-fuss grilled meal that never disappoints.
Dry Rub Grilled Chicken Thighs
Grilled chicken thighs with a dry rub are a game-changer when it comes to flavor, offering a rich and savory experience without the need for marinades. A dry rub is a mixture of spices and herbs applied to the surface of the chicken before grilling, creating a flavorful crust while keeping the meat juicy and tender. This method of preparation allows for maximum flavor without the complexity of marinades, and it’s perfect for chicken thighs, which are naturally more flavorful and tender compared to other cuts like chicken breasts.
Let’s dive deeper into the process and the reasons why dry rub grilled chicken thighs are a fantastic option.
1. What Is a Dry Rub?
A dry rub is a blend of seasonings, spices, and herbs that are massaged into the surface of the chicken before cooking. Unlike marinades that use liquid ingredients to tenderize and flavor the meat, a dry rub relies solely on the power of dry ingredients to create a flavorful crust. This technique is ideal for grilling because it locks in flavor while allowing the chicken to achieve a crispy, caramelized exterior.
Some typical ingredients in a dry rub for chicken thighs include:
- Paprika: Adds a sweet, smoky flavor that enhances the overall taste.
- Brown sugar: A touch of sweetness that helps caramelize the chicken during grilling.
- Garlic powder and onion powder: Bring out a savory, aromatic flavor.
- Cayenne pepper or chili powder: Adds a mild heat, giving the chicken an extra kick.
- Salt and black pepper: Essential for flavor enhancement and balancing the spice blend.
The beauty of a dry rub is its customizability—you can adjust the ratios and ingredients to suit your taste, whether you prefer a sweet, smoky, spicy, or savory profile.
2. Why Chicken Thighs Are Perfect for Dry Rubs
While dry rubs work well on various cuts of chicken, chicken thighs are particularly suited for this method for several reasons:
- Higher Fat Content: Chicken thighs are naturally more moist and juicy due to their higher fat content. The dry rub enhances the flavor of the skin while allowing the meat to stay tender and flavorful throughout the grilling process.
- Rich Flavor: Thighs have a richer, more intense flavor compared to chicken breasts, and the dry rub complements this flavor profile perfectly. The seasoning forms a crust that enhances the natural taste of the chicken without overwhelming it.
- Even Cooking: Chicken thighs are less prone to drying out on the grill, making them more forgiving for grilling at higher temperatures with a dry rub. The seasoning forms a protective barrier on the skin, helping to retain moisture and achieve that perfect grilled texture.
3. Preparing Dry Rubbed Chicken Thighs for Grilling
To achieve the best results with dry rub grilled chicken thighs, proper preparation is key. Here’s how to prepare your chicken and seasoning for grilling:
- Dry the Chicken: Pat your chicken thighs dry with paper towels. Removing excess moisture helps the dry rub stick better to the chicken, creating a flavorful, crispy exterior when grilled.
- Apply the Dry Rub: Generously apply the dry rub to the chicken thighs, making sure to cover both the skin and the meat underneath. Gently massage the seasoning into the surface to allow it to adhere properly. Don’t forget to season both sides for an even flavor distribution.
- Rest the Chicken: Allow the seasoned chicken thighs to rest for at least 15–30 minutes before grilling. This allows the flavors to marinate (even though it’s not a traditional marinade), and the salt in the dry rub will help draw out some moisture, which reabsorbs into the meat, enhancing the flavor.
4. Grilling Techniques for Perfect Dry Rub Chicken Thighs
Grilling chicken thighs with a dry rub requires the right balance of heat and timing to achieve the perfect texture. Here’s how to grill your chicken thighs for crispy, flavorful results:
- Preheat Your Grill: Get your grill to a medium-high heat, around 375°F to 400°F. This ensures that the chicken will cook evenly without burning the dry rub.
- Direct vs. Indirect Heat: To get a crispy skin and juicy interior, start by grilling the chicken thighs on direct heat for the first few minutes. Place the thighs skin-side down to get a nice char and crispy texture. After about 4-5 minutes, move the chicken to indirect heat to allow the thighs to cook through without overcooking or burning the outside.
- Flip Occasionally: For even cooking, flip the thighs every 5–7 minutes. Keep an eye on the chicken to avoid flare-ups, especially if you’re using charcoal. You want the dry rub to caramelize and form a crust, but not burn.
- Internal Temperature: Use a meat thermometer to check that the internal temperature of the chicken thighs has reached 165°F. Chicken thighs are more forgiving than breasts, but ensuring they are fully cooked is key to achieving the right texture.
5. Enhancing Your Dry Rub Grilled Chicken Thighs
While the dry rub is the star of the show, there are a few ways to enhance the flavor even further:
- Add Fresh Herbs: After grilling, consider topping your chicken thighs with fresh herbs like cilantro, parsley, or rosemary for an extra burst of flavor and color.
- Lemon Zest or Juice: A squeeze of fresh lemon or lime juice after grilling can provide a bright, zesty finish that balances the richness of the chicken thighs.
- Serve with a Sauce: Although dry rub grilled chicken thighs don’t require a marinade, you can complement the flavors with a side sauce like barbecue sauce, garlic butter, or a tangy yogurt-based dip.
- Pair with Grilled Vegetables: Serve your dry rub grilled chicken thighs alongside grilled vegetables like asparagus, zucchini, or a corn on the cob for a well-rounded meal that complements the flavors of the chicken.
6. Conclusion
Dry rub grilled chicken thighs are a fantastic way to enjoy flavorful, juicy chicken with minimal preparation. The combination of spices, herbs, and proper grilling techniques creates a delicious crust while keeping the meat tender and moist. Whether you’re grilling for a family dinner or hosting a barbecue, this recipe is an easy yet impressive option that delivers great results every time. By using the right dry rub blend, grilling techniques, and pairing options, you can create a perfectly seasoned and mouthwatering chicken dish that everyone will love.
Herb and Spice Grilled Chicken Breast
Grilled chicken breasts are a lean protein that can sometimes lack the rich flavor of other cuts like thighs, but with the right combination of herbs and spices, they can be transformed into a flavor-packed meal. A well-balanced herb and spice mix adds depth, complexity, and a tantalizing fragrance to the chicken, making it a delicious, healthy choice for any grill enthusiast. The beauty of herb and spice grilled chicken breast lies in its simplicity: a few key ingredients and techniques can turn a basic chicken breast into a savory masterpiece.
Let’s explore the components that make herb and spice grilled chicken breast so irresistible, and how to make the most of this versatile grilling method.
1. Choosing the Right Herbs for Chicken Breast
Herbs play a crucial role in enhancing the flavor of grilled chicken breast. They can provide fresh, fragrant notes that complement the natural taste of the chicken while making it less dry and more aromatic. The key is to choose herbs that are light but full of flavor, as chicken breast has a milder taste compared to darker cuts of meat. Here are some of the best herbs to use:
- Thyme: One of the most classic herbs for grilled chicken, thyme adds a subtle earthy, savory flavor that pairs perfectly with the mild taste of chicken. It’s versatile and can be used fresh or dried.
- Rosemary: Known for its robust and slightly piney aroma, rosemary is perfect for giving grilled chicken breast a more intense, savory taste. Use it sparingly, as its flavor can be quite potent.
- Oregano: This herb has a slightly bitter, warm flavor that works particularly well with grilled chicken. Whether fresh or dried, oregano complements other Mediterranean herbs and spices, making it a great choice for chicken breast.
- Basil: For a fresh and slightly sweet flavor, basil is an excellent herb for grilled chicken. It pairs especially well with Italian-inspired spices and is a must for anyone looking to add an aromatic touch to their dish.
- Parsley: Parsley brings a fresh, grassy note that brightens up grilled chicken. It’s mild enough to complement the stronger herbs and spices in the mix, without overpowering the dish.
2. Choosing the Right Spices for Chicken Breast
Alongside fresh or dried herbs, spices are essential for creating a bold flavor profile on your grilled chicken breast. The combination of herbs and spices should create a balanced taste that highlights the chicken while adding some complexity. Here are some great options:
- Paprika: Whether you prefer sweet paprika for a mild, smoky flavor or smoked paprika for a deeper, more intense taste, this spice adds warmth and richness to the chicken. It also contributes a beautiful color to the grilled chicken.
- Garlic Powder: Garlic powder is a must-have in most seasoning blends for grilled chicken. Its subtle, savory flavor complements the herbs and adds depth to the chicken, without the intensity of raw garlic.
- Onion Powder: Much like garlic powder, onion powder provides a mild savory sweetness that enhances the overall taste of the chicken. It’s a great addition to the spice blend for balancing out stronger flavors.
- Cumin: Known for its slightly smoky, earthy, and warm flavor, cumin is a fantastic spice to use in herb and spice grilled chicken breast. It adds depth without overpowering the other ingredients, making it a favorite in Mediterranean and Middle Eastern-inspired seasoning mixes.
- Chili Powder: If you like a bit of heat in your grilled chicken, chili powder is an excellent spice to include. It adds a moderate spicy kick that gives the chicken a flavorful depth without being overwhelming.
- Black Pepper: A dash of freshly ground black pepper is essential to round out any seasoning blend. It adds spiciness, sharpness, and enhances the aromatic qualities of the herbs and spices.
3. Creating the Perfect Herb and Spice Blend for Chicken Breast
The secret to flavorful herb and spice grilled chicken breast lies in the perfect seasoning blend. The goal is to balance savory, earthy, spicy, and fresh notes to bring out the best in the chicken breast without overwhelming its natural flavor. Here’s a simple and effective herb and spice blend to try:
- 2 teaspoons paprika (for warmth and color)
- 1 teaspoon garlic powder (for savory depth)
- 1 teaspoon onion powder (for subtle sweetness)
- 1 teaspoon dried thyme or rosemary (for herbal aroma)
- 1 teaspoon dried oregano (for Mediterranean flavor)
- 1/2 teaspoon cumin (for warmth and earthiness)
- 1/4 teaspoon black pepper (for subtle heat)
Mix these ingredients in a small bowl, then rub generously over the chicken breasts, making sure to coat both sides evenly. Let the chicken sit for about 15–30 minutes to allow the flavors to meld, but you can also prep the chicken ahead of time and let it marinate in the fridge for a few hours.
4. Grilling Techniques for Herb and Spice Chicken Breast
Now that you have your herb and spice blend ready, it’s time to grill the chicken breasts. While grilling chicken breast is simple, there are a few key techniques that will help you get moist, flavorful, and perfectly cooked chicken every time:
- Preheat Your Grill: Make sure your grill is preheated to medium-high heat (around 375°F to 400°F). A properly heated grill ensures that the chicken cooks quickly and evenly, creating a beautiful sear on the outside while keeping the inside juicy.
- Oil the Grill Grates: Before placing the chicken on the grill, oil the grates with a paper towel dipped in vegetable oil. This helps prevent sticking and promotes a nice, crisp texture.
- Use Direct and Indirect Heat: For the best results, start by grilling the chicken breasts on direct heat for 4–5 minutes per side to get that flavorful sear. After that, move the chicken to indirect heat to finish cooking through without drying out. This method helps maintain moisture and tenderness.
- Check Internal Temperature: The best way to ensure your grilled chicken breast is perfectly cooked is by using a meat thermometer. The internal temperature should reach 165°F. If you don’t have a thermometer, you can also check for juices running clear when you cut into the chicken.
- Let the Chicken Rest: After removing the chicken from the grill, let it rest for 5–10 minutes. This allows the juices to redistribute throughout the meat, resulting in juicier chicken breasts.
5. Enhancing Your Herb and Spice Grilled Chicken Breast
While the herb and spice mix is the star of the show, there are plenty of ways to enhance the flavor of your grilled chicken:
- Add Fresh Herbs After Grilling: For an extra pop of freshness, sprinkle freshly chopped herbs such as basil, parsley, or cilantro on the chicken just before serving. This gives a burst of color and fragrance that complements the spices.
- Pair with a Sauce: If you prefer a bit of sauce with your grilled chicken, a garlic butter sauce, yogurt-based sauce, or pesto can add richness and balance to the herbs and spices.
- Serve with Grilled Vegetables: Pair your herb and spice grilled chicken with a side of grilled vegetables like zucchini, bell peppers, or asparagus for a well-rounded, healthy meal.
- Lemon or Lime Zest: A little citrus zest on top of the chicken before serving can bring a fresh, tangy element that cuts through the richness of the spices, providing a refreshing contrast.
6. Conclusion
Herb and spice grilled chicken breast is a delicious and versatile dish that allows you to explore a variety of flavors while keeping the chicken juicy and tender. By using a simple yet flavorful blend of herbs and spices, you can easily create a mouthwatering grilled chicken that stands out at any cookout or family dinner. Whether you like it mildly seasoned or with a spicy kick, this method offers endless possibilities for customizations, making it a go-to choice for grilling season and beyond.
Smoked Paprika and Garlic Grilled Drumsticks
Grilled drumsticks are a popular choice for any grilling enthusiast. Their rich flavor and juicy texture make them an excellent option for a flavorful, satisfying meal. One of the most impactful ways to season chicken drumsticks is with smoked paprika and garlic, which adds a delicious smoky depth and savory complexity to the meat. The combination of these two ingredients helps elevate the chicken, giving it a mouthwatering aroma and a slightly crispy, caramelized exterior.
In this section, we will dive deeper into the benefits and techniques of grilling drumsticks with smoked paprika and garlic, offering tips on how to get the most out of these ingredients.
1. Why Smoked Paprika and Garlic Are Perfect for Grilled Drumsticks
Smoked paprika and garlic are an ideal match for grilled drumsticks for several reasons:
- Smoked Paprika: This variety of paprika is made from dried, smoked peppers, giving it a distinct smoky flavor that enhances grilled meats like chicken. It adds an earthy, savory warmth and a subtle depth that pairs perfectly with the natural flavors of the drumsticks. Smoked paprika is also mildly sweet and not too spicy, making it a versatile seasoning that works well with many other spices.
- Garlic: Garlic is a universal ingredient known for its rich, aromatic flavor. Whether using fresh garlic, garlic powder, or garlic granules, it adds a savory, slightly pungent note that complements the smokiness of the paprika and enhances the overall taste of the chicken. Garlic pairs wonderfully with almost any seasoning and brings a warmth and umami flavor that will leave everyone wanting more.
Together, these two ingredients create a balanced flavor profile that’s smoky, savory, and irresistibly delicious, making them a perfect pairing for grilled drumsticks.
2. Preparing Smoked Paprika and Garlic Grilled Drumsticks
Before grilling, it’s essential to properly prepare your drumsticks by seasoning them well and allowing the flavors to soak in. Here’s how to get started:
- Pat the Drumsticks Dry: Before applying any seasoning, pat your drumsticks dry with a paper towel. This step removes excess moisture, ensuring the seasoning sticks better and promoting a crispier, more flavorful skin.
- Seasoning the Chicken: Combine the smoked paprika and garlic with a few other simple ingredients to create a delicious dry rub or marinade. Here’s a basic seasoning mix:
- 2 teaspoons smoked paprika
- 1 teaspoon garlic powder (or 2–3 minced garlic cloves)
- 1 teaspoon onion powder
- 1/2 teaspoon salt
- 1/2 teaspoon black pepper
- 1 tablespoon olive oil (optional, for moisture and binding)
- Marinate or Rest: Allow the seasoned drumsticks to rest for about 15–30 minutes before grilling. If you want to take the flavor to the next level, marinate the chicken for a few hours or overnight in the fridge. This allows the smoked paprika and garlic to really infuse the meat, making the flavor even more intense.
3. Grilling Techniques for Smoked Paprika and Garlic Drumsticks
Grilling drumsticks requires a balance between high heat to create a crispy, flavorful skin and indirect heat to ensure the chicken cooks through evenly. Follow these steps to achieve perfectly grilled drumsticks:
- Preheat the Grill: Aim for a medium-high heat on your grill, around 375°F to 400°F. A grill with a two-zone setup works well for this recipe: one side with direct heat for searing the skin and another side with indirect heat for cooking the chicken through.
- Sear the Drumsticks: Start by placing the drumsticks over direct heat on the grill. This will help achieve that delicious crisp, charred exterior. Grill the drumsticks for about 3–5 minutes per side, turning occasionally, until the skin starts to brown and crisp up.
- Move to Indirect Heat: After the initial sear, move the drumsticks to the indirect heat zone to finish cooking. Cover the grill and cook the drumsticks for another 20–25 minutes, turning them once or twice. The internal temperature of the chicken should reach 165°F to ensure they are cooked through.
- Baste with Sauce (Optional): If you prefer a glaze or sauce on your drumsticks, you can brush the chicken with a barbecue sauce, honey garlic glaze, or lemon butter during the last few minutes of cooking. This will allow the sauce to set and create a nice, sticky finish while preserving the flavor of the smoked paprika and garlic.
- Check for Doneness: Use a meat thermometer to check the internal temperature of the drumsticks. It should reach 165°F at the thickest part of the meat. If you don’t have a thermometer, you can also check by piercing the chicken with a fork—the juices should run clear.
4. Enhancing Smoked Paprika and Garlic Grilled Drumsticks
While the smoked paprika and garlic dry rub is rich enough on its own, there are a few ways to elevate the flavors even further:
- Fresh Herbs: After grilling, garnish the drumsticks with freshly chopped herbs like parsley, cilantro, or rosemary for an added layer of freshness and color. The herbs complement the smoky flavor and brighten the dish.
- Lemon Zest or Juice: A squeeze of fresh lemon juice or a sprinkle of lemon zest can add a zesty, tangy contrast to the smoky, savory flavor of the chicken, cutting through the richness and adding a bright finish.
- Side Dishes: Serve your smoked paprika and garlic grilled drumsticks with side dishes that complement the smoky flavor. Options like grilled corn on the cob, roasted vegetables, potato salad, or a green salad with a tangy dressing can make the meal more well-rounded.
- Spicy Kick: If you like your drumsticks with a bit more heat, consider adding a pinch of cayenne pepper, red pepper flakes, or a drizzle of hot sauce to your seasoning mix or as a garnish after grilling.
5. Troubleshooting and Tips for Perfect Smoked Paprika and Garlic Drumsticks
- Avoid Burning the Paprika: Smoked paprika is relatively mild but can still burn if exposed to direct heat for too long. When grilling, make sure you don’t cook the drumsticks over too-high heat for extended periods, especially after the initial sear.
- Even Cooking: Drumsticks vary in size, so some may cook faster than others. Rotate the drumsticks frequently during the grilling process to ensure they cook evenly on all sides.
- Moisture: If you find that your drumsticks are drying out, you can baste them with a little olive oil or butter during the grilling process to help retain moisture and enhance the richness of the flavor.
6. Conclusion
Smoked paprika and garlic grilled drumsticks are a flavorful and simple way to take your chicken to the next level. The combination of smoky paprika and aromatic garlic enhances the chicken’s natural flavor, creating a savory, well-seasoned meal that everyone will love. Whether you’re hosting a BBQ or just grilling dinner for your family, this recipe provides a delicious, easy-to-make option that results in perfectly charred, juicy drumsticks with a mouthwatering smoky flavor. Pair them with a refreshing side dish or sauce, and you’ll have a meal that’s both comforting and full of complex flavors.
Pro Tips for Perfectly Grilled Chicken Every Time
How to Prevent Dryness and Retain Juiciness in Grilled Chicken
Grilling chicken can sometimes result in dryness, which can make the meat tough and unappealing. To achieve juicy, flavorful chicken every time, it’s essential to follow specific techniques that prevent moisture loss during the grilling process. In this section, we’ll explore the best strategies to ensure your chicken stays tender and juicy, without sacrificing flavor.
1. Choose the Right Cut of Chicken
Not all cuts of chicken are created equal when it comes to juiciness. Some parts of the chicken naturally retain moisture better than others. Here’s a breakdown:
- Bone-in, Skin-on Cuts: Bone-in chicken, such as thighs and drumsticks, tends to retain moisture better than boneless cuts. The bone helps insulate the meat, preventing it from drying out, while the skin keeps the juices locked inside. It also adds flavor and texture during the grilling process.
- Chicken Breasts: While chicken breasts are lean and healthy, they are more prone to dryness due to their low fat content. To avoid dry breast meat, consider opting for bone-in, skin-on breasts or brining them before grilling to help retain moisture.
2. Brining Chicken Before Grilling
Brining is one of the most effective methods to ensure your chicken remains juicy. The process involves soaking the chicken in a mixture of salt and water, which helps the meat absorb moisture and flavor before cooking.
- Why Brining Works: The salt in the brine helps the chicken absorb water through osmosis, causing the meat to hold onto moisture during cooking. This process also helps the proteins in the chicken break down, resulting in a more tender texture.
- Simple Brine Recipe: For a basic brine, combine 1/4 cup salt with 4 cups of water. You can also add herbs, spices, or sweeteners (like sugar or honey) to enhance the flavor. Soak your chicken for about 30 minutes to 2 hours in the brine, depending on the size of the cut. Be cautious not to brine for too long, as it could make the chicken too salty.
3. Avoid Overcooking
One of the main culprits of dry chicken is overcooking. The internal temperature of the chicken needs to reach a safe level, but if it exceeds this temperature, the meat will lose moisture and become tough. For grilled chicken, the general rule of thumb is:
- Chicken Breasts: Aim for an internal temperature of 165°F (75°C) for perfectly cooked, juicy chicken breasts. Remove the chicken from the grill just before it reaches this temperature, as it will continue to cook from residual heat.
- Bone-in Chicken: For bone-in cuts like thighs and drumsticks, cook until the internal temperature reaches 165°F (75°C) at the thickest part, ensuring the meat is fully cooked but still juicy.
- Use a Meat Thermometer: The best way to avoid overcooking is by using a meat thermometer. This tool provides an accurate reading of the chicken’s internal temperature, helping you achieve a perfectly cooked, juicy piece of meat.
4. Use Direct and Indirect Heat Cooking Techniques
Managing the grill temperature is essential for keeping your chicken juicy. Using a two-zone grilling method—a combination of direct and indirect heat—can help retain moisture while also achieving a perfect, crispy exterior.
- Direct Heat: Start by searing your chicken on direct heat for a few minutes on each side. This will create a golden, crispy skin that locks in the juices.
- Indirect Heat: After the initial sear, move the chicken to indirect heat to finish cooking. This allows the chicken to cook more gently and evenly, preventing it from drying out while reaching the optimal internal temperature.
The combination of direct heat for searing and indirect heat for cooking ensures a perfect balance of crispy skin and juicy, tender meat.
5. Baste with Oil or Marinades During Grilling
Basting your chicken during the grilling process helps maintain moisture and enhances the flavor. Applying a thin layer of oil or a marinade throughout grilling prevents the chicken from drying out. Here are a few options:
- Olive Oil: Brushing the chicken with olive oil helps create a moisture barrier, ensuring the meat stays juicy. It also aids in developing a flavorful, crispy skin. Herbed olive oils or garlic-infused oils can also add additional flavor.
- Butter: If you want an extra rich finish, basting the chicken with melted butter can enhance flavor and keep the chicken moist. Be sure to apply it during the final minutes of grilling to prevent burning.
- Marinades: While your goal is to skip marinating, a light baste with a thin marinade during grilling can still help enhance juiciness. Be sure to apply the marinade towards the end of the cooking process to avoid charring or burning.
6. Rest the Chicken Before Serving
Resting your chicken after grilling is one of the most important steps to retain its juices. As the chicken cooks, its juices are drawn toward the center. Allowing the chicken to rest for 5–10 minutes after grilling gives the juices time to redistribute throughout the meat, ensuring each bite is as juicy as possible.
To rest your chicken:
- Remove it from the grill and place it on a cutting board or serving platter.
- Tent it loosely with foil to keep the chicken warm while it rests.
- After resting, slice or serve the chicken, and enjoy the juiciness in every bite.
7. Consider Using a Thermometer or Grilling Tool to Maintain Moisture
Some advanced grilling tools, such as grill probes or temperature-controlled grills, can help you monitor the internal temperature and moisture levels of your chicken throughout the cooking process. These tools ensure that your chicken is cooked at the perfect temperature without overcooking, helping to prevent dryness and promoting juiciness.
Conclusion
Preventing dryness and retaining juiciness in grilled chicken is a combination of proper preparation, the right grilling techniques, and attention to detail. By choosing the right cuts, brining the meat, avoiding overcooking, and using indirect heat, you can ensure that your chicken remains tender and flavorful. With the right seasoning and basting, you can take your grilled chicken to the next level, ensuring every bite is juicy and satisfying.
Ideal Internal Temperature for Grilled Chicken
Achieving the perfect internal temperature for grilled chicken is crucial to ensure that the meat is both safe to eat and deliciously juicy. Grilling chicken to the ideal temperature not only helps avoid the risk of undercooking but also prevents overcooking, which can lead to dry, tough meat. Here, we’ll dive deeper into the importance of getting the internal temperature just right, and how to monitor it for optimal results.
1. The Safe Internal Temperature for Chicken
The U.S. Department of Agriculture (USDA) sets the safe internal cooking temperature for poultry at 165°F (75°C). This is the temperature at which harmful bacteria such as Salmonella are effectively killed, ensuring that the chicken is safe to eat.
However, it’s important to note that the temperature can continue to rise even after the chicken is removed from the grill. This residual heat, known as carryover cooking, can increase the internal temperature by another 5-10°F, which means the chicken may reach a perfect final temperature even if you pull it off the grill slightly earlier.
2. Different Cuts and Their Ideal Temperatures
While 165°F is the universally recommended temperature for chicken, different cuts of chicken may require slight adjustments in cooking time due to their varying thickness and fat content.
- Chicken Breasts: Because chicken breasts are lean and have less fat, they cook quickly and can dry out if overcooked. 165°F (75°C) is the ideal target temperature. For an extra layer of protection, remove the breasts from the grill at 160°F (71°C) and let them rest. During this resting time, the temperature will naturally rise to 165°F.
- Bone-in, Skin-on Chicken: Bone-in cuts like thighs, drumsticks, or wings are a little more forgiving due to their higher fat content. The safe internal temperature is still 165°F, but these cuts will remain juicier if removed from the grill at 160°F (71°C). The bone helps retain moisture, allowing the chicken to stay tender while finishing cooking off the grill.
- Chicken Thighs: Dark meat, such as chicken thighs, can actually be cooked to 175°F – 180°F (80°C – 82°C) for the best texture. At this higher temperature, the collagen in the thighs breaks down, resulting in tender, flavorful meat.
3. How to Accurately Measure the Internal Temperature
To ensure you’re reaching the perfect internal temperature, it’s essential to use a meat thermometer. This tool allows you to accurately monitor the temperature of the chicken without having to cut it open and risk losing valuable juices.
- Instant-Read Thermometers: These are the quickest and most convenient option. Simply insert the thermometer into the thickest part of the chicken, avoiding bones or fatty areas, for an accurate reading.
- Wireless or Bluetooth Thermometers: For more advanced grilling, you can use wireless meat thermometers that sync with your smartphone or grill. These allow you to monitor the internal temperature from a distance, so you don’t need to hover over the grill.
- Probe Thermometers: For prolonged grilling, probe thermometers can stay inserted in the chicken throughout the cooking process. These thermometers are great for larger cuts of meat and can help you keep track of the temperature without opening the grill frequently.
4. Carryover Cooking: The Importance of Resting Your Chicken
Once you remove your chicken from the grill, it’s essential to allow it to rest for at least 5 to 10 minutes. During this resting period, the chicken continues to cook as residual heat spreads throughout the meat. This carryover cooking helps ensure that the chicken reaches its final internal temperature without becoming overcooked or dry.
Resting also allows the juices, which were pushed to the center of the meat during grilling, to redistribute throughout the chicken, resulting in a more moist and flavorful bite.
5. Tips for Avoiding Overcooking
Overcooking is one of the most common mistakes when grilling chicken, leading to dry, rubbery meat. To prevent this, consider the following tips:
- Don’t rely on cooking times alone: Cooking times vary depending on the heat of your grill and the size of your chicken cuts. Instead, focus on checking the internal temperature regularly.
- Use two-zone cooking: Start by searing the chicken over direct heat to lock in juices and create a crispy exterior, then move it to indirect heat to finish cooking at a gentler temperature. This reduces the chances of overcooking the outside while waiting for the inside to reach the proper temperature.
- Monitor closely: Since chicken can go from perfectly cooked to overcooked quickly, it’s a good idea to check the internal temperature frequently, especially with lean cuts like chicken breasts.
6. Resting and Slicing the Chicken
Once your chicken reaches the desired temperature, don’t rush to cut into it right away. Allow it to rest for a few minutes. Cutting too soon can cause all the juices to spill out, resulting in dry meat. When ready to slice, always cut against the grain to ensure a tender bite.
Conclusion
The ideal internal temperature for grilled chicken is crucial for achieving juicy, flavorful results every time. By aiming for 165°F (75°C) for most cuts, you can ensure both food safety and optimal flavor. Remember to allow your chicken to rest before slicing, and use a thermometer for accuracy. By following these guidelines, you’ll avoid the pitfalls of overcooking and ensure your grilled chicken is always tender, juicy, and delicious.
Resting Time After Grilling for Best Texture
Resting chicken after grilling is an often overlooked yet crucial step in the cooking process. Allowing your chicken to rest helps improve its texture, juiciness, and overall flavor. This short period of time plays a pivotal role in ensuring the meat doesn’t lose its moisture and that every bite is tender and succulent. Let’s dive deeper into why resting your grilled chicken is essential and how to do it effectively for the best results.
1. The Science Behind Resting Meat
When chicken is cooking, the heat causes the muscle fibers in the meat to contract and push out moisture. If you slice into the chicken immediately after grilling, all of that moisture escapes, leaving the meat dry and tough. Resting allows the muscle fibers to relax, which in turn gives the juices time to redistribute throughout the meat.
During this period, the internal temperature continues to rise slightly from carryover cooking, but more importantly, the juices that were squeezed out during grilling return to the center of the meat. The resting period helps lock in these juices, ensuring that the chicken stays moist and tender.
2. How Long Should You Let Chicken Rest?
The ideal resting time for grilled chicken varies depending on the size and cut of the meat, but generally, a 5 to 10-minute rest is sufficient for most cuts:
- Chicken Breasts: Rest for 5 minutes. Since boneless, skinless chicken breasts are lean, they don’t need as long to relax. A short rest allows the juices to redistribute without losing too much moisture.
- Bone-in Cuts (Thighs, Drumsticks, Wings): Rest for 8 to 10 minutes. Bone-in chicken benefits from a longer resting time due to the denser texture and larger size. The bone also helps to insulate the meat, keeping it warm and juicy longer.
- Whole Chicken or Large Cuts: For a whole grilled chicken or large cuts like a spatchcocked bird, allow it to rest for up to 15 minutes. This gives the juices time to fully redistribute throughout the meat, ensuring that every bite is as moist and flavorful as possible.
3. Why Resting Improves Texture
Grilling chicken to the perfect internal temperature ensures that the meat is safe to eat and flavorful, but resting is the final key to achieving optimal texture. Here’s how resting enhances the eating experience:
- Tenderness: Resting the chicken allows the muscle fibers to soften and reabsorb some of the moisture lost during grilling. This results in a more tender texture when you cut into the meat.
- Juiciness: The most noticeable benefit of resting is the improved juiciness of the chicken. During grilling, moisture moves away from the surface and toward the center of the meat. If you slice the chicken too soon, that moisture is lost. Resting allows the juices to redistribute and settle evenly throughout the meat, leading to a juicy bite every time.
- Flavor: The natural flavors of the chicken are enhanced during resting. As the juices return to the meat, they carry with them the flavors from any seasoning, dry rubs, or marinades you’ve used, ensuring that every bite is well-seasoned and flavorful.
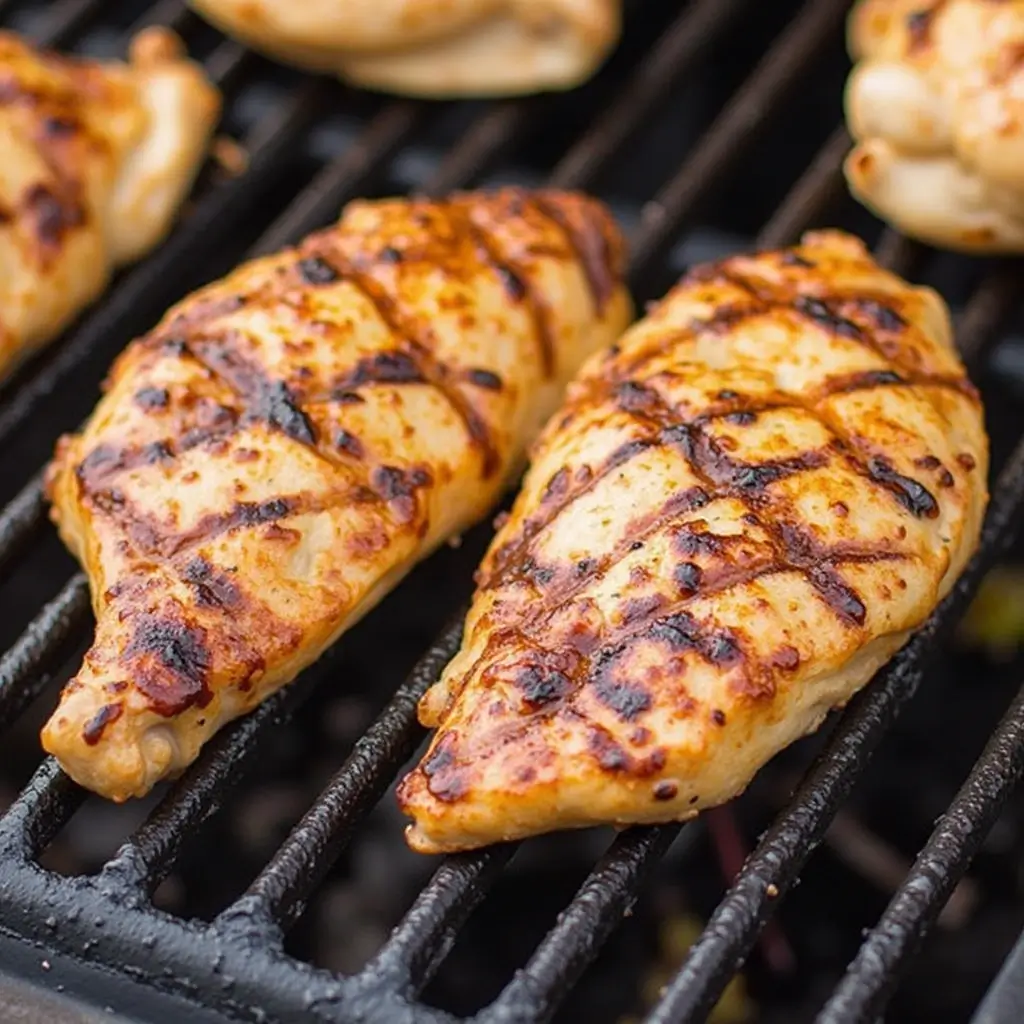
4. How to Rest Chicken Correctly
To get the most out of your resting period, follow these steps:
- Remove from the Grill: As soon as your chicken has reached the desired internal temperature (usually 165°F or higher for most cuts), remove it from the grill. Place it on a clean cutting board or serving platter.
- Cover Loosely with Foil: Lightly tent the chicken with aluminum foil. This helps keep the chicken warm while it rests, but be careful not to wrap it too tightly. You want to avoid trapping too much steam, which can make the skin soggy if it’s crispy.
- Let it Rest Uncovered for Larger Cuts: For larger cuts, such as a whole grilled chicken or large thighs, it’s better to rest them without covering them completely. This allows the chicken to cool slightly and settle without losing too much heat.
- Don’t Rush: While it might be tempting to slice into your chicken right away, giving it that extra 5 to 10 minutes is key. It’s during this time that the magic happens, transforming your grilled chicken from good to great.
5. Resting Time and the Type of Chicken Skin
Resting is not just about the meat; it also plays an important role in the texture of the chicken skin. If you’ve grilled skin-on chicken (such as thighs or drumsticks), resting helps maintain the crispiness of the skin, as long as the chicken isn’t wrapped too tightly in foil.
- Crispy Skin: The outer skin of the chicken will stay crispy and flavorful if you rest it properly. When you cut into the chicken too early, the skin can lose its crunch due to the release of moisture from the meat.
- Moisture Retention: The skin acts as a barrier that keeps the juices inside, and resting ensures that the chicken doesn’t lose moisture that would otherwise be forced out when cutting into it.
6. Benefits of Resting for Grilled Chicken Texture
- Preventing Dryness: Grilled chicken can easily become dry if cut too soon, but resting allows the meat to retain more of its natural juices. This step is essential for keeping the chicken moist and flavorful.
- Achieving Perfect Slices: Resting gives you time to slice your chicken properly without the juices spilling out immediately. Whether you’re serving whole pieces or slicing breasts or thighs, a rested chicken will hold together better and present a cleaner cut.
- Better Presentation: Resting helps ensure your grilled chicken looks as good as it tastes. When you slice into it after resting, the meat holds its shape, and the juices stay inside rather than pooling onto the plate.
7. Resting vs. Cutting Into Chicken Right Away
It might be tempting to serve chicken straight from the grill, especially when you’re hungry or serving guests. However, cutting into chicken too soon can result in loss of moisture and compromised texture. Resting doesn’t just improve the juiciness and flavor; it also helps maintain the integrity of the meat and skin. Don’t skip this step, and you’ll be rewarded with perfectly cooked, tender, juicy chicken every time.
Conclusion
Resting your grilled chicken for just a few minutes can significantly enhance its texture, juiciness, and flavor. By allowing the meat to relax and redistribute its juices, you’ll ensure a tender, flavorful, and satisfying meal. Whether you’re grilling chicken breasts, thighs, or a whole bird, this small but essential step is key to perfecting your grilling technique and creating chicken that’s both safe to eat and wonderfully juicy. So, next time you fire up the grill, remember: that patience is key for achieving the best-grilled chicken texture!