
Why You’ll Love This Honey Mustard Chicken Recipe
Honey mustard chicken is the perfect blend of sweet, tangy, and savory flavors, making it a family-favorite dish that’s easy to prepare. Whether you’re looking for a quick weeknight meal or a flavorful dish to impress guests, this recipe delivers juicy, tender chicken coated in a rich honey mustard sauce.
In this step-by-step guide, we’ll walk you through everything you need to know to make the best honey mustard chicken at home. From choosing the right ingredients to mastering different cooking methods—baking, grilling, or pan-searing—you’ll learn how to achieve the perfect balance of flavors in every bite. Plus, we’ll share expert tips on marinades, side dishes, and storage so you can enjoy this dish any time.
Let’s dive into this delicious, foolproof recipe! 🍯🍗
The Perfect Balance of Sweet, Tangy, and Savory Flavors
One of the reasons honey mustard chicken is such a crowd-pleaser is its irresistible flavor combination. The harmony between sweet, tangy, and savory elements makes this dish both comforting and exciting for your taste buds. Here’s how each component plays a crucial role in achieving that perfect balance:
1. Sweetness from Honey
Honey is the star of this dish, providing natural sweetness that balances the acidity of mustard. It also helps create a caramelized glaze on the chicken when cooked, adding depth and a slightly sticky texture that enhances every bite. The thicker the honey, the richer the sauce will be, so opting for high-quality raw honey can make a difference in flavor.
2. Tanginess from Mustard
The bold tangy kick comes from a combination of Dijon mustard and yellow mustard. Dijon mustard has a smooth, slightly spicy, and complex flavor, while yellow mustard brings a milder tang with a hint of vinegar. Together, they provide the perfect contrast to the sweetness of honey, ensuring the dish isn’t overly sugary.
3. Savory Depth from Seasonings
To round out the flavor profile, savory seasonings like garlic powder, paprika, salt, and fresh thyme enhance the dish with warmth and umami. Garlic powder adds an aromatic depth, while paprika brings a touch of smokiness. A bit of lemon juice or apple cider vinegar can further balance the flavors, preventing the sauce from being too heavy.
4. The Magic of Cooking Method
The way you cook honey mustard chicken also plays a role in its flavor development. Grilling brings a smoky char, enhancing the savory elements, while baking allows the sauce to thicken and infuse into the chicken. Pan-searing creates a beautiful golden crust, locking in juices for maximum flavor.
This delicate balance of sweet, tangy, and savory makes honey mustard chicken not only delicious but also versatile—pairing well with a variety of sides like roasted veggies, rice, or a fresh salad. It’s a dish that satisfies all taste preferences, making it a must-try for any home cook! 🍯🍗✨
Easy to Make with Simple Pantry Ingredients
One of the best things about honey mustard chicken is that it’s incredibly easy to prepare, requiring only a handful of common pantry staples. You don’t need any fancy ingredients or special cooking techniques—just a few essentials that you likely already have in your kitchen. This makes it a go-to recipe for busy weeknights, last-minute dinners, or meal prep.
1. The Core Ingredients
The heart of this dish lies in a simple yet flavorful honey mustard sauce, made with just a few everyday ingredients:
- Honey – The natural sweetness enhances the flavor and helps create a rich glaze on the chicken.
- Dijon Mustard – Adds a smooth, tangy kick and depth of flavor.
- Yellow Mustard – Brings a mild, slightly vinegary contrast to balance the sweetness.
- Olive Oil or Butter – Helps the chicken stay juicy while adding richness.
- Garlic Powder & Paprika – Essential seasonings that boost the overall taste.
- Salt & Black Pepper – Classic spices that enhance all the flavors.
2. Customizable with What You Have
Another great thing about this recipe is its flexibility. You can tweak the ingredients based on what’s in your pantry:
- No Dijon mustard? Substitute it with spicy brown mustard or even whole-grain mustard for a more textured sauce.
- Out of fresh garlic? Garlic powder works just as well.
- Prefer a smoky flavor? Add a pinch of smoked paprika or a dash of Worcestershire sauce.
This adaptability means you can always make honey mustard chicken without running to the store, making it an easy and convenient meal option.
3. No Complicated Cooking Techniques
This recipe doesn’t require any special culinary skills—just a few simple steps:
- Mix the ingredients – Whisk together honey, mustard, and seasonings to create the flavorful sauce.
- Marinate the chicken – Let the chicken absorb the flavors for 30 minutes (or longer for deeper taste).
- Cook using your preferred method – Bake, grill, or pan-sear until golden and juicy.
The entire process is beginner-friendly and can be completed in under 30-40 minutes from start to finish, making it perfect for anyone who wants a quick, delicious, and fuss-free meal.
4. Works with Different Cuts of Chicken
Another reason this recipe is so simple is that you can use any cut of chicken you have on hand:
- Chicken breasts – Lean, tender, and quick to cook.
- Chicken thighs – Juicier and more flavorful, perfect for grilling or baking.
- Chicken drumsticks or wings – Great for a party-style meal with a crispy glaze.
Since the marinade works well with any cut, you can adapt this recipe to whatever chicken you already have in your fridge, making it even more convenient.
Final Thoughts
This honey mustard chicken recipe proves that simple ingredients can create an incredibly flavorful dish. With no complicated steps or hard-to-find ingredients, it’s a recipe you can make anytime, whether for a family dinner, meal prep, or even a special occasion. Fast, easy, and absolutely delicious! 🍯🍗✨
Versatile Cooking Methods: Baked, Grilled, or Pan-Seared
One of the best things about honey mustard chicken is that it can be cooked in multiple ways, depending on your preference, available kitchen tools, or the season. Whether you want a hands-off baking method, a smoky grilled version, or a quick stovetop sear, this dish adapts beautifully to different cooking techniques. Here’s a breakdown of each method and how to achieve the best results for each one.
1. Baked Honey Mustard Chicken: Easy and Hands-Off
Why choose this method?
- Perfect for a no-fuss, set-it-and-forget-it meal.
- Allows the sauce to caramelize and soak into the chicken.
- Great for cooking multiple portions at once.
How to Bake Honey Mustard Chicken:
- Preheat the oven to 375°F (190°C).
- Marinate the chicken in the honey mustard sauce for at least 30 minutes (optional but enhances flavor).
- Place the chicken in a greased baking dish and pour the remaining sauce over it.
- Bake uncovered for 25-30 minutes (for boneless breasts) or 35-40 minutes (for bone-in thighs).
- Broil for 2-3 minutes at the end to create a slightly crispy caramelized top.
- Let it rest for 5 minutes before serving.
✅ Pro Tip: If using bone-in, skin-on chicken, baking at 400°F (200°C) will help crisp up the skin while keeping the inside juicy.
2. Grilled Honey Mustard Chicken: Smoky and Flavorful
Why choose this method?
- Adds a delicious charred, smoky flavor to the dish.
- Ideal for summer BBQs or meal prepping.
- Great for chicken thighs, breasts, or drumsticks.
How to Grill Honey Mustard Chicken:
- Preheat the grill to medium-high heat (375-400°F / 190-200°C).
- Marinate the chicken for at least 1 hour (or overnight for deeper flavor).
- Lightly oil the grill grates to prevent sticking.
- Grill the chicken for 5-7 minutes per side, flipping once, until it reaches an internal temperature of 165°F (75°C).
- Brush extra sauce on top during the last few minutes for a sticky, flavorful glaze.
- Let the chicken rest for 5 minutes before slicing.
✅ Pro Tip: For extra juiciness, use chicken thighs instead of breasts since they retain more moisture when grilled.
3. Pan-Seared Honey Mustard Chicken: Quick and Flavorful
Why choose this method?
- Ideal for a fast weeknight dinner.
- Creates a beautiful golden-brown crust on the chicken.
- Great for making a creamy honey mustard sauce in the same pan.
How to Pan-Sear Honey Mustard Chicken:
- Heat 1-2 tablespoons of olive oil or butter in a large skillet over medium-high heat.
- Season and sear the chicken for 4-5 minutes per side until golden brown.
- Lower the heat to medium and pour in the honey mustard sauce.
- Cover and cook for another 5-7 minutes, letting the sauce thicken.
- Spoon the sauce over the chicken as it cooks for extra flavor.
- Remove from heat and let it rest for 5 minutes before serving.
✅ Pro Tip: If you want a creamy honey mustard sauce, stir in a bit of heavy cream or Greek yogurt at the end for a rich, velvety finish.
Bonus Cooking Methods: Slow Cooker & Air Fryer
🔹 Slow Cooker: Add chicken and honey mustard sauce to the slow cooker. Cook on low for 6 hours or high for 3-4 hours for a fall-apart tender texture.
🔹 Air Fryer: Cook marinated chicken at 375°F (190°C) for 15-18 minutes, flipping halfway for crispy, juicy results.
Final Thoughts
No matter which cooking method you choose, honey mustard chicken always turns out juicy, flavorful, and satisfying. Whether you prefer the caramelized glaze from baking, the smoky char from grilling, or the quick crispiness from pan-searing, this dish is versatile and easy to adapt. Try out different methods and find your favorite way to enjoy this delicious recipe! 🍯🔥🍗
Pairs Well with a Variety of Side Dishes
One of the best things about honey mustard chicken is its versatility when it comes to side dishes. The sweet, tangy, and savory flavors of the chicken pair beautifully with a wide range of accompaniments, from light and refreshing salads to hearty, comforting starches. Whether you’re planning a casual family meal or a special dinner, you can customize the sides to match the occasion and your taste preferences.
1. Classic Comfort Sides
If you’re craving a hearty, filling meal, these comforting side dishes perfectly complement honey mustard chicken:
- Mashed Potatoes – The creamy, buttery texture of mashed potatoes balances the bold, tangy flavors of the chicken. Try adding garlic, chives, or cheese for extra richness.
- Roasted Potatoes – Crispy, golden-brown potatoes seasoned with herbs and garlic add a delicious crunch to your meal.
- Rice Pilaf – A light and flavorful rice dish with sautéed onions, garlic, and herbs enhances the depth of the honey mustard sauce.
- Mac and Cheese – The creamy, cheesy goodness of mac and cheese contrasts beautifully with the zesty chicken.
✅ Pro Tip: For a healthier alternative, try mashed cauliflower or quinoa instead of traditional mashed potatoes or rice.
2. Light and Refreshing Sides
For a lighter, more refreshing meal, consider pairing your honey mustard chicken with these vibrant, fresh sides:
- Mixed Green Salad – A simple salad with arugula, spinach, or romaine, tossed with a light vinaigrette, adds a crisp contrast to the rich sauce.
- Coleslaw – The crunchy texture and tangy dressing of coleslaw perfectly balance the sweetness of honey mustard chicken. Try a vinegar-based slaw for an extra zesty kick.
- Cucumber and Tomato Salad – A fresh mix of cucumbers, cherry tomatoes, red onions, and a lemon dressing provides a cool, refreshing bite.
- Steamed or Roasted Vegetables – Broccoli, asparagus, Brussels sprouts, or green beans complement the dish with added nutrition and color.
✅ Pro Tip: Add a squeeze of lemon or a light balsamic drizzle to your veggies for an extra flavor boost.
3. Bread and Grain-Based Sides
For those who enjoy bread or grain-based sides, these options are excellent choices to soak up the delicious honey mustard sauce:
- Crusty Bread or Dinner Rolls – A warm, fluffy roll or a slice of crusty baguette is perfect for mopping up extra sauce.
- Quinoa or Couscous – These grains offer a nutty flavor and light texture that balance the richness of the chicken.
- Cornbread – The slight sweetness of cornbread complements the honey in the mustard sauce beautifully.
- Wild Rice – A hearty, earthy alternative to white rice that pairs well with the tangy flavors of the dish.
✅ Pro Tip: If you want an extra flavor boost, cook quinoa or couscous in chicken broth instead of water for a richer taste.
4. International-Inspired Sides
If you’re looking for a creative twist, try pairing your honey mustard chicken with sides inspired by global cuisines:
- Garlic Butter Noodles (Asian-Inspired) – Lightly seasoned noodles with a hint of garlic and soy sauce add a delicious umami contrast.
- Mediterranean Couscous Salad – A refreshing side with cherry tomatoes, cucumbers, feta, and olives that enhances the dish’s tangy elements.
- Mexican-Style Corn (Elote) – Grilled corn coated in lime, cheese, and a bit of chili powder balances the sweetness of the honey mustard.
- Grilled Pineapple (Hawaiian-Style) – The caramelized sweetness of grilled pineapple pairs beautifully with the mustard’s tangy notes.
✅ Pro Tip: Pairing flavors from different cuisines can create exciting new combinations that keep the dish interesting.
5. Low-Carb & Healthy Side Options
For those following a low-carb or keto-friendly diet, these healthy sides pair well with honey mustard chicken:
- Cauliflower Rice – A great substitute for traditional rice, offering a light, low-carb base for your meal.
- Zucchini Noodles (Zoodles) – A fresh, low-carb alternative to pasta that absorbs the delicious honey mustard sauce.
- Grilled Vegetables – Bell peppers, eggplant, and zucchini make for a colorful, healthy side that enhances the dish.
- Avocado Salad – A mix of avocado, cherry tomatoes, and red onions tossed in a lime dressing provides a creamy and refreshing contrast.
✅ Pro Tip: Roasting or grilling veggies enhances their natural sweetness, making them an excellent match for honey mustard chicken.
Final Thoughts
Honey mustard chicken is incredibly versatile, making it easy to pair with a wide range of side dishes. Whether you prefer comforting classics, light and healthy options, or international flavors, there’s a perfect side dish to suit every occasion. The key is to balance the meal’s textures and flavors, ensuring every bite is as delicious as the last.
So, whether you’re serving it with mashed potatoes for a cozy dinner or grilled veggies for a light, nutritious meal, you can’t go wrong with this flavorful dish! 🍯🍗✨
Essential Ingredients for the Best Honey Mustard Chicken
Chicken Choices: Chicken Breast vs. Chicken Thighs
When making honey mustard chicken, choosing the right cut of chicken is crucial to achieving the best texture, juiciness, and flavor. Both chicken breast and chicken thighs are excellent options, but they differ in fat content, tenderness, and cooking methods. Here’s a detailed comparison to help you decide which cut works best for your recipe.
1. Chicken Breast: Lean and Mild
Why Choose Chicken Breast?
- Lean and Healthy – Lower in fat and calories, making it a great choice for healthy meals.
- Mild Flavor – Has a neutral taste, allowing the honey mustard sauce to shine.
- Versatile – Works well for baking, grilling, or pan-searing.
Best Cooking Methods for Chicken Breast:
Since chicken breast is low in fat, it can dry out if overcooked. To keep it tender and juicy:
- Marinate the chicken for at least 30 minutes to 2 hours to enhance moisture and flavor.
- Use medium-high heat when pan-searing and avoid overcooking.
- For baking, cook at 375°F (190°C) for 20-25 minutes, and let it rest before slicing.
- Consider using bone-in, skin-on chicken breasts for extra juiciness.
✅ Pro Tip: If using boneless, skinless chicken breasts, pound them to an even thickness before cooking to ensure they cook evenly.
2. Chicken Thighs: Juicy and Flavorful
Why Choose Chicken Thighs?
- More Flavorful – Higher fat content makes them richer and more tender.
- Juicier – Less prone to drying out, making them more forgiving when cooking.
- Crispier Skin – If using skin-on thighs, they crisp up beautifully when baked or pan-seared.
Best Cooking Methods for Chicken Thighs:
Since thighs contain more fat and connective tissue, they are well-suited for:
- Baking at 400°F (200°C) for 35-40 minutes to render fat and crisp the skin.
- Grilling over medium heat for 6-7 minutes per side, creating a smoky, caramelized crust.
- Pan-searing on medium-high heat for 5-7 minutes per side, finishing with a short braise in the sauce.
✅ Pro Tip: Bone-in, skin-on thighs take slightly longer to cook but have superior flavor and texture compared to boneless thighs.
3. Which Cut Should You Use?
| Feature | Chicken Breast | Chicken Thighs |
|---|---|---|
| Fat Content | Low (lean) | Higher (juicier) |
| Flavor | Mild | Rich, slightly gamey |
| Cooking Time | Shorter (can dry out) | Slightly longer but more forgiving |
| Best For | Baking, grilling, pan-searing | Grilling, roasting, slow-cooking |
| Nutritional Value | Lower fat, higher protein | More fat, but richer in iron and flavor |
✅ Best Choice for:
- Health-conscious meals? 👉 Chicken breast
- Maximum juiciness and flavor? 👉 Chicken thighs
- Meal prep and leftovers? 👉 Chicken thighs (stay moist longer)
- Quick cooking with a lean texture? 👉 Chicken breast
4. Can You Use Both? Absolutely!
If you can’t decide, try a mix of both chicken breasts and thighs in the same recipe. This way, you get the best of both worlds—leaner, firmer breast meat alongside tender, flavorful thigh meat. Just be mindful of cooking times, as thighs may need a few extra minutes compared to breasts.
Ultimately, the choice comes down to personal preference and how you plan to serve the dish. No matter which cut you choose, the honey mustard sauce will ensure every bite is packed with flavor! 🍯🔥🍗
Enhancing Flavors: Lemon Juice, Fresh Thyme, and Brown Sugar
To truly elevate your honey mustard chicken and bring out the depth of its sweet, tangy, and savory flavors, the addition of a few carefully selected ingredients can make a huge difference. While the basic honey mustard sauce provides the backbone, lemon juice, fresh thyme, and brown sugar add complex layers that enhance the overall flavor profile. Here’s how each of these ingredients works its magic in your dish.
1. Lemon Juice: Adding Brightness and Balance
Why Choose Lemon Juice?
- Brightens the Sauce – Lemon juice adds a burst of fresh acidity, which cuts through the richness of the honey mustard sauce and balances the sweetness.
- Enhances Flavor Depth – The tangy nature of lemon juice enhances the overall flavor complexity, making the dish more vibrant and flavorful.
- Tenderizes the Chicken – The acidity of lemon juice acts as a natural tenderizer, helping the chicken retain moisture and tenderness during cooking.
How to Use Lemon Juice in Honey Mustard Chicken:
- In the marinade: Add 1-2 tablespoons of fresh lemon juice to the marinade along with honey and mustard. The acid will help tenderize the chicken while infusing it with zesty flavor.
- In the sauce: Stir in a teaspoon or two of lemon juice into the honey mustard sauce before cooking or serving. This will brighten the sauce and add a subtle tartness that enhances the other flavors.
- As a finishing touch: A quick squeeze of fresh lemon over the cooked chicken just before serving will bring an extra layer of freshness and balance to the dish.
✅ Pro Tip: For a more bold citrus flavor, use lemon zest in addition to the juice, as the zest contains essential oils that provide an aromatic kick.
2. Fresh Thyme: Earthy and Aromatic
Why Choose Fresh Thyme?
- Adds Earthy Depth – Fresh thyme has a woodsy, herbal flavor with slight floral notes, which complements the sweet and tangy flavors of honey mustard chicken.
- Enhances Savory Notes – Thyme adds a savory complexity, making the chicken taste more sophisticated and balanced.
- Aromatic – Fresh thyme releases a delightful fragrance when cooking, which helps to elevate the sensory experience of your meal.
How to Use Fresh Thyme in Honey Mustard Chicken:
- In the marinade: Add a few sprigs of fresh thyme to your marinade for extra flavor infusion. Thyme’s earthy notes will permeate the chicken and blend beautifully with the honey mustard sauce.
- In the sauce: Toss 1-2 teaspoons of fresh thyme leaves into the sauce mixture while cooking for an aromatic and savory undertone.
- As a garnish: After cooking, sprinkle a little fresh thyme over the chicken as a garnish. This not only adds flavor but also gives the dish a beautiful, rustic appearance.
✅ Pro Tip: If using dried thyme, use about half the amount as you would with fresh thyme, as dried thyme is more concentrated.
3. Brown Sugar: Sweetness with a Rich, Molasses Flavor
Why Choose Brown Sugar?
- Enhances Sweetness – Brown sugar adds a deep, rich sweetness to the honey mustard sauce, making it more complex and balanced.
- Brings Caramelization – The molasses content in brown sugar helps the sauce caramelize when cooking, giving your honey mustard chicken a deliciously sticky glaze and a slight crispy outer layer.
- Complements the Mustard – Brown sugar’s rich, warm flavor works wonderfully with the tangy bite of mustard, creating a harmonious sweet-savory flavor profile.
How to Use Brown Sugar in Honey Mustard Chicken:
- In the sauce: Stir in 1-2 tablespoons of brown sugar to the honey mustard sauce to help balance the tanginess of the mustard and the acidity of the lemon juice.
- In the marinade: Brown sugar can also be added to the marinade for a more gentle sweetness that seeps into the chicken as it rests.
- As a glaze: If you want a caramelized finish, brush a little brown sugar on the chicken during the last few minutes of cooking or broiling. This will give the chicken a beautiful, shiny, slightly crispy coating.
✅ Pro Tip: For a richer flavor, use dark brown sugar instead of light brown sugar, as it has a stronger molasses flavor and deeper sweetness.
4. How These Ingredients Work Together
When combined, lemon juice, fresh thyme, and brown sugar create an incredibly balanced and layered flavor profile for your honey mustard chicken. The lemon juice provides brightness and acidity to counteract the sweetness, while thyme contributes earthy depth and savory notes that complement the chicken. The brown sugar ensures the sauce is not overly tangy, adding the right amount of richness and caramelized flavor.
By incorporating these ingredients into the marinade or sauce, you’ll create a dish that’s not only delicious but multi-dimensional. The combination of sweet, tangy, savory, and earthy flavors will elevate the honey mustard chicken and make it an unforgettable meal.
Final Thoughts
These simple yet powerful ingredients—lemon juice, fresh thyme, and brown sugar—work together to enhance and elevate the flavors of your honey mustard chicken. The balance of acidity, sweetness, and earthiness creates a harmony that transforms a basic chicken recipe into something truly special. Experiment with different ratios and enjoy the complexity they bring to your dish! 🍯🍗🌿
Best Oils for Cooking: Olive Oil vs. Butter
When preparing honey mustard chicken, the choice of cooking fat plays a crucial role in not only the flavor but also the texture and health benefits of the dish. Two of the most commonly used fats for cooking are olive oil and butter. Both offer unique qualities that can enhance your chicken dish, but they differ in flavor, cooking properties, and nutritional value. Let’s break down the key differences between these two fats to help you choose the best one for your recipe.

1. Olive Oil: Heart-Healthy and Versatile
Why Choose Olive Oil?
- Healthier Option – Olive oil, especially extra virgin olive oil (EVOO), is packed with monounsaturated fats, which are known for their heart-healthy benefits. It has been shown to lower bad cholesterol levels and may even reduce inflammation.
- Rich in Antioxidants – Olive oil is high in antioxidants, such as vitamin E and polyphenols, which contribute to overall health and have anti-inflammatory properties.
- Neutral Flavor – Olive oil has a more neutral flavor compared to butter, which allows the honey mustard sauce to take center stage. It won’t overpower the delicate flavors of the chicken or the sauce.
- Higher Smoke Point – Olive oil generally has a smoke point of around 375°F (190°C), which makes it suitable for baking, pan-searing, and grilling. It won’t break down or release harmful compounds at typical cooking temperatures.
How to Use Olive Oil in Honey Mustard Chicken:
- Pan-Searing: When pan-searing the chicken, olive oil provides a light, even coat for the chicken, helping it cook crispy on the outside while remaining juicy on the inside.
- Grilling: Use olive oil as a light brush to coat the chicken before grilling, ensuring the chicken doesn’t stick to the grill grates while enhancing flavor without masking it.
- Baking: For baked chicken, olive oil can be used to drizzle over the chicken to help create a golden, crisp exterior.
✅ Pro Tip: Choose extra virgin olive oil for its superior flavor and health benefits, especially if you’re looking for a richer taste and higher antioxidant content.
2. Butter: Rich and Flavorful
Why Choose Butter?
- Creamy and Rich Flavor – Butter is known for its rich, creamy, and savory flavor, which can provide a luscious taste that is perfect for savory dishes like honey mustard chicken. The mild sweetness of butter balances nicely with the tangy and sweet honey mustard sauce.
- Helps with Browning – Butter contains milk solids that aid in browning and caramelization, giving your chicken a golden, crispy exterior and deeper flavor.
- Great for Sauces – Butter is also a key ingredient in many classic sauces, as it helps create a smooth texture and velvety finish, making it an ideal base for a honey mustard glaze.
- Lower Smoke Point – Butter has a lower smoke point (around 300°F / 150°C) compared to olive oil, so it can burn at higher cooking temperatures. However, it can still be used effectively at medium heat for pan-searing or baking.
How to Use Butter in Honey Mustard Chicken:
- Pan-Searing: Butter is perfect for creating a golden, crispy sear on the chicken. You can also add a bit of garlic or thyme to the pan to infuse more flavor into the butter as it melts.
- In the Sauce: A tablespoon or two of butter in your honey mustard sauce will add a rich, smooth texture, making the sauce more creamy and glossy.
- Baking: When baking the chicken, you can coat the chicken with melted butter or baste it during cooking for a rich, golden finish.
✅ Pro Tip: To prevent butter from burning while cooking, use clarified butter or ghee, which has a higher smoke point due to the removal of milk solids.
3. Olive Oil vs. Butter: Which is Best for Your Honey Mustard Chicken?
| Feature | Olive Oil | Butter |
|---|---|---|
| Flavor | Mild, neutral | Rich, creamy, and savory |
| Smoke Point | Higher (375°F / 190°C) | Lower (300°F / 150°C) |
| Health Benefits | Heart-healthy (monounsaturated fats) | Contains saturated fats; lower in antioxidants |
| Browning/Caramelization | Good, but less pronounced | Excellent for crispy texture and browning |
| Best For | Searing, grilling, baking | Searing, creating sauces, adding richness |
| Texture | Lighter, thinner | Creamier, thicker |
4. How to Combine Both for the Best Results
If you can’t decide between olive oil and butter, why not use both? Combining olive oil and butter can give you the best of both worlds:
- Use olive oil to cook the chicken at a slightly higher heat, and finish it off with butter to add a rich, flavorful glaze.
- Blend both fats into your sauce: Start by using olive oil as a base, and then finish with butter for a smooth, velvety sauce that complements the honey mustard flavor.
This combination allows you to take advantage of the healthier aspects of olive oil while still achieving the rich, indulgent flavor that butter provides.
Final Thoughts
Ultimately, both olive oil and butter have their place in making the perfect honey mustard chicken. If you’re aiming for a lighter, healthier option, olive oil is your best bet. However, if you’re looking to add a rich, decadent flavor to your dish, butter will help you achieve that irresistible taste. Whether you choose one or both, these fats will contribute to a flavorful, crispy, and juicy honey mustard chicken that will leave your taste buds craving more!
Step-by-Step Guide to Making Honey Mustard Chicken
Step 1: Prepare the Honey Mustard Marinade
The first and most crucial step in creating the best honey mustard chicken is preparing the marinade. This is where the magic begins—the marinade is the foundation of your chicken’s flavor profile. By allowing the chicken to soak in the marinade for a period of time, you allow the flavors to penetrate the meat, ensuring that each bite is tender, juicy, and full of deliciousness. Here’s how to craft the perfect honey mustard marinade to get the best results for your chicken.
1. Choosing the Right Ingredients for the Marinade
The marinade for honey mustard chicken typically consists of a few core ingredients that complement each other perfectly. These ingredients are carefully selected to provide the right balance of sweet, tangy, and savory flavors, as well as to ensure the chicken stays tender and flavorful.
Basic Ingredients for Honey Mustard Marinade:
- Honey: Adds natural sweetness that balances the tanginess of the mustard and the acidity of the lemon juice, giving the marinade a rich, smooth texture. Honey also helps to caramelize the chicken during cooking, creating a glossy, slightly crispy exterior.
- Mustard: The key ingredient for creating that tangy base. Use Dijon mustard for a sharper, more refined tang, or yellow mustard for a milder flavor. Mustard provides the perfect balance to the honey and adds a slight zesty kick.
- Olive Oil: Acts as the fat in the marinade, helping to coat the chicken and ensure even cooking. It also helps dissolve and blend all the ingredients together, making the marinade smooth and well-balanced.
- Lemon Juice: Adds a fresh acidity that brightens the flavors and balances out the richness of the honey and mustard. Lemon juice also helps tenderize the chicken.
- Garlic: Fresh garlic or garlic powder infuses the marinade with a savory depth, complementing the sweetness and tanginess. It gives the chicken a slightly spicy undertone that balances the sweeter flavors.
- Fresh Herbs (optional): Fresh thyme, rosemary, or parsley can be added to the marinade for a touch of earthiness and herbal fragrance. These herbs help to create a more complex flavor profile.
2. Mixing the Ingredients
To create the perfect honey mustard marinade, you need to combine all the ingredients in the right proportions. The ratio of honey to mustard is key in achieving the ideal balance between sweetness and tanginess. Here’s a guideline to follow:
- 1/4 cup of honey
- 1/4 cup of mustard (Dijon or yellow)
- 2 tablespoons of olive oil
- 2 tablespoons of lemon juice (freshly squeezed)
- 2-3 cloves of garlic (minced or 1 teaspoon garlic powder)
- Optional: 1 tablespoon of fresh herbs (such as thyme or rosemary)
How to Mix the Marinade
- In a medium bowl, whisk together the honey and mustard until they are well combined. The honey will start to thicken the mustard and create a smooth base.
- Add the olive oil and lemon juice, continuing to whisk until the mixture is emulsified and smooth. The oil helps to coat the chicken and keep it tender, while the lemon juice brightens the flavor.
- Add garlic (either minced or garlic powder) and any optional fresh herbs. Whisk again to incorporate all the flavors together.
3. The Perfect Marinade Consistency
The consistency of the marinade should be slightly thick but not overly sticky. It should be able to coat the chicken evenly without being too runny or too thick. If you find that the marinade is too thick, you can thin it out with a small amount of water or extra lemon juice. The goal is to create a smooth, pourable mixture that will be able to cling to the chicken pieces and ensure even flavor distribution.
4. Marinating the Chicken
Once the marinade is ready, it’s time to marinate the chicken. This is where the chicken absorbs all the wonderful flavors from the marinade, resulting in tender, juicy meat that’s bursting with flavor. Here’s how to do it:
How to Marinate the Chicken:
- Place the chicken in a resealable plastic bag or shallow dish. If you’re using chicken breasts, consider pounding them to an even thickness for more even marinating and cooking. For chicken thighs, ensure they’re all fully coated in the marinade.
- Pour the marinade over the chicken, ensuring that every piece is thoroughly coated. If using a resealable bag, seal the bag and gently massage the marinade into the chicken. If using a dish, cover the chicken and refrigerate.
- Let the chicken marinate for at least 30 minutes to 1 hour, but for the best flavor, marinate for 4-6 hours or even overnight. The longer the chicken marinates, the more the flavors can penetrate the meat.
✅ Pro Tip: If you’re marinating chicken breasts, it’s important not to marinate for too long (more than 8 hours) as the acidity from the lemon juice could make the chicken too tender and mushy. For chicken thighs, you can marinate for a longer period of time.
5. Tips for Marinating Success
- Even Coating: Ensure the chicken is evenly coated with the marinade to achieve consistent flavor.
- Use a Ziplock Bag: For convenience, a resealable bag is ideal because it allows you to distribute the marinade evenly by massaging it into the chicken, plus it saves space in the fridge.
- Don’t Reuse Marinade: If you want to use the marinade as a sauce later, set aside some of the marinade before adding it to the raw chicken to avoid cross-contamination.
Final Thoughts on Preparing the Marinade
The honey mustard marinade is the key to unlocking maximum flavor in your chicken. The combination of sweet, tangy, and savory ingredients creates a base that infuses the chicken with moisture, flavor, and tenderness. By following the steps above, you’ll ensure that your chicken is perfectly marinated and ready for whatever cooking method you choose—whether it’s pan-searing, grilling, or baking. With the marinade in place, you’re just one step away from making the best honey mustard chicken you’ve ever tasted! 🍯🍗
Step 2: Marinate the Chicken for Maximum Flavor
After preparing the honey mustard marinade, the next essential step is to marinate the chicken. Marinating the chicken allows the flavors from the honey mustard mixture to penetrate deeply into the meat, ensuring that every bite is bursting with the perfect balance of sweetness, tanginess, and savory goodness. The process of marination is key to achieving tender, juicy, and flavorful chicken, and with the right timing and technique, you can truly elevate the dish.
1. The Importance of Marinating
Marinating is not just about flavor—it’s also about tenderizing the chicken and ensuring it stays moist during cooking. The combination of acidity from lemon juice, sweetness from honey, and the natural oils in the marinade work together to soften the chicken and prevent it from becoming dry or tough. This process is especially important when cooking lean cuts like chicken breasts, which can easily dry out if not properly marinated.
Why Marinate?
- Flavor Penetration: The marinade works to infuse the chicken with deep, layered flavors that wouldn’t be achievable by just seasoning the surface.
- Tenderness: The acidity from ingredients like lemon juice or vinegar helps to break down proteins, resulting in tender, juicy chicken.
- Juiciness: Marinating helps the chicken retain moisture during cooking, ensuring it doesn’t dry out, especially when grilling or baking.
2. Timing Is Everything
While marinating the chicken for a short period can still enhance flavor, the longer you marinate, the better the results. This is because the flavor compounds in the honey mustard sauce need time to fully penetrate the meat.
How Long Should You Marinate the Chicken?
- 30 minutes to 1 hour: This is the minimum amount of time you should marinate the chicken. The chicken will still pick up some flavor, but it won’t have the full depth that a longer marination provides.
- 4 to 6 hours: For better flavor and tenderness, marinate the chicken for 4 to 6 hours. This will allow the honey mustard mixture to really penetrate the meat and create a more intense flavor profile.
- Overnight: If you have the time, marinating the chicken overnight (up to 12 hours) is ideal, as it gives the flavors ample time to fully develop. However, be mindful of not marinating too long (especially chicken breasts), as the acid from the lemon juice or vinegar can break down the proteins too much, leading to a mushy texture. Chicken thighs, on the other hand, are more forgiving and can handle longer marinating times.
3. Tips for Effective Marinating
To get the best results from marinating, follow these expert tips:
A. Use a Resealable Plastic Bag
One of the easiest and most effective ways to marinate chicken is by using a resealable plastic bag. Here’s why:
- Even Coating: A bag allows you to coat the chicken evenly with the marinade, making sure all surfaces are exposed to the flavor.
- Space Efficiency: A bag takes up less space in your refrigerator compared to a dish, and it’s easier to flip and massage the chicken to ensure uniform marination.
- No Mess: It keeps the mess contained, allowing for a neater marinating experience.
B. Massage the Marinade into the Chicken
To ensure that every piece of chicken gets a good coating, you can gently massage the marinade into the meat. This helps the chicken absorb more flavor. For added flavor absorption, make small cuts or slashes on the surface of the chicken (especially with chicken breasts) to create more surface area for the marinade to penetrate.
C. Don’t Overcrowd the Chicken
Whether you’re using a bag or a shallow dish, make sure there’s enough space for the chicken to be fully coated and that the marinade can circulate around all the pieces. If the chicken is too crowded, the marinade may not be able to penetrate evenly.
D. Marinate in the Refrigerator
It’s essential to marinate the chicken in the refrigerator, not at room temperature, to avoid bacterial growth. While marinating is an essential step, you want to ensure it’s done safely. Keep the chicken covered and chilled at all times.
4. Should You Marinate Chicken Skin-On or Skinless?
While marinating works for both skin-on and skinless chicken, each type will offer slightly different results:
- Skinless Chicken: If you’re using skinless chicken breasts or thighs, the marinade will fully penetrate the meat, infusing it with flavor throughout. Skinless cuts tend to absorb marinades more quickly, which is why marinating for 1-3 hours can yield great results.
- Skin-On Chicken: When you marinate chicken with skin, the skin acts as a barrier to prevent some of the marinade from soaking into the meat. However, the flavors will still infuse the chicken, and the skin will get crispy and flavorful as it cooks. If you’re using skin-on chicken, you may want to increase the marination time to ensure the flavors seep into the meat beneath the skin.
5. Don’t Reuse Marinade
If you plan to use the marinade as a sauce for the chicken later, set aside some of the marinade before adding it to the raw chicken. Never reuse marinade that has been in contact with raw meat, as it could contain harmful bacteria. If you need extra sauce, you can either cook the leftover marinade or make a fresh batch to drizzle over the cooked chicken.
6. Marinate Whole Chicken vs. Chicken Pieces
If you’re marinating a whole chicken, consider using a larger container or bag and making sure the marinade reaches all parts of the bird, including inside the cavity. Whole chickens generally require a longer marinating time (at least 6 hours) to allow the marinade to reach the deeper parts. For chicken pieces, such as breasts or thighs, marinating for 1 to 6 hours will generally suffice.
7. Marinate Before Cooking, Not After
The goal is to allow the marinade to work its magic before the chicken hits the heat. Marinating the chicken before cooking ensures that the flavors will be absorbed and that the meat is tenderized. Once the chicken is cooked, the marinade will not have the same tenderizing or flavor-enhancing effect, and it will lose its effectiveness if added afterward.
Final Thoughts on Marinating
Marinating the chicken is the key step in ensuring your honey mustard chicken is flavorful, tender, and juicy. By taking the time to properly marinate your chicken, you’re ensuring that the flavors fully develop and that the chicken comes out perfectly cooked. Remember that the right balance of time and technique will make all the difference in creating a memorable dish that you and your guests will love.
Step 3: Choose Your Cooking Method (Baked, Grilled, or Pan-Seared)
Once your chicken has marinated to perfection, the next important step is choosing how to cook it. The cooking method you choose will have a significant impact on the texture, flavor, and overall outcome of your honey mustard chicken. Whether you prefer the crispiness of grilling, the tenderness of baking, or the richness of pan-searing, each method offers its own unique qualities. Below, we’ll explore the benefits of each method and provide tips to help you achieve the best results for your honey mustard chicken.
1. Baking Honey Mustard Chicken
Baking is a fantastic cooking method for honey mustard chicken, especially if you want a hands-off approach or are preparing a larger quantity of chicken. This method allows for even cooking, keeping the chicken juicy and tender while allowing the honey mustard glaze to caramelize on the outside.
Benefits of Baking:
- Consistent Results: Baking offers an easy and consistent way to cook chicken without much active attention.
- Tender and Juicy: The chicken cooks evenly, which helps retain moisture and keeps the meat tender.
- Caramelization: Baking allows the honey mustard marinade to caramelize on the chicken’s surface, creating a delicious, slightly crispy exterior that contrasts perfectly with the tender interior.
How to Bake Honey Mustard Chicken:
- Preheat your oven to 375°F (190°C).
- Arrange your marinated chicken pieces on a baking sheet lined with parchment paper or aluminum foil for easy cleanup.
- If you like, brush some extra marinade on top of the chicken before baking to create a more intense glaze.
- Bake the chicken for 25-30 minutes for breasts or 35-40 minutes for thighs, depending on the thickness of the chicken. Use a meat thermometer to ensure the internal temperature reaches 165°F (74°C).
- For extra crispiness, you can broil the chicken for the last 2-3 minutes to get a crispy, golden-brown exterior.
2. Grilling Honey Mustard Chicken
Grilling is a perfect method for cooking honey mustard chicken if you’re looking for a smoky flavor and charred texture. The grill imparts a distinct smoky richness to the chicken while sealing in the marinade’s flavors, making the chicken tender and juicy on the inside.
Benefits of Grilling:
- Smoky Flavor: Grilling adds a delicious smoky element that enhances the overall flavor of the honey mustard chicken.
- Crispy Exterior: The high heat of the grill helps create a crispy and caramelized crust while keeping the chicken moist inside.
- Quick Cooking: Grilling tends to be a faster method, making it ideal for those short on time.
How to Grill Honey Mustard Chicken:
- Preheat your grill to medium-high heat (about 400°F / 200°C).
- Lightly oil the grill grates or brush the chicken with olive oil to prevent sticking.
- Place the marinated chicken pieces on the grill and cook for 5-7 minutes per side for breasts or 7-9 minutes per side for thighs, depending on thickness.
- Use tongs to flip the chicken once, ensuring it gets nice grill marks.
- Check the internal temperature using a meat thermometer, aiming for 165°F (74°C).
- For a sticky, caramelized finish, you can brush the chicken with extra honey mustard marinade during the last few minutes of grilling. This will help create a flavorful glaze that adheres to the chicken.
3. Pan-Seared Honey Mustard Chicken
If you prefer a rich, golden-brown crust and are looking for a more intimate, hands-on cooking method, pan-searing is the way to go. Pan-searing is ideal for boneless skinless chicken breasts or chicken thighs, as it allows you to control the heat and create that crispy, flavorful crust while keeping the inside juicy and tender.
Benefits of Pan-Searing:
- Rich Flavor: Pan-searing creates a deep, golden-brown crust on the outside of the chicken, which adds incredible flavor.
- Quick and Intense Cooking: The direct heat of the pan results in fast cooking with minimal effort, giving you that beautiful crust without overcooking the chicken.
- Crispiness: The use of oil or butter in the pan helps to form a crispy, flavorful layer on the chicken.
How to Pan-Seer Honey Mustard Chicken:
- Heat a large skillet (preferably cast iron) over medium-high heat and add 1-2 tablespoons of olive oil or butter.
- Once the oil is hot and shimmering, place the marinated chicken pieces in the pan. Make sure not to crowd the pan, as this can cause the chicken to steam instead of sear.
- Cook the chicken for 5-7 minutes per side, depending on the thickness. The chicken should develop a golden-brown crust on both sides.
- Lower the heat to medium and continue cooking for an additional 2-3 minutes to ensure the chicken is cooked through without burning the exterior.
- Use a meat thermometer to check the internal temperature of the chicken, aiming for 165°F (74°C).
4. Which Method Is Right for You?
- Baking is perfect for a hands-off, consistent method with even cooking and a glazed exterior. It’s also ideal for larger portions or when you’re preparing multiple servings at once.
- Grilling is your go-to method if you want a smoky flavor, crispy exterior, and quick cooking time. It’s excellent for a casual outdoor meal or when you want to impress guests with charred perfection.
- Pan-searing gives you more control over the texture and flavor of your chicken, especially if you enjoy a rich, golden-brown crust. It’s ideal for a smaller batch of chicken or when you’re looking for a fast, flavorful option with a crispy finish.
5. Extra Tips for Cooking Success
- Rest the Chicken After Cooking: Regardless of the cooking method, always let the chicken rest for 5-10 minutes after cooking to allow the juices to redistribute and keep the chicken moist.
- Baste with Extra Marinade: During the last few minutes of cooking, you can baste the chicken with the leftover marinade to intensify the flavors and help the glaze stick to the surface.
- Don’t Overcrowd: Whether baking, grilling, or pan-searing, avoid overcrowding the pan or grill to ensure the chicken cooks evenly and the glaze can form properly.
Final Thoughts on Choosing Your Cooking Method
The choice between baked, grilled, or pan-seared honey mustard chicken ultimately comes down to your preference for flavor and texture. Each method offers something unique—whether it’s the smokiness of the grill, the even cooking of the oven, or the richness of the skillet. No matter which method you choose, your honey mustard chicken will be tender, flavorful, and delicious!
Step 4: Cook Until Golden and Juicy
Now that your honey mustard marinated chicken is ready, it’s time to cook it to perfection. This step is where the magic happens—bringing out the flavors, juiciness, and golden-brown color that makes this dish so irresistible. Whether you’re baking, grilling, or pan-searing, the goal is to achieve a beautifully golden exterior that’s crisp, while ensuring the chicken remains tender, juicy, and thoroughly cooked inside.
Here’s how to achieve that perfect balance between a crisp, flavorful exterior and a juicy, tender interior.
1. Monitor Cooking Time for Perfect Juiciness
The key to a juicy chicken is cooking it just long enough to lock in moisture without overcooking it. Chicken is done when it reaches an internal temperature of 165°F (74°C). To get that ideal texture, you should focus on the following:
Avoid Overcooking
While it’s tempting to leave the chicken on the grill or in the oven for extra time, overcooking is the number one enemy of juicy chicken. Dryness can set in quickly, especially in lean cuts like chicken breasts. For chicken thighs, the added fat helps maintain moisture, but they still need to be cooked properly.
Tip: Use a meat thermometer to check the internal temperature of the chicken. The thermometer should read 165°F (74°C) at the thickest part of the meat (without touching the bone).
2. Achieving a Beautiful Golden-Brown Exterior
The golden, caramelized crust on your chicken is a result of the sugars in the honey mustard marinade reacting to heat. Whether you’re using the baking, grilling, or pan-searing method, this is the moment when your chicken transforms into a visually appealing, perfectly cooked dish.
Baking
When baking, the heat of the oven evenly distributes, allowing the chicken to develop a nice golden crust. To enhance this, you can broil the chicken for the last 2-3 minutes. Broiling exposes the chicken to intense heat from above, helping to create that crisp, golden exterior while keeping the inside moist.
- Tip: Keep an eye on your chicken while broiling to avoid burning the surface.
Grilling
Grilling gives you that beautiful, charred exterior, particularly if you’re able to get some grill marks. The direct heat from the grill gives a natural crispiness to the chicken skin (if you’re using skin-on chicken), or helps caramelize the honey mustard sauce on skinless cuts.
- Tip: Resist the urge to move the chicken around too much on the grill. Let it cook undisturbed to develop the golden-brown sear.
Pan-Searing
Pan-searing gives you the ultimate control over the crust. Using a hot skillet allows the chicken to develop a golden-brown, slightly crispy layer that locks in the flavors. The oil or butter used for searing helps create that rich, golden-brown surface that makes the honey mustard chicken so irresistible.
- Tip: If you’re pan-searing, once the chicken has a beautiful golden color, reduce the heat to medium to ensure the inside of the chicken cooks through without burning the outside.
3. Locking in Moisture for Juicy Chicken
While achieving a golden-brown crust is important, keeping the chicken moist and tender is the real goal. The marinated chicken will have absorbed all the delicious honey mustard flavors, and it’s critical to keep the juices inside during the cooking process.
Baking
When baking chicken, cover the dish with foil for the first part of cooking if you’re worried about it drying out. This helps retain moisture and allows the chicken to cook evenly. For the last 10-15 minutes, uncover the chicken to allow the marinade to caramelize and form a beautiful golden color on the outside.
- Tip: Baste the chicken halfway through cooking with some of the leftover marinade to keep it moist.
Grilling
Grilling requires constant attention to ensure the chicken does not dry out. The high heat from the grill can lead to moisture loss, especially on lean chicken breasts. One way to avoid this is by using indirect heat for the first few minutes of grilling, then moving the chicken to the hotter side for the final caramelization.
- Tip: If using skinless chicken breasts, be mindful of flare-ups that could dry out the meat. Consider covering the chicken with a lid to retain moisture while grilling.
Pan-Searing
When pan-searing, you can lock in moisture by keeping the heat at a medium to high level. Searing the chicken too quickly or at too high a temperature will result in a crisp crust but could dry out the interior. Adding butter or olive oil and basting the chicken while it cooks can help retain moisture and give it a beautiful, flavorful coating.
- Tip: When pan-searing, resist the urge to flip the chicken too often. Let it cook undisturbed on one side for several minutes before turning it to get that nice, golden crust.
4. Resting the Chicken for Optimal Juiciness
Once your chicken reaches that perfect golden color and is cooked through, it’s important to let it rest for at least 5-10 minutes. Resting allows the juices to redistribute throughout the meat, preventing them from running out when you cut into the chicken.
- Tip: Cover the chicken loosely with foil during resting to keep it warm. This step ensures that the chicken remains moist and flavorful when you cut into it.
5. Visual and Textural Cues for Perfectly Cooked Chicken
There are a few visual and textural signs to look out for to ensure that your chicken is cooked perfectly:
- Golden Brown Color: Whether baking, grilling, or pan-searing, look for a golden-brown crust that indicates caramelization of the honey mustard marinade. This is a sign that the chicken has achieved a crispy exterior while still retaining moisture inside.
- Juices Run Clear: If you cut into the chicken and the juices run clear, it’s a good sign that it’s cooked through. If the juices are still pink or red, it needs more time.
- Firm to the Touch: Gently press on the chicken with a fork or tongs—if it’s firm but slightly bouncy, it’s likely cooked properly. If it feels squishy or very soft, it may need a little more time on the heat.
Final Thoughts on Cooking Honey Mustard Chicken
Achieving the perfect golden and juicy honey mustard chicken is a balance of timing, attention, and the right cooking method. Whether you opt for baking, grilling, or pan-searing, the goal is always to get that irresistible crisp, golden exterior while maintaining a tender, juicy interior. With the right technique, your honey mustard chicken will not only look delicious but taste amazing—flavorful and moist in every bite!
Best Cooking Methods for Honey Mustard Chicken
Baked Honey Mustard Chicken: Oven Temperature and Timing
Baking your Honey Mustard Chicken in the oven is one of the most reliable methods to achieve a perfectly cooked, golden-brown, and juicy chicken. However, getting the temperature and timing right is key to ensuring that the chicken is thoroughly cooked without becoming dry or overdone. The oven’s heat allows the honey mustard marinade to caramelize, creating a rich, flavorful crust while keeping the inside tender and juicy.
1. The Ideal Oven Temperature for Baking Chicken
The ideal temperature for baking Honey Mustard Chicken is typically 375°F (190°C). This moderate heat allows the chicken to cook through without burning the outside or causing the marinade to scorch. At this temperature, the chicken will bake evenly, and the marinade will have enough time to thicken and form a beautiful caramelized layer on the surface.
- Tip: For a slightly crispier exterior, you can increase the temperature to 400°F (200°C) for the final 5-10 minutes of baking. This helps to sear the marinade, creating a golden crust while still keeping the inside moist.
2. Cooking Time: How Long Should You Bake Chicken?
The baking time can vary depending on the cut of chicken you are using and its thickness. Here’s a general guide for cooking times based on different types of chicken:
- Boneless, skinless chicken breasts: 20-25 minutes
- Bone-in, skin-on chicken breasts: 35-45 minutes
- Chicken thighs (boneless, skinless): 25-30 minutes
- Bone-in, skin-on chicken thighs: 40-50 minutes
For boneless, skinless chicken breasts, the cooking time is shorter, as they cook faster without the bone and skin. Conversely, bone-in cuts take longer to cook, as the bone helps retain moisture but requires more time to cook through thoroughly.
- Tip: Always check the internal temperature with a meat thermometer to ensure the chicken has reached 165°F (74°C) at the thickest part of the meat. This ensures it’s fully cooked while remaining moist and juicy.
3. How to Prevent Overcooking or Drying Out the Chicken
Overcooking can cause your honey mustard chicken to become dry and tough, which is why it’s important to monitor the cooking time closely. Here are a few tips to prevent this from happening:
- Use a Meat Thermometer: Inserting a meat thermometer into the thickest part of the chicken allows you to monitor the temperature without cutting into it and losing the juices. Chicken should be cooked to 165°F (74°C) for safe consumption.
- Cover the Chicken: If you’re concerned about the chicken drying out, you can cover the baking dish with aluminum foil for the first part of cooking. This helps trap moisture, creating a more humid environment inside the dish, which helps keep the chicken tender.
- Rest the Chicken: Once the chicken is done baking, let it rest for 5-10 minutes before cutting into it. This allows the juices to redistribute, ensuring a moist, juicy interior.
4. Achieving a Golden, Crispy Crust in the Oven
While baking is a great way to cook the chicken through, getting that golden, crispy crust is where you can elevate your dish. Here’s how you can ensure your Honey Mustard Chicken develops a beautifully caramelized crust in the oven:
- Broil for the Last Few Minutes: Once the chicken reaches an internal temperature of 165°F (74°C), turn on the broiler in your oven for the last 2-3 minutes. Keep an eye on the chicken to make sure it doesn’t burn. The high heat will caramelize the honey mustard marinade, creating a crispy, golden exterior.
- Baste the Chicken: If you’re worried about the chicken becoming dry while baking, baste the chicken halfway through the cooking time with some of the leftover marinade (be sure to reserve some that hasn’t touched raw chicken). This adds moisture and encourages the marinade to thicken and glaze the chicken as it bakes.
- Avoid Overcrowding the Pan: If you’re baking multiple pieces of chicken, give them space in the baking dish to ensure air circulates around each piece. This promotes even cooking and ensures the chicken gets a crisp exterior without steaming.
5. Tips for Even Cooking and Perfect Presentation
To make sure your Honey Mustard Chicken cooks evenly, consider these tips:
- Use a Baking Sheet or Dish: A baking sheet is ideal for cooking chicken breasts or thighs because it allows air to circulate around the chicken, helping to cook it evenly. If you prefer to use a baking dish, choose one that fits the chicken pieces without overcrowding.
- Flip the Chicken (Optional): If you’re using skinless chicken breasts, consider flipping them halfway through the cooking process to ensure even browning on both sides. However, bone-in pieces like thighs or drumsticks usually don’t need to be flipped since they cook well with the skin side up.
- Arrange with Vegetables (Optional): If you want to cook a one-pan meal, consider placing some root vegetables (like potatoes, carrots, or sweet potatoes) around the chicken in the baking dish. These vegetables will soak up the flavors from the marinade and cook perfectly alongside the chicken.
Final Thoughts on Baked Honey Mustard Chicken
Baking your Honey Mustard Chicken in the oven is a simple yet effective way to create a flavorful, tender, and golden-brown dish. By setting the right temperature and keeping an eye on the cooking time, you can achieve a chicken that’s juicy on the inside with a beautifully crisped exterior. The added benefit of baking is the ability to use minimal hands-on time, allowing you to focus on preparing side dishes or other components of your meal. With a few simple tips, your Honey Mustard Chicken will turn out perfect every time!
Grilled Honey Mustard Chicken: Achieving the Perfect Char
Grilling is one of the best ways to cook Honey Mustard Chicken, as it imparts a smoky, slightly charred flavor that perfectly complements the sweet, tangy, and savory marinade. Achieving the perfect char is all about getting the balance right between high heat and careful cooking to ensure that the outside of the chicken is beautifully caramelized while the inside remains tender and juicy.
1. Preheat the Grill to the Right Temperature
Before you even think about placing the chicken on the grill, it’s essential to get the grill up to the right temperature. This helps achieve a perfect sear and prevents the chicken from sticking or drying out.
Direct vs. Indirect Heat
For Honey Mustard Chicken, it’s best to use two-zone cooking (a combination of direct and indirect heat) for optimal results:
- Direct Heat: This is when the chicken is placed directly over the flames or heat source. This high heat creates a beautiful charred crust and caramelizes the honey mustard marinade.
- Indirect Heat: Once the chicken has been seared, you’ll want to move it to a cooler area of the grill to finish cooking through without burning. This will allow the chicken to cook gently, ensuring the interior is juicy and tender.
- Ideal Temperature: Preheat your grill to medium-high heat (around 375°F to 400°F or 190°C to 200°C) for direct grilling, and adjust the temperature to medium (about 300°F to 350°F or 150°C to 175°C) for indirect grilling.
2. Preparing the Chicken for Grilling
Before grilling, make sure your Honey Mustard Chicken is well-marinated, which will help it absorb the flavors and moisture from the marinade. Additionally, there are a few preparation steps you can take to ensure your chicken is perfectly grilled.
Pat Dry (Optional)
If the marinade is too wet or watery, it can prevent the chicken from forming a good sear. Before placing the chicken on the grill, pat it dry with paper towels to remove excess marinade. This will help achieve a better crust and prevent flare-ups on the grill.
- Tip: Leave some marinade on the chicken to keep the flavors intact, but don’t let it drip excessively onto the grill grates.
Use a Grill Basket (Optional)
For boneless chicken breasts or thighs, a grill basket can be helpful to ensure the chicken stays in place and doesn’t stick to the grates. It also allows for easier flipping, especially if you’re grilling skinless pieces.
- Tip: If you prefer skin-on chicken, place the chicken skin-side down first to allow the skin to crisp up and develop a nice, golden-brown color.
3. Achieving the Perfect Char
The char you achieve on the Honey Mustard Chicken will depend largely on how you handle the grilling process. Charred edges are key to enhancing the flavor of the chicken, but it’s important not to burn the marinade or the chicken itself. Here’s how to perfect your grill marks and golden crust:
Searing the Chicken
Place the chicken on the direct heat side of the grill and close the lid. The direct heat will quickly start to caramelize the honey mustard marinade, turning it into a rich, golden-brown, crispy layer. Searing the chicken for 3-5 minutes per side will give it those signature grill marks and a flavorful crust.
- Tip: Avoid flipping the chicken too early. Give it time to sear properly so that it doesn’t stick to the grates.
Flipping the Chicken
Once the first side is nicely seared and you see grill marks, it’s time to flip the chicken. Be sure to flip it only once to maintain the grill marks and to avoid losing flavor from the marinade.
- Tip: Use tongs or a spatula to flip the chicken gently without tearing the crispy skin or damaging the chicken.
Charred, Not Burnt
While you want a charred exterior, be cautious of overcooking the chicken, especially on the edges. The sugars in the honey mustard marinade can burn quickly if exposed to high heat for too long. To prevent this, move the chicken to the indirect heat section of the grill once you’ve achieved a good sear.
- Tip: If the chicken starts to char too quickly or the marinade looks like it’s burning, reduce the heat or move it further away from the direct flames.
4. Cooking Through Without Drying Out
While achieving the perfect char is important, you don’t want to lose sight of the most important factor: ensuring the chicken is fully cooked and moist inside. Here’s how to make sure the chicken stays juicy and tender while getting that beautiful grilled exterior:
Indirect Heat to Finish Cooking
Once the chicken has developed a nice charred crust on both sides, move it to the cooler side of the grill to finish cooking through with indirect heat. Close the lid to create an oven-like environment that helps cook the chicken evenly. The temperature inside the grill should hover around 300°F (150°C) for optimal cooking without drying out the chicken.
- Tip: This indirect heat allows the chicken to cook through without getting overcooked on the outside. You’ll be able to maintain that beautiful golden-brown exterior while keeping the inside tender and juicy.
Use a Meat Thermometer
The only way to ensure the chicken is thoroughly cooked is to use a meat thermometer. Insert the thermometer into the thickest part of the chicken, avoiding the bone. The chicken is done when the internal temperature reads 165°F (74°C).
- Tip: If the chicken is close to the right temperature but not quite there, leave it on the indirect heat for another 5-10 minutes, checking periodically with the thermometer.
5. Let the Chicken Rest After Grilling
Once your Honey Mustard Chicken has reached the perfect char and is fully cooked, it’s important to let it rest for 5-10 minutes before serving. This allows the juices to redistribute, ensuring that the chicken stays juicy and tender when sliced.
- Tip: Cover the chicken loosely with aluminum foil to keep it warm during the resting period.
Final Thoughts on Grilled Honey Mustard Chicken
Grilling Honey Mustard Chicken is an excellent way to elevate the flavors with a perfect balance of charred sweetness and smoky aroma. By mastering the grilling process, from preheating the grill to carefully monitoring the cooking times, you can ensure that your chicken turns out perfectly charred on the outside and juicy on the inside. The smoky grill flavor pairs beautifully with the tangy sweetness of the honey mustard marinade, creating a dish that’s sure to impress!
Pan-Seared Honey Mustard Chicken: Quick and Flavorful Skillet Method
Pan-searing is a fantastic way to cook Honey Mustard Chicken, especially when you want a quick, flavorful meal without firing up the grill or turning on the oven. This skillet method allows the honey mustard marinade to caramelize, creating a delicious, golden-brown crust while the chicken stays juicy and tender on the inside. Pan-searing also gives the chicken a nice crispy exterior that adds an extra layer of texture and flavor to the dish. Here’s how to master the pan-seared method for Honey Mustard Chicken.
1. Choosing the Right Skillet for Pan-Seared Chicken
For the best results, it’s crucial to select the right skillet. Ideally, you’ll want to use a heavy-bottomed skillet that retains heat well and distributes it evenly. Here are a few options:
- Cast Iron Skillet: This is one of the best options for pan-searing chicken. Cast iron retains heat very well, which ensures that the chicken will get an even sear and cook through without losing too much moisture. It also adds a crispy crust to the chicken.
- Stainless Steel Skillet: A stainless steel skillet also works well for pan-searing chicken, especially if you don’t have a cast iron skillet. It’s durable, non-reactive, and retains heat well, making it great for creating that perfect caramelized crust.
- Nonstick Skillet: While nonstick skillets are great for preventing the chicken from sticking, they may not give you the same level of sear as cast iron or stainless steel. However, it can still be a good option if you want a less greasy finish.
- Tip: Choose a skillet with a flat surface to ensure even cooking and to maximize the contact area between the chicken and the pan.
2. Preheating the Skillet to the Right Temperature
Getting the skillet hot enough is key to achieving a crispy, golden-brown crust on your Honey Mustard Chicken. Preheat your skillet over medium-high heat for about 2-3 minutes before adding the chicken. This ensures that the skillet is evenly heated and ready for searing.
- Tip: To test if the skillet is hot enough, drop a small amount of water into the pan. If it sizzles immediately, the pan is ready for the chicken.
3. Using the Right Cooking Oil
When pan-searing Honey Mustard Chicken, it’s important to use a high-heat cooking oil that won’t burn at the high temperatures needed to sear the chicken. Here are a few good options:
- Olive Oil: Extra virgin olive oil is a great choice for flavor, but it has a lower smoke point (around 375°F or 190°C), which means it can start to smoke at higher temperatures. It works well for a gentler sear, but be mindful of the heat.
- Vegetable Oil or Canola Oil: These oils have a higher smoke point (around 400-450°F or 200-230°C), making them ideal for high-heat cooking. They won’t burn or smoke as easily, allowing you to achieve a crisp exterior without worrying about flavor loss.
- Butter (Optional): Adding a little butter to the pan toward the end of cooking gives the chicken a rich flavor. However, butter alone can burn quickly, so it’s best to combine it with another high-heat oil for a perfect balance.
- Tip: Heat the oil until it shimmers but doesn’t smoke, as this ensures the chicken will sear properly without burning.
4. Searing the Chicken to Achieve a Golden Crust
Place the marinated chicken in the preheated skillet, making sure that each piece is flat and making full contact with the pan. The chicken should sizzle when it hits the pan, which is a good sign that it’s beginning to sear.
Cooking Time
- For boneless, skinless chicken breasts, cook the chicken for about 4-5 minutes per side.
- For boneless, skinless chicken thighs, cook for about 5-6 minutes per side, as thighs tend to be a bit thicker and take longer to cook.
- Tip: Don’t overcrowd the pan! If you’re cooking multiple pieces of chicken, do it in batches to ensure the chicken sears evenly. Overcrowding the pan can lower the heat and result in steaming rather than searing.
Flipping the Chicken
Once the first side of the chicken is golden brown, flip it carefully using tongs or a spatula. You should see a crispy caramelized crust on the side that was searing. Let the other side cook until it’s browned and the chicken reaches an internal temperature of 165°F (74°C). This may take an additional 4-5 minutes for boneless breasts, or a bit longer for bone-in pieces.
- Tip: Avoid flipping the chicken too early. Let it sear without moving it too much for the best results.
5. Adding Extra Flavor and Moisture While Cooking
To enhance the flavor of your pan-seared Honey Mustard Chicken, there are a few additional steps you can take while the chicken is cooking:
Basting with the Marinade
Once the chicken is seared on both sides, you can add a little bit of extra honey mustard marinade to the pan and baste the chicken with it as it cooks. This adds moisture and intensifies the flavor.
- Tip: Make sure the marinade is cooked thoroughly if it’s coming into contact with the chicken, to avoid any contamination from raw meat.
Adding Fresh Herbs or Garlic
For an extra flavor boost, add a few sprigs of fresh thyme or crushed garlic cloves to the pan during the last few minutes of cooking. This imparts a beautiful aromatic flavor to the chicken and helps it cook more evenly.
- Tip: You can also add a small knob of butter toward the end of cooking for a richer, more indulgent flavor. Swirl the butter in the pan until it melts and coats the chicken.
6. Ensuring Even Cooking and Juiciness
Pan-searing allows the Honey Mustard Chicken to cook quickly, but it’s important to ensure that the chicken is cooked all the way through without drying out.
- Use a Meat Thermometer: Insert a meat thermometer into the thickest part of the chicken. It should read 165°F (74°C) to ensure it’s cooked safely and thoroughly.
- Let the Chicken Rest: After removing the chicken from the skillet, let it rest for 5 minutes before slicing. This helps the juices redistribute throughout the chicken, ensuring it stays juicy and tender when cut.
7. Serving the Pan-Seared Honey Mustard Chicken
Once your Honey Mustard Chicken is perfectly seared and rested, it’s time to serve! This method produces a deliciously crispy exterior and a moist interior that’s packed with flavor. The golden-brown crust formed from the marinade gives a great contrast to the tender, juicy chicken.
You can serve this chicken with a variety of sides, such as roasted vegetables, rice, or a crisp salad, for a well-rounded and satisfying meal.
- Tip: To add a finishing touch, drizzle a little more of the honey mustard sauce over the chicken just before serving for an extra burst of flavor.
Final Thoughts on Pan-Seared Honey Mustard Chicken
Pan-searing is a fantastic method to create a quick, flavorful, and crispy Honey Mustard Chicken. With the right skillet, oil, and temperature, you can achieve the perfect balance of caramelized, golden-brown crust and juicy, tender chicken. This method not only cooks quickly but also brings out the full depth of flavor in the honey mustard marinade, making it a great choice for busy weeknights or special occasions when you want something delicious in a short amount of time.
Slow Cooker or Air Fryer Option: Hands-Off Cooking Methods
For those who prefer hands-off cooking methods that still yield juicy, flavorful Honey Mustard Chicken, both the Slow Cooker and Air Fryer are fantastic options. These methods offer convenience, allowing you to prepare the meal with minimal effort, while still achieving a delicious, tender chicken. Whether you have a busy day ahead or simply want to avoid turning on the oven, these cooking methods ensure your Honey Mustard Chicken comes out perfectly cooked without constant supervision.
1. Slow Cooker Honey Mustard Chicken: Set It and Forget It
The slow cooker is a perfect choice for making Honey Mustard Chicken when you want to set the chicken and forget it. This method gently cooks the chicken over an extended period, making it extremely tender and juicy, as it absorbs the flavors from the honey mustard marinade.
How to Cook Honey Mustard Chicken in a Slow Cooker:
- Prepare the Marinade: As with the stovetop method, begin by preparing your honey mustard marinade. Whisk together the honey, mustard, garlic, and other ingredients for the marinade.
- Season the Chicken: Coat the chicken with the marinade. You can use chicken breasts or thighs, depending on your preference. For an extra layer of flavor, you can brown the chicken in a skillet for a few minutes before transferring it to the slow cooker.
- Slow Cook: Place the marinated chicken in the slow cooker. Cover and cook on low heat for 4-6 hours or high heat for 2-3 hours. The low, slow heat will allow the chicken to absorb all the flavors of the marinade while becoming incredibly tender.
- Tip: For a richer flavor, you can add a splash of chicken broth or white wine to the slow cooker to create a savory base sauce that complements the honey mustard.
- Optional Step – Thicken the Sauce: If you prefer a thicker sauce, after cooking, remove the chicken and transfer the sauce to a saucepan. Simmer over medium heat for about 5-10 minutes until the sauce reduces and thickens, then pour it over the chicken when serving.
Benefits of Using a Slow Cooker for Honey Mustard Chicken:
- Tender, Fall-Apart Chicken: The slow cooking method ensures that the chicken becomes very tender, practically falling apart. This is especially ideal for chicken thighs, which are naturally juicier and more flavorful when slow-cooked.
- Set It and Forget It: Once everything is in the slow cooker, you can go about your day and not worry about the chicken. It’s an ideal option for busy people or those who prefer minimal hands-on cooking.
- Flavor Infusion: The slow cooking process gives the chicken time to soak up the flavors of the marinade, resulting in a rich and flavorful meal.
2. Air Fryer Honey Mustard Chicken: Quick and Crispy Results
If you want the convenience of a faster cooking time but still want a crispy finish, the air fryer is an excellent choice. The air fryer uses hot air circulation to crisply cook the chicken while locking in the moisture. It’s perfect for those who crave the texture of crispy chicken skin or a caramelized crust without the need for deep frying.
How to Cook Honey Mustard Chicken in an Air Fryer:
- Prepare the Marinade: As with other methods, mix the honey mustard marinade. Coat the chicken with this mixture and allow it to marinate for at least 30 minutes, though you can let it sit longer for deeper flavor.
- Preheat the Air Fryer: Preheat your air fryer to 375°F (190°C) for about 3-5 minutes. This step ensures that the chicken cooks evenly from the start.
- Place the Chicken in the Air Fryer: Arrange the marinated chicken in the air fryer basket. Be sure not to overcrowd the basket, as this can prevent the chicken from cooking evenly and achieving a crisp texture.
- Cook: Cook the chicken at 375°F (190°C) for 10-15 minutes, depending on the thickness of the chicken. If using boneless, skinless chicken breasts, start checking for doneness around 10 minutes. For bone-in chicken, it may take a few minutes longer.
- Tip: Flip the chicken halfway through the cooking time to ensure both sides get crispy and golden brown.
Benefits of Using an Air Fryer for Honey Mustard Chicken:
- Quick Cooking: The air fryer cooks the chicken much faster than other methods, making it perfect for those who want a quick and easy dinner. In just 15 minutes or less, you’ll have crispy, juicy chicken ready to serve.
- Crispy Texture: The air fryer is known for creating a crispy exterior without using a lot of oil. The honey mustard marinade will caramelize as the chicken cooks, giving you a beautiful, crispy outer layer.
- Less Oil, Healthier Option: Unlike traditional frying, the air fryer requires little to no oil, making it a healthier option while still providing a satisfying crunch.
- Hands-Off Cooking: Once you’ve placed the chicken in the air fryer, you can walk away and let it cook. It’s a great choice for busy evenings when you want to prepare a meal with minimal fuss.
3. Choosing Between the Slow Cooker and Air Fryer
Both the slow cooker and air fryer offer different benefits depending on your needs:
- Choose the Slow Cooker if:
- You have more time and want a hands-off cooking method that will result in a super tender chicken.
- You prefer fall-apart chicken that has absorbed the full depth of the marinade flavors.
- You are looking for a method that is perfect for meal prepping or preparing larger batches of food.
- Choose the Air Fryer if:
- You want crispy, golden-brown chicken with a quicker cooking time.
- You prefer a healthier, less-oily method that still gives you the crunch and texture of frying.
- You are looking for a fast, weeknight-friendly option for a quick meal.
4. Final Thoughts on Slow Cooker and Air Fryer Honey Mustard Chicken
Both the Slow Cooker and Air Fryer are great choices for preparing Honey Mustard Chicken in an easy, hands-off way. Whether you’re looking for super tender chicken with rich flavor (slow cooker) or crispy, juicy chicken with a quick cook time (air fryer), both methods ensure a delicious result. Depending on your schedule, the flavors you want to highlight, and your kitchen tools, you can choose the method that best fits your cooking style and time constraints. Either way, you’ll end up with a perfectly cooked Honey Mustard Chicken that’s sure to impress!
Serving Suggestions and Storage Tips
Best Side Dishes: Roasted Vegetables, Rice, or Mashed Potatoes
When it comes to pairing the perfect sides with Honey Mustard Chicken, you want dishes that complement the dish’s sweet, tangy, and savory flavors without overpowering them. The best side dishes are those that offer balance in texture, flavor, and nutrition, while enhancing the overall meal experience. Roasted vegetables, rice, and mashed potatoes are classic options that are versatile and easy to prepare. Let’s break down how each of these sides works wonderfully with Honey Mustard Chicken.
1. Roasted Vegetables: Fresh and Flavorful Pairing
Roasted vegetables bring a lovely depth of flavor to the table and provide a perfect contrast to the sweet honey mustard glaze on the chicken. Roasting vegetables enhances their natural sweetness and caramelizes their edges, which harmonizes beautifully with the honey in the chicken marinade.
Why Roasted Vegetables Work Well:
- Savory & Sweet Balance: The roasted vegetables, especially those like carrots, brussels sprouts, and sweet potatoes, have a naturally sweet profile, which complements the honey mustard sauce on the chicken. The slight bitterness of brussels sprouts or the earthiness of root vegetables like parsnips balances the richness of the chicken.
- Colorful & Nutrient-Dense: Roasting brings out the vibrant colors in vegetables, making the plate visually appealing. The variety of vegetables, such as zucchini, bell peppers, red onions, and cauliflower, provides a broad spectrum of nutrients, including fiber, vitamins, and antioxidants.
- Easy to Prepare: Roasting vegetables is simple and can be done alongside the chicken in the oven, making it a practical side that doesn’t require extra attention.
How to Roast Vegetables for Honey Mustard Chicken:
- Toss vegetables with olive oil, salt, pepper, and your favorite herbs like rosemary, thyme, or oregano.
- Roast at 400°F (200°C) for about 25-35 minutes, flipping halfway through for even crispiness. For an added layer of flavor, squeeze a bit of lemon juice over the vegetables before serving.
2. Rice: A Soft, Mild Base to Soak Up Flavors
Rice is a fantastic side dish that acts as a soft, neutral base to soak up the vibrant honey mustard sauce from the chicken. It balances out the richness of the chicken and can be flavored in a variety of ways to enhance the overall meal.
Why Rice Works Well:
- Mild & Versatile: The mild flavor of rice, especially white rice, brown rice, or wild rice, provides a soothing counterpoint to the boldness of the honey mustard chicken. It can easily be flavored with broth or herbs to add more depth to the dish without clashing with the chicken’s flavors.
- Absorbs Sauces: Rice is excellent at soaking up the sauces from your honey mustard chicken. As you bite into the juicy chicken, the rice will capture any remaining marinade, giving you a complete flavor experience.
- Hearty & Filling: Rice adds volume to the meal, making it more filling. It works well for serving large groups or when you want a more substantial side dish.
How to Prepare Rice for Honey Mustard Chicken:
- Cook white rice or brown rice according to package instructions. To boost the flavor, cook the rice in chicken broth or add herbs like bay leaves or thyme during cooking.
- For a slightly different twist, make fried rice with leftover rice, adding vegetables and a little soy sauce to enhance the flavor without overwhelming the honey mustard chicken.
3. Mashed Potatoes: Comforting and Creamy
For a more indulgent side dish, mashed potatoes are always a winner. Their creamy, smooth texture pairs perfectly with the crisp or tender chicken, and their mild flavor makes a wonderful contrast to the sweet and tangy marinade on the chicken. Mashed potatoes also have a comforting, familiar quality that everyone loves.
Why Mashed Potatoes Work Well:
- Creamy Texture: The smooth, creamy texture of mashed potatoes contrasts wonderfully with the crispy exterior of grilled or pan-seared chicken, creating a satisfying contrast.
- Versatility in Flavor: Mashed potatoes can be customized to complement the honey mustard chicken. You can infuse them with garlic, butter, or even cheese for extra richness. For a twist, try sour cream or cream cheese to add tanginess that echoes the flavors in the chicken.
- Filling and Hearty: Mashed potatoes are a comfort food that makes the meal feel complete, perfect for a family dinner or when you’re craving something extra satisfying.
How to Make Mashed Potatoes for Honey Mustard Chicken:
- Boil Yukon Gold or Russet potatoes until tender, then mash with butter, heavy cream, and salt.
- For extra flavor, roast garlic and blend it into the potatoes, or mix in cheddar cheese for a cheesy mash.
- Add fresh chives or parsley as a garnish for a touch of color and freshness.
4. Additional Side Dish Ideas:
While roasted vegetables, rice, and mashed potatoes are excellent choices, here are a few more side dishes that can elevate your Honey Mustard Chicken:
- Quinoa: A protein-packed, nutty alternative to rice that pairs well with honey mustard’s sweetness.
- Sauteed Greens: Spinach, kale, or green beans sautéed with garlic and olive oil add a bright, slightly bitter flavor to balance out the richness of the chicken.
- Crispy Roasted Potatoes: Small, roasted potatoes with a crispy exterior and fluffy interior make a wonderful side that complements the crispy skin of the chicken.
- Coleslaw: A fresh, crunchy coleslaw with a tangy dressing can bring a refreshing contrast to the rich flavors of the chicken.
Conclusion:
Whether you opt for the earthy sweetness of roasted vegetables, the comfort of mashed potatoes, or the simplicity of rice, each of these side dishes provides a complementary flavor profile and texture that enhances your Honey Mustard Chicken. By balancing rich, savory, and sweet components with the crispy, tender chicken, these sides help create a well-rounded, satisfying meal that’s sure to impress your family or guests. Choose your sides based on your mood or dietary preferences, and enjoy a meal that’s as delicious as it is versatile!
How to Store Leftovers: Refrigeration and Freezing Tips
Leftovers from your Honey Mustard Chicken meal can be stored for future enjoyment, whether you’re looking to save time on busy days or just want to enjoy the dish again. Storing and reheating Honey Mustard Chicken properly ensures that you maintain its juicy texture and rich flavors while preventing any food waste. Below are tips on how to store your leftovers in the refrigerator and freezer, along with best practices for reheating them.
1. Storing in the Refrigerator
If you plan to eat your Honey Mustard Chicken within a few days, the refrigerator is the best option. Properly stored, your chicken will stay fresh for up to 3-4 days. Follow these steps to ensure your leftovers stay flavorful and safe to eat:
How to Store Honey Mustard Chicken in the Refrigerator:
- Cool the Chicken First: Before refrigerating your chicken, make sure it has cooled to room temperature. Avoid leaving it out for more than 2 hours to reduce the risk of bacterial growth.
- Use an Airtight Container: Store the chicken in an airtight container or wrap it tightly in plastic wrap and place it in a resealable bag. The airtight container will help preserve moisture and prevent the chicken from drying out.
- Store the Sauce Separately (Optional): If you have extra honey mustard sauce, you can store it separately in a small container. This will allow you to reapply it when reheating the chicken, enhancing the flavor and moisture.
How to Reheat Honey Mustard Chicken from the Refrigerator:
- Oven Method: Preheat your oven to 350°F (175°C). Place the chicken on a baking sheet and cover it loosely with foil to keep it from drying out. Bake for about 10-15 minutes, or until heated through.
- Microwave Method: Place the chicken on a microwave-safe plate and cover it with a damp paper towel to lock in moisture. Microwave on high for 1-2 minutes, checking halfway through to ensure it’s heated evenly.
- Skillet Method: You can also reheat the chicken in a skillet on medium heat with a splash of water or extra honey mustard sauce to keep it moist. Cover the skillet to trap heat and warm it for about 5-7 minutes.
2. Freezing Honey Mustard Chicken for Long-Term Storage
If you want to store your Honey Mustard Chicken for a longer period, freezing is the way to go. When properly frozen, your chicken will retain its flavor and texture for up to 3-4 months. However, the honey mustard marinade may separate or lose some of its consistency after freezing, so it’s important to store the chicken properly for the best results.
How to Freeze Honey Mustard Chicken:
- Cool Completely: Just like for refrigeration, allow the chicken to cool completely before freezing to prevent excess moisture from forming inside the storage container.
- Wrap the Chicken Properly: Wrap individual pieces of chicken tightly in plastic wrap or aluminum foil. For added protection, place the wrapped chicken in a resealable freezer bag or a vacuum-sealed bag. Be sure to squeeze out as much air as possible to prevent freezer burn.
- Label and Date: Label the bag with the date of freezing, so you can track how long the chicken has been stored. This helps you stay within the optimal 3-4 month freezing period.
- Freezing the Sauce: If you have leftover honey mustard sauce, you can freeze it in a separate container or ice cube tray. The sauce will stay fresh for about 2-3 months.
How to Reheat Frozen Honey Mustard Chicken:
- Thawing: For the best results, thaw your frozen Honey Mustard Chicken overnight in the refrigerator. This allows the chicken to thaw evenly and safely.
- Reheat Using the Oven: Once thawed, you can reheat the chicken in the oven at 350°F (175°C) for about 15-20 minutes. If the chicken is frozen solid, it will take longer (up to 30 minutes). Be sure to cover the chicken with foil to prevent it from drying out.
- Skillet Method: If you’re in a hurry and didn’t thaw the chicken, you can reheat it straight from the freezer in a skillet. Add a little oil or water, cover the skillet, and heat the chicken on medium-low for about 15-20 minutes, checking often to ensure it doesn’t burn.
3. Reheating Tips for Maintaining Flavor and Texture
Reheating leftovers, especially chicken, can sometimes result in a dry, rubbery texture if not done properly. Here are some tips to help you achieve the best results when reheating your Honey Mustard Chicken:
- Add Moisture: To prevent the chicken from drying out during reheating, add a small amount of water or extra honey mustard sauce to the chicken before heating. This will help retain moisture and flavor.
- Reheat Evenly: Ensure that the chicken is heated through evenly by checking the temperature at several points. The internal temperature should reach 165°F (74°C) to ensure it’s safe to eat.
- Use a Basting Brush: If you’re reheating the chicken in the oven or on the stove, consider brushing it with some extra honey mustard sauce to boost the flavor and moisture levels. This will also help the chicken retain the signature glaze.
4. Tips for Preventing Freezer Burn and Maintaining Quality
When freezing chicken, there are a few things to keep in mind to avoid freezer burn and maintain the quality of the meat:
- Squeeze out Air: Air exposure is the primary cause of freezer burn. By squeezing out as much air as possible from the storage bags, you can prevent freezer burn from affecting your chicken.
- Use a Vacuum Sealer: If you have a vacuum sealer, use it for a more airtight seal. This is one of the most effective ways to store Honey Mustard Chicken for long-term freezing without compromising quality.
- Use within 3-4 Months: For optimal flavor and texture, consume your frozen Honey Mustard Chicken within 3-4 months. The longer the chicken stays in the freezer, the more likely it is to lose moisture and flavor.
Conclusion:
By properly storing your Honey Mustard Chicken in the refrigerator or freezer, you can enjoy it again later without sacrificing flavor or quality. Refrigerating it is ideal for short-term storage, while freezing is perfect for long-term convenience. Whether you’re reheating leftovers from the fridge or thawing frozen chicken, follow these tips to maintain the juicy, tender, and flavorful qualities that make Honey Mustard Chicken such a satisfying dish. With these simple storage and reheating practices, you’ll be able to enjoy this delicious meal on another busy night or whenever you crave a tasty meal.
Reheating Without Drying Out: Oven, Microwave, and Skillet Methods
Reheating Honey Mustard Chicken can sometimes result in dryness, especially if not done carefully. To ensure your leftovers remain juicy, flavorful, and tender, it’s essential to use the right methods and reheating techniques. Whether you’re using an oven, microwave, or skillet, there are specific strategies you can employ to preserve moisture, flavor, and texture. Let’s explore how to reheat your chicken using each of these methods, so you can enjoy a delicious meal just like it was fresh off the stove.
1. Oven Method: Gently Reheat for Juicy Chicken
The oven is the best option for reheating Honey Mustard Chicken if you want to preserve its moisture, flavor, and texture. By using gentle heat, you can avoid drying out the chicken while ensuring it is heated evenly throughout. This method is perfect for reheating larger quantities or whole pieces of chicken, as it evenly warms the chicken without making it tough.
Steps for Reheating in the Oven:
- Preheat the Oven: Preheat your oven to 350°F (175°C). This temperature is low enough to heat the chicken gradually without overcooking it.
- Add Moisture: To keep the chicken juicy, place it on a baking sheet and lightly cover it with aluminum foil. If you’d like to preserve the honey mustard sauce, you can brush some extra sauce over the chicken before covering it with foil. You can also add a few tablespoons of water or chicken broth around the chicken to create steam and keep it moist.
- Reheat: Place the baking sheet in the oven and reheat the chicken for 10-15 minutes, depending on the size and thickness of the pieces. Check for doneness by cutting into the thickest part of the chicken to ensure it’s heated through. The internal temperature should reach 165°F (74°C).
- Finish with Broil (Optional): For a crispy exterior, you can uncover the chicken during the last 2-3 minutes of reheating and switch to the broil setting. This will crisp up the edges of the chicken, giving it a fresh texture.
Why the Oven Method Works:
- The low and slow heat ensures the chicken doesn’t dry out.
- Covering with foil traps moisture, keeping the chicken juicy.
- This method is ideal for reheating multiple pieces of chicken or larger cuts like chicken breasts or thighs.
2. Microwave Method: Quick and Convenient
The microwave is the most convenient method for reheating Honey Mustard Chicken, especially when you’re in a hurry. While it is the fastest option, it requires some care to prevent the chicken from drying out or becoming rubbery. The key is to use medium heat and to monitor the chicken closely while reheating.
Steps for Reheating in the Microwave:
- Prepare the Chicken: Place the chicken on a microwave-safe plate. To keep the chicken moist, cover it with a damp paper towel or a microwave-safe cover. This will trap steam and help the chicken stay juicy.
- Add Moisture: If your chicken seems dry, you can drizzle a small amount of water or extra honey mustard sauce over the chicken. This will help to retain moisture during the microwave reheating process.
- Reheat: Set the microwave to medium heat and heat the chicken in 30-second intervals. After each interval, check to see if the chicken is hot enough. Rotate the chicken to ensure it heats evenly. Continue reheating in 30-second increments until the internal temperature reaches 165°F (74°C).
- Rest Before Serving: Allow the chicken to rest for a minute or two after reheating, as this helps redistribute the juices, keeping it tender.
Why the Microwave Method Works:
- The damp paper towel helps trap moisture and prevents the chicken from becoming too dry.
- The microwave reheats the chicken quickly without overcooking the meat.
- It’s the fastest and most convenient method for reheating a single portion or smaller pieces of chicken.
3. Skillet Method: Quick and Flavorful
The skillet method is an excellent way to reheat Honey Mustard Chicken without losing any of its crispiness or flavor. This method works particularly well if you want to revive the texture of grilled or pan-seared chicken. With a skillet, you can quickly reheat the chicken while adding a bit of extra moisture to keep it juicy.
Steps for Reheating in a Skillet:
- Heat the Skillet: Preheat a skillet over medium heat. You can add a small amount of oil (like olive oil or vegetable oil) or a tablespoon of butter to help retain moisture while reheating.
- Add Moisture: If you have leftover honey mustard sauce, brush some over the chicken or drizzle a bit of water or chicken broth into the skillet. This will create steam and prevent the chicken from drying out.
- Reheat: Place the chicken in the skillet and cover it with a lid. This traps heat and moisture, allowing the chicken to reheat evenly without drying out. Heat the chicken for about 5-7 minutes, flipping it halfway through to ensure it warms through on both sides.
- Check for Temperature: Use a meat thermometer to ensure the chicken reaches an internal temperature of 165°F (74°C) before serving.
Why the Skillet Method Works:
- The high heat of the skillet helps maintain a crispy texture while keeping the chicken moist.
- The lid traps steam, preventing the chicken from drying out and helping it retain its juicy tenderness.
- It’s great for adding extra flavor if you choose to reheat the chicken with additional honey mustard sauce or a little seasoning.
Tips for All Methods:
- Avoid Overheating: Whether you’re using the oven, microwave, or skillet, avoid overcooking the chicken during the reheating process. Overheating can lead to tough, dry meat. Reheat in short bursts and check the internal temperature often.
- Reapply Sauce: For a more flavorful experience, add some extra honey mustard sauce during the reheating process, either by basting it or drizzling it over the chicken. This adds flavor and moisture, ensuring the chicken stays succulent.
- Use a Meat Thermometer: The best way to ensure your chicken is thoroughly reheated without being overdone is to check the internal temperature. It should be 165°F (74°C) to guarantee it is safe and hot throughout.
Conclusion:
Reheating Honey Mustard Chicken doesn’t have to result in dry, flavorless leftovers. By using the oven, microwave, or skillet methods, you can preserve the chicken’s juiciness, flavor, and texture. Each method has its advantages, whether you’re looking for a quick reheating solution (microwave), a more thorough and crispy reheat (oven), or a quick and flavorful fix (skillet). With the right approach, your leftovers will taste just as delicious as when they were first served, making for a satisfying meal every time.
Meal Prep Ideas: Making It Ahead for Easy Weeknight Dinners
Honey Mustard Chicken is not only a delicious and versatile dish, but it also makes for an excellent meal prep option. Preparing this dish ahead of time can save you precious time during busy weeknights, allowing you to enjoy a homemade, flavorful meal without the stress of last-minute cooking. With just a little planning, you can have Honey Mustard Chicken ready to go for several days, perfect for both lunch and dinner. Let’s explore how to incorporate Honey Mustard Chicken into your meal prep routine.
1. Preparing the Chicken in Bulk
One of the easiest ways to make Honey Mustard Chicken for meal prep is by cooking it in bulk. When you’re planning for multiple meals, preparing a larger batch ensures you have enough for several days. This method works well whether you prefer chicken breasts or chicken thighs since both can be marinated and cooked in large quantities without compromising flavor or texture.
Steps for Bulk Cooking:
- Marinate the Chicken: To save time, marinate the chicken in the honey mustard sauce overnight or for at least 30 minutes. This ensures the chicken is flavorful and tender.
- Cook in Larger Quantities: Choose your preferred cooking method, such as baking, grilling, or pan-searing. Baking multiple pieces on a sheet pan at once or grilling a few pieces simultaneously can save you time and effort.
- Cut and Portion: Once cooked, slice or chop the chicken into portions that are easy to pack for individual meals. This also makes it easier to incorporate into different recipes throughout the week.
Why Bulk Cooking Works:
- Cooking in bulk means you only need to prep the chicken once, and you have it ready for multiple meals.
- Pre-portioned servings make it easy to grab and go during the week.
- Having a large batch of Honey Mustard Chicken on hand simplifies meal planning and can reduce the chances of resorting to unhealthy or takeout options.
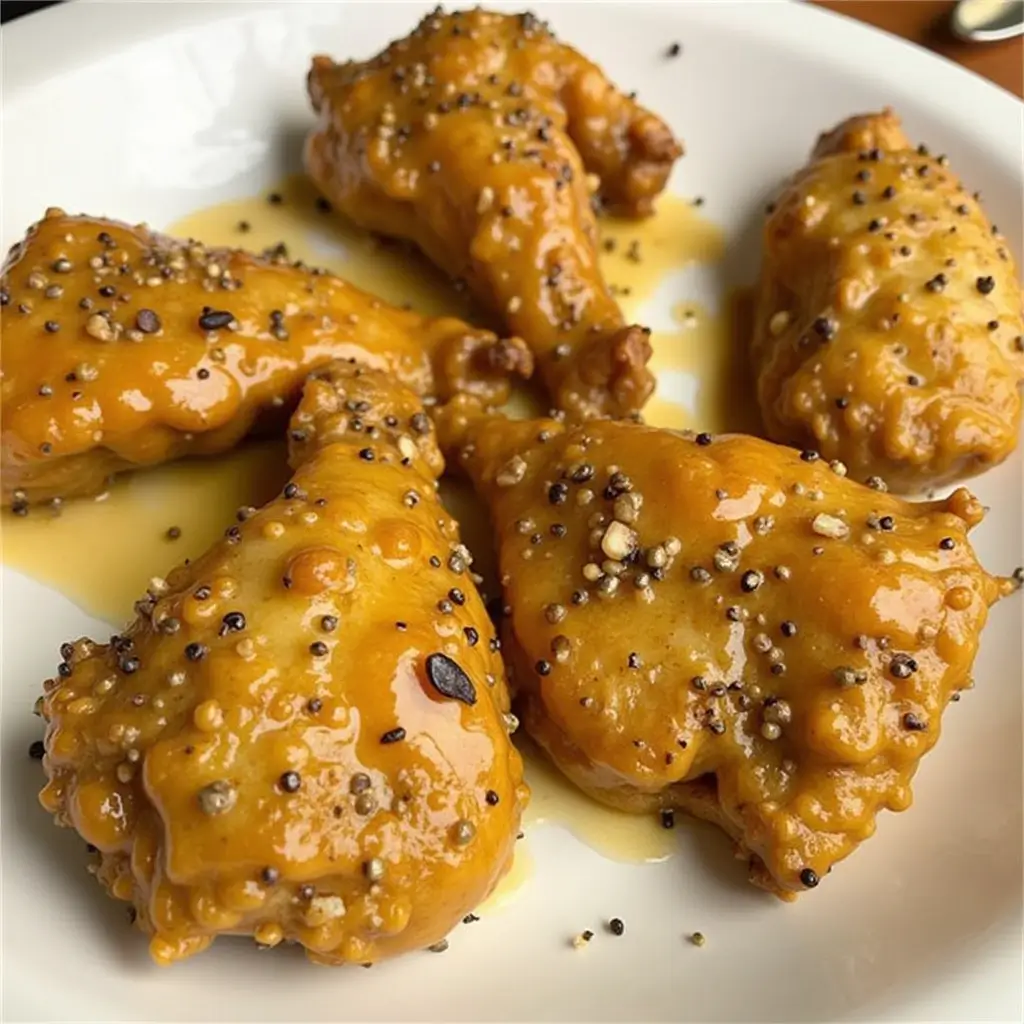
2. Pre-Assembly for Quick Dinners
Another effective meal prep technique is assembling meals ahead of time, so when it’s time to eat, all you need to do is heat and serve. By combining Honey Mustard Chicken with a variety of vegetables, grains, or salads, you can create balanced, ready-to-go dinners that are perfect for busy weeknights.
Meal Ideas for Pre-Assembly:
- Chicken and Rice Bowls: Layer Honey Mustard Chicken over cooked rice (white, brown, or cauliflower rice for a low-carb option). Add steamed vegetables like broccoli, carrots, or zucchini for added nutrition. You can even drizzle extra honey mustard sauce over the bowl for extra flavor.
- Grilled Chicken Salad: Prepare a fresh salad with mixed greens, cherry tomatoes, cucumbers, and your choice of dressing. Add slices of Honey Mustard Chicken on top for a tasty, protein-packed meal. You can also pack individual portions of the dressing on the side to keep the salad fresh.
- Chicken Wraps: Make wraps with whole wheat tortillas, Honey Mustard Chicken, spinach, shredded carrots, and any additional veggies you like. Wrap them tightly and store them in the fridge for easy grab-and-go lunches or dinners.
Why Pre-Assembling Works:
- By assembling meals ahead of time, you minimize the effort involved during the week. All you need to do is heat up the meal or eat it cold.
- Meal prepping in this way helps you maintain portion control and ensures you’re eating balanced, healthy meals.
- You can easily switch up the sides and salads, so you’re not eating the same thing every day.
3. Freezing for Long-Term Meal Prep
If you’re looking to take meal prep to the next level and want to prepare Honey Mustard Chicken for weeks in advance, consider freezing it. Freezing allows you to store Honey Mustard Chicken for future use, making it a perfect option for those who like to plan ahead for busy weeks or want to have homemade meals ready to go in a pinch.
Steps for Freezing Honey Mustard Chicken:
- Cook and Cool: First, cook the chicken fully (whether by baking, grilling, or pan-searing). Allow it to cool completely before freezing to prevent moisture from accumulating inside the storage container.
- Store in Freezer-Safe Containers: Slice or chop the chicken into individual portions, and store it in freezer-safe bags or airtight containers. Label the containers with the date so you know when it was prepared.
- Add Extra Sauce: For added flavor, you can also freeze the honey mustard marinade separately in a small container. When reheating, simply add the sauce back onto the chicken for a fresh burst of flavor.
- Reheat Properly: When ready to use, thaw the chicken in the fridge overnight or use the microwave or stovetop for a quicker defrost. Reheat the chicken using one of the methods mentioned above, and you’ll have a delicious meal in minutes.
Why Freezing Works:
- Freezing Honey Mustard Chicken means you have meals that are ready to go anytime. You don’t have to worry about last-minute cooking or deciding what to eat each night.
- It saves time by allowing you to batch-cook and store meals that will last for weeks, giving you an ongoing supply of flavorful chicken.
- Freezing chicken can help you save money by buying ingredients in bulk and reducing food waste.
4. Make-Ahead Sauces and Sides
In addition to cooking the chicken ahead of time, you can also prepare the sides and sauces for your meals. Having pre-cooked sides like roasted vegetables, mashed potatoes, rice, or quinoa means you can quickly reheat them and pair them with your Honey Mustard Chicken for a complete meal.
Tips for Make-Ahead Sides:
- Roasted Vegetables: Roast your favorite veggies (e.g., carrots, brussels sprouts, sweet potatoes) in advance and store them in the fridge. Reheat them with the chicken, or serve them cold in a salad.
- Grains: Prepare grains like brown rice, quinoa, or farro and store them in containers. They can be reheated quickly in the microwave, or you can toss them into a salad with the chicken for a cold meal.
- Sauces: Make a double batch of honey mustard sauce or gravy to store in the fridge. This way, you always have extra flavor when needed.
Why Make-Ahead Sides Work:
- Having sides ready to go eliminates the need to make last-minute decisions about what to eat.
- You can customize the sides to your taste and dietary preferences, making the meal more varied and balanced.
- Pre-cooking sides also saves time and ensures you’ll always have something delicious to pair with your Honey Mustard Chicken.
Conclusion:
Meal prepping Honey Mustard Chicken is an easy and efficient way to make weeknight dinners less stressful and more flavorful. Whether you choose to bulk cook the chicken, assemble meals in advance, freeze portions, or prepare side dishes ahead of time, you’ll have delicious, healthy meals that are ready to go whenever you need them. By incorporating Honey Mustard Chicken into your meal prep routine, you can enjoy homemade, satisfying meals without spending hours in the kitchen each day.