When it comes to comfort food, few dishes can compete with the timeless appeal of meatloaf. This easy and delicious meatloaf recipe is the perfect balance of savory flavors, making it the ideal choice for a quick weeknight dinner or a satisfying weekend meal. Whether you’re a seasoned cook or a beginner in the kitchen, this simple recipe guarantees juicy, flavorful results every time. With just a handful of basic ingredients and minimal prep, you’ll have a hearty meal ready in no time. Say goodbye to complicated meals and hello to your new go-to dinner that’s sure to please everyone at the table!
Key Ingredients for the Perfect Meatloaf Recipe
Ground Beef: Choosing the Best Cut for Flavor
When it comes to making the perfect meatloaf, the quality of ground beef you choose plays a crucial role in the flavor and texture of the dish. Not all ground beef is created equal, and selecting the right cut can make all the difference.
1. Understanding Fat Content in Ground Beef
Ground beef comes in various fat percentages, and this fat content directly affects the moisture and juiciness of your meatloaf. For a flavorful and tender meatloaf, aim for ground beef with a fat content between 80% lean and 85% lean. This balance ensures that your meatloaf remains juicy while avoiding excess grease. While leaner ground beef, such as 90% lean or higher, may be healthier, it can sometimes result in a dry meatloaf due to the lack of fat.
2. Popular Cuts for Ground Beef
The most common cuts used for ground beef include chuck, round, and sirloin. Chuck is often considered the best choice for meatloaf due to its rich marbling, which adds both flavor and moisture. It’s well-balanced in terms of fat content, giving your meatloaf that perfect, juicy texture. If you prefer a leaner option, ground sirloin offers a slightly firmer texture but still provides good flavor. Round, on the other hand, is leaner and may require extra seasoning or moisture to prevent the meatloaf from becoming dry.
3. Fresh vs. Pre-Ground Beef
Whenever possible, opt for fresh ground beef from a butcher or meat counter, rather than pre-packaged ground beef from the store. Freshly ground beef has a better texture and flavor, and you can often choose the exact fat content you prefer. If you don’t have access to fresh ground beef, ensure that the pre-packaged meat is from a reputable source and check the expiration date to ensure freshness.
4. Blending Different Cuts of Beef
For an extra boost of flavor and a more complex texture, some recipes recommend blending different cuts of ground beef. Combining chuck with a bit of ground sirloin or round can give you a balance of juiciness and a firm texture that holds up well during baking. This blend creates a meatloaf with both depth of flavor and a satisfying mouthfeel.
By carefully choosing the right cut of ground beef, you’ll be well on your way to creating a meatloaf that’s packed with flavor and moisture. So, next time you’re preparing your meatloaf, don’t rush the decision—invest in high-quality beef that will elevate your dish and make your meal even more delicious.
Essential Meatloaf Seasonings and Spices
The secret to a mouthwatering meatloaf lies not only in the quality of the meat but also in the blend of seasonings and spices that bring the dish to life. Meatloaf is a canvas for flavor, and with the right mix of herbs, spices, and condiments, you can take your meatloaf from ordinary to extraordinary. Let’s dive into the essential seasonings and spices that are key to achieving a perfectly flavored meatloaf.
1. Salt and Pepper: The Basics
Salt and pepper are the foundation of any great meatloaf. Salt enhances the natural flavors of the beef, while pepper adds a subtle kick. Be sure to season your meat mixture generously with both, but remember to adjust according to taste. Start with about 1 teaspoon of salt and ½ teaspoon of pepper, and increase from there if needed. A pinch of sea salt or kosher salt can add more texture and flavor depth than regular table salt.
2. Garlic and Onion Powder: A Flavor Boost
Garlic and onion powder are two must-have seasonings that elevate the savory profile of your meatloaf. These ingredients are staples in many meatloaf recipes because they infuse the dish with a rich, aromatic flavor. Garlic powder offers a gentle garlic essence without overpowering the meat, while onion powder contributes a mild sweetness. Together, they create a well-rounded flavor base. If you prefer fresh garlic and onions, you can certainly use them, but the powdered versions are more convenient and evenly distribute throughout the mixture.
3. Dried Herbs: A Savory Touch
Herbs like dried oregano, thyme, and basil can add a delightful herbal note to your meatloaf. Dried oregano imparts an earthy, slightly bitter flavor, while thyme offers a mild, savory aroma. Basil contributes a subtle sweetness that complements the richness of the beef. A teaspoon of each is usually the right amount, but feel free to adjust based on your personal preference. Fresh herbs can be substituted, but you’ll need to use about three times the amount of dried herbs.
4. Worcestershire Sauce: Adding Depth of Flavor
Worcestershire sauce is a classic ingredient that helps deepen the flavor of meatloaf. Its tangy, savory profile with a hint of sweetness gives the meatloaf a rich umami flavor. Adding 1 to 2 tablespoons of Worcestershire sauce to your meat mixture will enhance the overall taste and help to keep the meatloaf moist. It’s also a great complement to the ground beef, balancing out the other spices and seasonings.
5. Mustard and Ketchup: For a Sweet and Tangy Kick
For an extra layer of flavor, many meatloaf recipes call for mustard and ketchup. Mustard adds a sharp tang that contrasts nicely with the sweetness of ketchup, and both are essential for creating the iconic meatloaf glaze. A tablespoon of yellow mustard and a generous dollop of ketchup mixed into the meat mixture can help to balance the savory flavors. Additionally, mustard can add a subtle heat, while ketchup provides moisture and sweetness to the meatloaf.
6. Other Optional Spices for Extra Flavor
If you want to experiment with more unique flavors, there are several optional spices you can add to customize your meatloaf. Consider adding:
- Smoked paprika for a mild smokiness.
- Cayenne pepper for a touch of heat and warmth.
- Chili powder for a slightly earthy and spicy flavor.
- Parsley for a fresh, herbal note. These additional spices can add depth and a personalized touch to your meatloaf.
7. A Binding Agent: Eggs and Breadcrumbs
While not technically a spice, adding eggs and breadcrumbs to your meatloaf mixture is key to achieving the right texture and moisture. The eggs help bind the meat together, while the breadcrumbs absorb the fat and juices, keeping the meatloaf moist and tender. For added flavor, you can use seasoned breadcrumbs or soak them in milk to create a soft, flavorful base for your meatloaf.
By combining these essential seasonings and spices, you’ll create a meatloaf that’s full of depth and flavor. Don’t be afraid to experiment with different herbs and spices to find the perfect combination that suits your tastes, and enjoy the delicious, savory results!
Additional Ingredients Like Breadcrumbs and Eggs
While ground beef is the star of the show, the supporting ingredients like breadcrumbs and eggs play a vital role in transforming your meatloaf into a tender, moist, and flavorful masterpiece. These ingredients not only help with the texture but also enhance the flavor and ensure the meatloaf holds its shape during baking. Let’s take a closer look at how breadcrumbs and eggs contribute to the success of your meatloaf.
1. Breadcrumbs: The Key to Moisture and Texture
Breadcrumbs are an essential ingredient in meatloaf recipes, acting as a binding agent that holds the meat together while also absorbing excess moisture. They help prevent the meatloaf from becoming too dense or crumbly, giving it a light, tender texture.
- Types of Breadcrumbs: There are several types of breadcrumbs you can use depending on the flavor and texture you desire:
- Plain breadcrumbs are the most common choice and work well for achieving a neutral texture.
- Seasoned breadcrumbs add extra flavor, as they often contain garlic powder, dried herbs, and salt, which can complement your meatloaf’s seasoning.
- Panko breadcrumbs are a popular option for an extra-crispy texture. They create a lighter, airier loaf but can be slightly less moist than traditional breadcrumbs.
- Homemade breadcrumbs are an excellent option if you have leftover bread. Simply toast or dry out some bread and then crush it into crumbs. This allows you to control the texture and add a personal touch to the meatloaf.
2. How Much Breadcrumbs to Use
The amount of breadcrumbs you use can vary based on your preference for texture. Generally, ½ to 1 cup of breadcrumbs per pound of ground beef is a good starting point. If you prefer a softer meatloaf, stick to the lower end of the range. For a firmer texture, you can use slightly more breadcrumbs.
3. Eggs: Binding and Moisture
Eggs serve as the primary binding agent in meatloaf, holding the breadcrumbs and meat together while also contributing moisture. Without eggs, the meatloaf would likely fall apart and have a dry, crumbly texture. Eggs help to create a cohesive mixture that holds its shape during baking.
- How Many Eggs to Use: The typical rule of thumb is to use one egg for every pound of ground beef. If you’re using a leaner cut of meat, such as ground turkey or chicken, you may want to add an extra egg to ensure enough moisture. If you’re preparing a larger batch, you can adjust the number of eggs accordingly. For example, if you use 2 pounds of ground beef, you’ll need 2 eggs.
- Egg Substitutes: If you’re looking for an alternative to eggs due to dietary preferences or allergies, there are several substitutes that work well in meatloaf:
- Flaxseed meal: Mix 1 tablespoon of flaxseed meal with 3 tablespoons of water to create an egg substitute. This works well for adding moisture and binding the ingredients.
- Applesauce: A ¼ cup of unsweetened applesauce can replace one egg. It adds a touch of sweetness and moisture to the meatloaf.
- Greek yogurt: A ¼ cup of plain Greek yogurt can also serve as an egg replacement, providing moisture and a slight tangy flavor.
4. Soaking the Breadcrumbs
To achieve a tender, moist meatloaf, consider soaking your breadcrumbs in a liquid like milk, broth, or even ketchup before mixing them with the meat. Soaking the breadcrumbs ensures that they absorb moisture and swell up, which in turn helps keep the meatloaf juicy and prevents it from becoming dry. This step is particularly important if you’re using dry breadcrumbs or panko, as they can absorb more liquid than fresh breadcrumbs.
5. Experimenting with Add-ins
While breadcrumbs and eggs are the core ingredients, many home cooks like to experiment with additional ingredients to enhance the texture and flavor of their meatloaf. Some popular add-ins include:
- Grated cheese: Adding shredded cheese to the meat mixture can make the meatloaf extra savory and give it a rich, gooey texture.
- Vegetables: Chopped onions, bell peppers, or mushrooms can add moisture and depth to the flavor of the meatloaf. Make sure to sauté any vegetables with high moisture content (like mushrooms) to prevent the meatloaf from becoming too watery.
- Oats or cooked rice: Some meatloaf recipes use oats or cooked rice as a substitute for breadcrumbs, offering a slightly different texture and extra nutritional value.
- Herbs and spices: Fresh parsley, thyme, or rosemary can be added to the breadcrumbs or egg mixture for a burst of flavor.
By carefully selecting and preparing the right breadcrumbs and eggs, you ensure that your meatloaf has the ideal balance of moisture, tenderness, and flavor. Don’t be afraid to customize these ingredients to suit your taste preferences and dietary needs, and experiment with different add-ins to make the meatloaf your own.
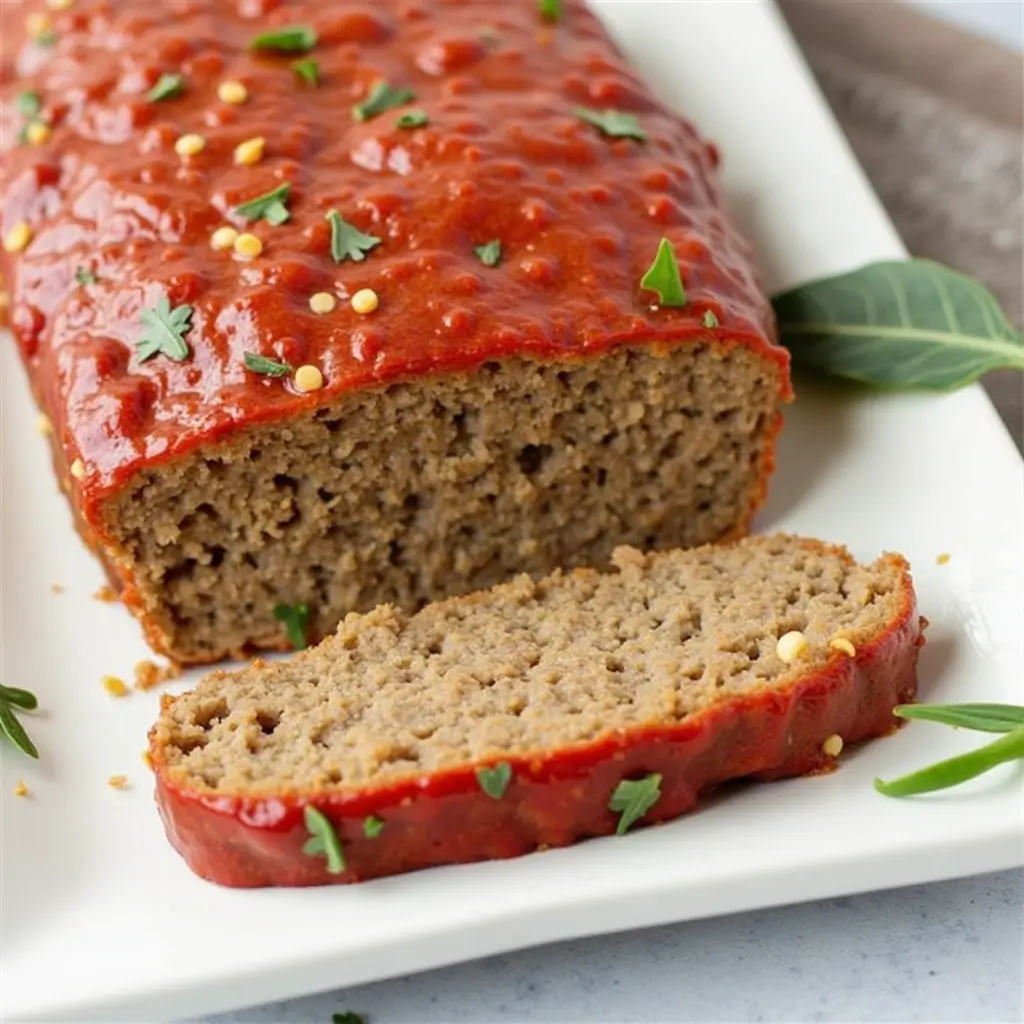
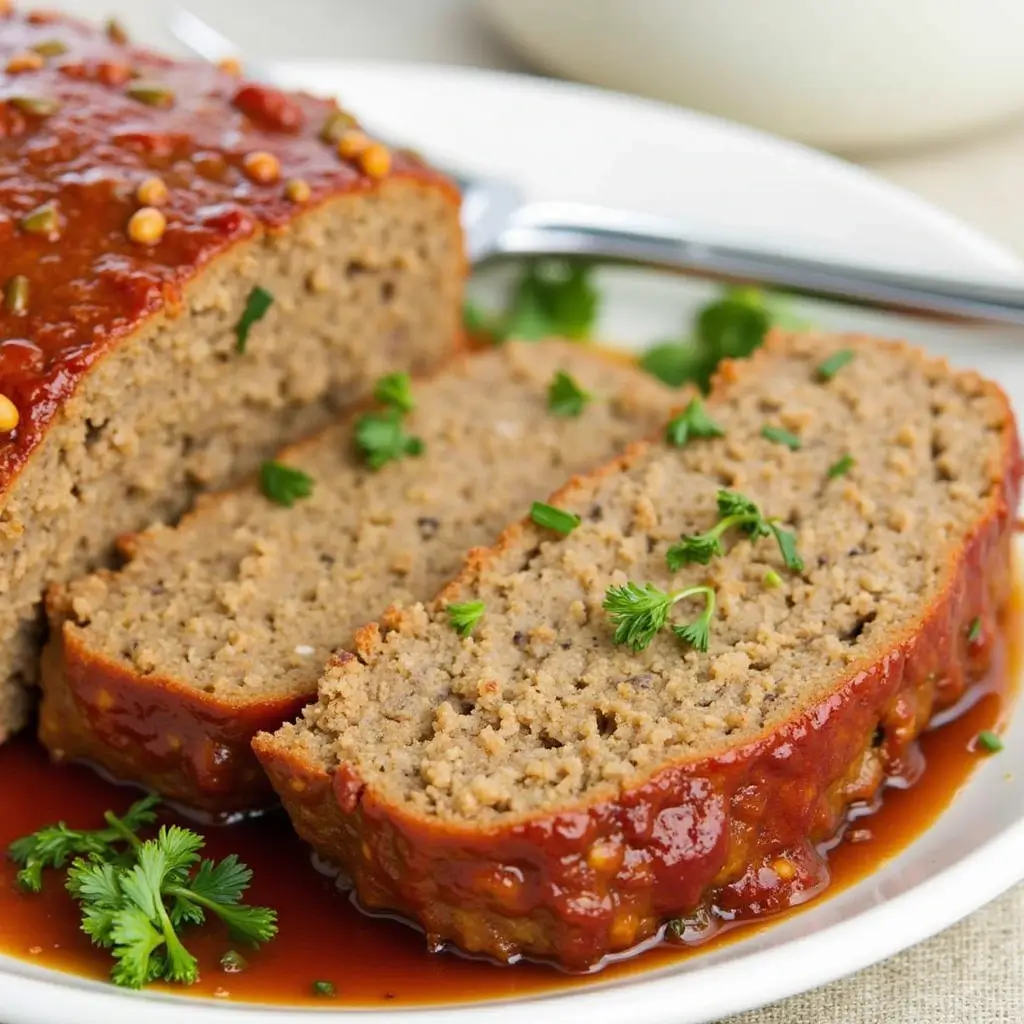
Making the Meatloaf Glaze: A Sweet and Savory Touch
One of the standout features of a great meatloaf is the glaze that coats it, adding an irresistible combination of sweetness and savory richness. The glaze not only enhances the flavor of the meatloaf but also helps to keep it moist during baking, giving it a beautiful, caramelized finish. A well-made glaze can elevate your meatloaf from simple to spectacular. Let’s explore how to create the perfect meatloaf glaze and the ingredients that make it shine.
1. Classic Meatloaf Glaze Ingredients
A traditional meatloaf glaze combines a few simple ingredients, primarily ketchup, brown sugar, and Worcestershire sauce. These ingredients work together to provide a balance of tangy, sweet, and savory notes that complement the flavors of the meat. Here’s a breakdown of the essential components:
- Ketchup: The base of most meatloaf glazes, ketchup offers sweetness and acidity. It helps to create a glossy finish and caramelizes nicely when baked.
- Brown Sugar: Brown sugar adds a deep, molasses-like sweetness to the glaze, which contrasts beautifully with the savory, seasoned meat. Light brown sugar is typically used for a mild sweetness, but dark brown sugar can give the glaze a richer flavor.
- Worcestershire Sauce: This ingredient contributes a savory umami flavor, bringing a touch of tang and complexity to the glaze. The slight acidity of Worcestershire sauce helps balance out the sweetness of the brown sugar and ketchup.
2. Adding Extra Flavor with Mustard and Vinegar
To enhance the flavor profile and make your glaze stand out, consider adding a small amount of yellow mustard or apple cider vinegar. Both ingredients introduce a tangy kick that complements the sweetness of the ketchup and sugar while balancing the richness of the beef.
- Mustard: A teaspoon of yellow mustard gives a subtle sharpness to the glaze without overpowering the other flavors. Dijon mustard can also be used for a slightly more sophisticated flavor.
- Apple Cider Vinegar: A splash of vinegar provides acidity, which helps to cut through the fattiness of the meat and gives the glaze a tangy finish that’s perfect for balancing out the sweetness.
3. Optional Add-Ins for a Personalized Glaze
While the classic meatloaf glaze is delicious on its own, you can customize it with additional ingredients to add layers of complexity and richness:
- Smoked Paprika: Adds a smoky flavor that complements the savory notes of the meat. A pinch of smoked paprika can give the glaze a unique depth that works especially well if you’re using leaner cuts of beef or adding a smoky flavor to your meatloaf.
- Hot Sauce or Chili Flakes: For those who enjoy a little heat, a dash of hot sauce or a pinch of red pepper flakes will introduce a spicy kick that contrasts with the sweetness of the glaze.
- Garlic Powder or Onion Powder: For an extra layer of savory flavor, you can add a small amount of garlic or onion powder. These spices are especially useful if you’re not using fresh garlic and onions in the meat mixture.
4. How to Make the Glaze
Making the glaze is simple and quick. In a small bowl, combine the following ingredients:
- ½ cup of ketchup
- 2 tablespoons of brown sugar
- 1 tablespoon of Worcestershire sauce
- 1 teaspoon of mustard (optional)
- 1 teaspoon of apple cider vinegar (optional)
- A pinch of salt and pepper (to taste)
- Optional add-ins like smoked paprika, hot sauce, or garlic powder
Whisk everything together until smooth, ensuring that the brown sugar dissolves completely into the mixture. Taste and adjust the seasonings if needed, depending on your preference for sweetness, tang, or heat.
5. How to Apply the Glaze
To get the most out of your glaze, apply it in layers during the cooking process. Here’s the ideal method:
- First Coat: After forming your meatloaf and placing it in the baking pan, brush a generous layer of glaze over the top before baking. This creates a nice base layer that will begin to caramelize and set.
- Midway Glaze: About 20-25 minutes into the baking process, remove the meatloaf from the oven and brush on another layer of glaze. This second coat will build up the sweetness and give your meatloaf a glossy finish.
- Final Glaze: Once your meatloaf is fully cooked (internal temperature of 160°F), add a final layer of glaze on top and return the meatloaf to the oven for an additional 5 minutes. This final glazing step ensures that your meatloaf has a beautifully caramelized, shiny topping.
6. Tips for Perfecting Your Glaze
- Avoid Over-Baking the Glaze: Be careful not to overbake the glaze, as it can become too sticky or even burn. Keep an eye on the meatloaf during the last 10 minutes of baking to ensure the glaze stays perfectly caramelized.
- Make It Ahead: If you’re short on time, you can prepare the glaze in advance and store it in the fridge for up to a week. Just give it a good stir before applying it to your meatloaf.
- Glaze Variations: For a more tangy or spicy glaze, experiment with adding barbecue sauce, honey, or even soy sauce. Each variation brings a unique flavor twist to your meatloaf.
A great meatloaf glaze is the final touch that ties the whole dish together, adding a sweet-savory complexity that enhances the overall flavor. By crafting a flavorful, caramelized glaze, you not only add visual appeal but also ensure that every bite of your meatloaf is packed with rich, bold flavors.
How to Make a Juicy and Flavorful Meatloaf
Mixing the Ingredients: Tips for a Tender Texture
Achieving the perfect meatloaf texture is an art. The goal is to have a meatloaf that’s tender, moist, and juicy, rather than dry or dense. The way you mix the ingredients is critical, as overworking or underworking the meat can significantly impact the final result. Here are some expert tips and techniques for mixing your meatloaf ingredients to achieve a tender and flavorful loaf every time.
1. Don’t Overmix the Meat
One of the biggest mistakes people make when preparing meatloaf is overmixing the meat. Overworking the meat causes the proteins to become too tight, leading to a dense, tough texture. When mixing the meat, aim to handle it gently. Use your hands (or a spoon if you prefer) and mix the ingredients just enough to combine them. You don’t want to knead the mixture like bread dough—simply fold the ingredients together until everything is incorporated.
2. Use Cold Ingredients
Start with cold ground meat and cold ingredients, especially if you’re adding eggs or dairy. The reason for this is that colder ingredients are less likely to break down the fat in the meat, which helps the meatloaf hold its structure and retain its juiciness. If the meat and eggs are too warm, the fat can melt prematurely, resulting in a greasy, dry loaf.
3. Add Breadcrumbs and Liquid Gradually
Breadcrumbs are essential for absorbing the moisture and holding everything together, but it’s important to incorporate them gradually, so they don’t overpower the other ingredients. Soak your breadcrumbs in a small amount of liquid (such as milk, broth, or even ketchup) before adding them to the meat mixture. This ensures they’re soft and absorb the liquid evenly, contributing to a moist meatloaf. You can adjust the amount of liquid based on the texture of the mixture—if it feels too dry, add a little more liquid; if it’s too wet, add a few more breadcrumbs.
4. Consider the Binding Ingredients
Eggs and breadcrumbs are the primary binding agents in meatloaf, helping to hold everything together and maintain moisture. Eggs also help with the structure and elasticity of the meatloaf, giving it a smooth, cohesive texture. When adding eggs, be sure to crack them into a separate bowl before mixing them into the meat mixture, as this ensures an even distribution. Similarly, if you’re using any alternative binding ingredients like oats or cooked rice, make sure they’re well-incorporated into the mix.
5. Season Evenly
Ensuring that your seasonings are evenly distributed throughout the meatloaf is crucial for consistent flavor. After adding the dry ingredients (spices, breadcrumbs), and wet ingredients (milk, Worcestershire sauce, eggs), use your hands or a spoon to gently mix everything until fully incorporated. However, be cautious not to overmix, as it can make the meatloaf too dense.
6. Handle the Mixture with Care
When transferring your meatloaf mixture into a loaf pan, handle it as gently as possible. Avoid packing the mixture too tightly into the pan. If you press it down too firmly, the meatloaf will be dense, rather than light and airy. Instead, loosely form the loaf in the pan, ensuring there are no air pockets. If you’re baking the meatloaf free-form on a sheet pan, form it into a loose, rounded shape with your hands.
7. Try a Meatloaf Mix
For an added layer of flavor and texture, consider using a combination of meats instead of just one. A blend of beef, pork, and sometimes veal is a common meatloaf mix. The fat content in pork adds moisture and tenderness, while beef provides a rich, hearty flavor. Mixing in different meats ensures a more balanced texture and flavor profile for your meatloaf.
8. Test for Consistency Before Baking
Before you bake your meatloaf, it’s important to test the consistency of the mixture. You can do this by taking a small amount of the meat mixture and pan-frying it in a small patty to check for seasoning and texture. This also helps to ensure that the mixture holds together well without falling apart. If the patty crumbles, your meatloaf mixture might be too dry, and you can add a little more liquid. If it’s too soft, add a few more breadcrumbs to improve the structure.
9. Let the Mixture Rest
After mixing your meatloaf ingredients and forming it into a loaf shape, let it rest for a few minutes before placing it in the oven. This resting period allows the breadcrumbs and liquid to fully absorb, and it gives the flavors time to meld together. It also allows the fat to redistribute, which helps to prevent the meatloaf from becoming greasy during baking.
10. Moisture Is Key
To keep your meatloaf tender, it’s important to maintain moisture throughout the cooking process. Consider adding a small amount of grated vegetables like zucchini, carrot, or mushrooms to the meat mixture. These vegetables not only add moisture but also contribute to the overall flavor without altering the texture too much. Additionally, you can add a tablespoon or two of broth, tomato paste, or even a bit of grated cheese to increase moisture.
By following these tips, you’ll be able to mix your meatloaf ingredients to perfection, achieving a tender, juicy texture with the perfect balance of flavors. Remember, it’s all about gently combining the ingredients and being mindful of how you handle the mixture. With the right approach, your meatloaf will turn out light, tender, and full of flavor every time.
Shaping and Placing the Meatloaf in the Pan
The way you shape and place your meatloaf in the pan can have a significant impact on its texture and how evenly it cooks. Whether you’re using a loaf pan or baking the meatloaf free-form on a baking sheet, the goal is to ensure that the meatloaf cooks evenly, holds its shape, and doesn’t become too dense. Let’s break down the essential steps for shaping and placing your meatloaf to achieve the best results.
1. Loaf Pan vs. Free-Form Meatloaf
There are two main methods for placing your meatloaf in the oven: using a loaf pan or baking it free-form on a sheet pan. Both methods have their advantages, depending on the texture and appearance you prefer.
- Loaf Pan: This is the traditional method, and it’s ideal for beginners or if you want a perfectly shaped, uniform meatloaf. A loaf pan provides structure and prevents the meatloaf from spreading out, resulting in a neat, compact shape. It also helps the meatloaf cook more evenly by keeping the juices contained.
- Free-Form on a Sheet Pan: If you prefer a slightly crispier crust or want to create a more rustic-looking meatloaf, baking it free-form on a baking sheet is a great option. Without the confinement of a pan, the meatloaf will have more surface area exposed to the heat, which results in a deliciously browned exterior. However, it requires a bit more attention to ensure the meatloaf holds its shape and doesn’t flatten out during baking.
2. Shaping the Meatloaf
Once your meatloaf mixture is ready, the next step is to shape it into a loaf. Proper shaping is key to achieving an evenly cooked meatloaf with a tender texture. Here’s how to do it:
- Loaf Shape: Whether using a pan or baking free-form, aim for a rectangular or oval shape with slightly rounded edges. This helps ensure even cooking, as the heat can circulate better around the meatloaf. If you’re using a loaf pan, you’ll want the meatloaf mixture to fill the pan without overflowing, and you may want to slightly mound the center so that it doesn’t sink during baking.
- Avoid Over-Packing: When shaping the meatloaf, avoid pressing the mixture too firmly. Over-packing the meat can lead to a dense, dry loaf. Gently form the meat into a loaf shape, either by hand or using a spatula, being careful not to compress it too much. If you’re baking it free-form, you can use your hands to mold the mixture into a loaf shape with gently tapered edges.
- Size and Proportions: The size of your meatloaf should ideally be proportional to the amount of meat mixture. For a standard meatloaf recipe (1 to 1.5 pounds of ground meat), aim for a loaf that’s about 9 to 10 inches long and 5 inches wide. This ensures it cooks evenly and doesn’t end up too thick in the middle, which can cause the outer layers to overcook.
3. Greasing the Pan (if Using a Loaf Pan)
If you’re using a loaf pan, it’s important to grease the pan lightly to prevent the meatloaf from sticking. You can use cooking spray, vegetable oil, or a small amount of butter. Alternatively, you can line the pan with parchment paper for easy removal. A well-greased pan will allow the meatloaf to come out smoothly once cooked, without sticking to the sides or bottom.
4. Lining the Pan with Foil (Optional)
For easy cleanup, you can line the loaf pan with aluminum foil, allowing you to lift the meatloaf out of the pan after baking. This also helps retain the moisture as the foil traps the steam. Just be sure to grease the foil to prevent sticking.
5. Baking Free-Form Meatloaf on a Sheet Pan
If you’re opting to bake your meatloaf free-form, you won’t need a pan, but you will want to use a sheet pan lined with parchment paper or aluminum foil. Place the shaped meatloaf directly on the lined sheet pan, ensuring there’s enough space around the meatloaf to allow air circulation. This ensures even browning on all sides and gives the meatloaf a crispy exterior. You may also want to use a wire rack placed over the baking sheet to elevate the meatloaf slightly, which helps it cook evenly from all angles.
6. Creating a Slight Indentation
One trick for preventing your meatloaf from puffing up in the center is to create a slight indentation down the middle of the loaf before baking. This simple step helps the meatloaf cook more evenly by allowing heat to reach the center without overcooking the edges. Use your fingers or the back of a spoon to make a shallow groove along the top of the meatloaf. This indentation will disappear as the meatloaf cooks, but it ensures a more evenly cooked, tender texture.
7. Leave Space Around the Meatloaf
If you’re baking your meatloaf free-form on a sheet pan, avoid crowding the meatloaf by placing it too close to the sides of the pan. Leave enough room around the meatloaf so that hot air can circulate evenly, ensuring that it cooks uniformly. If using a loaf pan, this step is less of a concern because the pan itself will guide the cooking process.
8. Top the Meatloaf with Glaze
Before placing the meatloaf in the oven, don’t forget to add a layer of glaze (or a few coats, if you prefer). Spread a generous layer of your meatloaf glaze over the top of the shaped loaf. If you’re baking it free-form, you can also apply the glaze to the sides of the meatloaf to create a deliciously caramelized crust. Applying the glaze before baking ensures it will adhere to the meatloaf and enhance the flavor, while a second layer of glaze partway through baking will build up the flavor and texture.
9. Use a Meat Thermometer
If you want to ensure your meatloaf is fully cooked without over-baking, use a meat thermometer to check the internal temperature. The meatloaf should reach an internal temperature of 160°F (71°C) to ensure it is safe to eat. For the best results, check the temperature at the thickest part of the meatloaf, usually near the center.
10. Rest the Meatloaf Before Slicing
After the meatloaf is done baking, allow it to rest for 10 minutes before slicing. Resting gives the juices time to redistribute throughout the meat, resulting in a juicier, more flavorful loaf. It also makes slicing easier and helps prevent the loaf from falling apart.
The Baking Process: Time and Temperature Tips
Baking the perfect meatloaf requires careful attention to both time and temperature. The goal is to achieve a well-browned exterior while ensuring the inside is cooked thoroughly and remains juicy and tender. Incorrect time and temperature settings can result in a dry or overcooked loaf, so it’s important to follow the right guidelines for the best results. Below are tips to help you perfect the baking process for your easy and delicious meatloaf.
1. Ideal Oven Temperature for Meatloaf
The most commonly recommended temperature for baking meatloaf is 350°F (175°C). This temperature strikes a perfect balance between cooking the meat through without drying it out, and achieving a nice brown crust on the outside. While some recipes may suggest higher temperatures (like 375°F or 400°F) for a faster bake, baking at 350°F allows for even cooking and more control over the texture.
2. Baking Time Based on Size
The baking time for meatloaf depends on several factors, including the size and shape of the loaf, as well as the amount of meat you’re using. As a general rule:
- For a standard 1 to 1.5-pound meatloaf, it will take about 1 hour to bake at 350°F.
- If you’re making a larger loaf, say 2 to 3 pounds, the baking time will extend to around 1.5 hours.
However, time can vary based on your oven, the thickness of the meatloaf, and whether it’s placed in a loaf pan or baked free-form.
3. Using a Meat Thermometer for Accuracy
To ensure your meatloaf is fully cooked without over-baking, a meat thermometer is the best tool to use. The USDA recommends that ground meat should reach an internal temperature of 160°F (71°C) for safety. Inserting a thermometer into the thickest part of the meatloaf (usually the center) will give you a precise reading. If the thermometer reads 160°F, the meatloaf is done. If not, return it to the oven for additional time and check again after 10-minute intervals.
4. Avoiding Over-Baking
One of the biggest challenges in the baking process is overcooking the meatloaf, which can lead to a dry and crumbly texture. Overbaking also results in the caramelized glaze becoming overly thick and hard. To avoid this, check your meatloaf regularly after the 1-hour mark (for smaller loaves), and make sure it reaches the ideal internal temperature.
Remember, ovens can vary in temperature, so even if a recipe says 1 hour at 350°F, you may need a little more or less time. Always rely on your meat thermometer for the most accurate results.
5. Covering or Uncovering During Baking
While some meatloaf recipes suggest covering the pan with aluminum foil during the first portion of baking to retain moisture, others leave it uncovered for a more pronounced crust. Here’s when to do each:
- Covering with foil: This helps to keep the meatloaf moist by trapping steam, preventing it from drying out during baking. This method is particularly useful when you want to maintain a tender texture, especially in thicker or denser meatloafs. After about 40 minutes of baking, remove the foil to allow the top to brown and develop a delicious glaze.
- Uncovered: Baking the meatloaf uncovered will give you a crispier, more caramelized crust, which many people prefer. If you’re baking your meatloaf uncovered, ensure the glaze (if you’re using one) is applied after the first 20-30 minutes of baking to prevent it from burning.
6. Checking for Doneness: Visual Cues
In addition to using a meat thermometer, there are other visual signs to check for doneness. A well-baked meatloaf will:
- Have a deep golden-brown color on the outside.
- The glaze (if used) will be glossy and slightly caramelized.
- If you use a loaf pan, the edges of the meatloaf will have slightly pulled away from the sides of the pan.
If the top begins to darken too much but the inside hasn’t reached 160°F, you can loosely cover the meatloaf with aluminum foil to prevent it from burning while it finishes cooking.
7. Resting the Meatloaf After Baking
Once your meatloaf reaches the proper internal temperature, it’s crucial to let it rest for 10-15 minutes before slicing. This step allows the juices to redistribute within the meat, keeping the meatloaf moist and flavorful. Cutting too soon can cause the juices to spill out, leading to a dry loaf. The resting time also helps the loaf set, making it easier to slice cleanly.
If you’re serving the meatloaf with a glaze, you can apply a final thin layer of glaze after the meatloaf has rested. This step is optional but can enhance the flavor and appearance before serving.
8. Use of a Baking Rack (Optional)
To ensure even heat distribution around your meatloaf, consider using a baking rack. Placing the loaf on a rack allows heat to circulate more evenly on all sides of the meatloaf, resulting in a more uniform cook. If you’re using a loaf pan, a rack helps to elevate the meatloaf off the bottom, preventing it from sitting in the rendered fat. This technique is especially helpful for free-form meatloafs, where you want a crisp crust on all sides.
9. Final Glaze or Topping (Optional)
If you prefer a glossy, sweet, or savory topping, such as a ketchup-based glaze, honey-mustard, or barbecue sauce, apply it in the last 20-30 minutes of baking. This allows the glaze to set without burning, giving the meatloaf a beautiful finish. Alternatively, you can add a final layer of glaze or sauce just after the meatloaf has finished baking and rested, allowing the heat from the loaf to gently warm the topping.
10. Adjusting the Cooking Time for Variations
If you’re making a meatloaf with alternative ingredients (such as a mix of meats, vegetables, or leaner cuts), you might need to adjust the cooking time slightly. For example, turkey or chicken meatloaf will cook faster than beef meatloaf, so you’ll want to check the internal temperature earlier. On the other hand, denser, fattier meats might require a little longer to reach the ideal temperature.
How to Check When Meatloaf is Perfectly Cooked
Cooking meatloaf to perfection is all about finding the right balance between a golden, crispy exterior and a moist, tender interior. However, knowing exactly when the meatloaf is done can be tricky, especially since overcooking can lead to dryness. Fortunately, there are several methods you can use to check for doneness, ensuring that your meatloaf is perfectly cooked every time. Let’s break down the best ways to check when your meatloaf is ready to be served.
1. Using a Meat Thermometer for Accurate Temperature
The most reliable way to determine whether your meatloaf is cooked all the way through is by using a meat thermometer. This tool provides an accurate internal temperature reading, ensuring the meatloaf is not undercooked or overdone.
- Ideal Internal Temperature: The internal temperature of the meatloaf should reach 160°F (71°C) according to the USDA. This temperature ensures that the meat is fully cooked, safe to eat, and still juicy. A thermometer inserted into the thickest part of the meatloaf (usually the center) will give you the most accurate reading.
- Quick Tip: Always insert the thermometer horizontally from the side rather than from the top. This avoids piercing the glaze, which could lead to inaccurate readings or damaging the exterior.
2. Visual Cues to Look For
If you don’t have a meat thermometer or prefer to check visually, there are some clear signs that your meatloaf is cooked perfectly.
- Golden Brown Exterior: The outside of the meatloaf should have a deep, golden-brown color. This indicates that the meatloaf has had enough time to form a flavorful crust. The caramelized glaze (if used) should be glossy and slightly sticky, not burnt or overly dried out.
- Juices Running Clear: One of the simplest visual cues for checking doneness is to slice into the meatloaf and examine the juices. When the meatloaf is fully cooked, the juices should run clear, not pink or red. If the juices are still reddish or runny, the meatloaf needs more time in the oven.
- Firm to the Touch: Gently press the top of the meatloaf with your finger. If the meatloaf feels firm and springs back slightly, it’s likely done. If it feels squishy or soft in the center, it may need additional time to cook.
3. Cutting into the Meatloaf for a Visual Check
If you’re unsure whether the meatloaf has reached the desired internal temperature, carefully slice into the center with a sharp knife. Check for the following:
- Even Color: The interior should have a consistent, cooked appearance throughout. There should be no signs of pinkness in the center. If there is any pink or red color, the meatloaf is undercooked and should be returned to the oven for additional time.
- Moist and Tender Texture: The inside should be moist and tender, not dry or crumbly. If you notice that the meatloaf is excessively dry inside, it might be an indication that it has been overcooked.
4. The Resting Test (Touch Test)
Once your meatloaf has reached the ideal internal temperature or visual cues suggest it’s done, use a touch test. After removing the meatloaf from the oven, allow it to rest for about 10-15 minutes. During this time, the residual heat will continue to cook the meat slightly, while the juices settle and redistribute within the meatloaf. When you press on the loaf, it should feel firm but still have a slight give. This shows that the meatloaf has cooked thoroughly but hasn’t dried out.
5. The Fat Drip Test (For Fatty Loafs)
For meatloafs made with higher fat content (such as a beef and pork blend), there’s an additional method to check doneness: the fat drip test. As the meatloaf bakes, the fat will render out and collect in the pan. If the pan is filled with an excessive amount of fat or if the meatloaf is swimming in liquid after cooking, it could be a sign that it’s not yet fully cooked, or that you’ve used too much fat in the mixture. A well-cooked meatloaf will release some fat, but there should still be a small amount left in the pan, not an overflowing pool of grease.
6. Checking the Meatloaf Glaze
If you’ve applied a glaze, it’s important to check how it’s set. A properly cooked meatloaf will have a glaze that is slightly caramelized and glossy, not dried or overly charred. If the glaze looks burnt, but the internal temperature is correct, it’s a sign that the glaze was applied too early in the baking process. Try applying it during the last 20 minutes of baking to prevent overbrowning.
7. Slicing for Even Portions
When slicing into the meatloaf to check for doneness, aim to cut evenly sized slices. This will allow you to see the texture throughout the loaf, ensuring that no part is overcooked or undercooked. If you find that parts of the loaf are more cooked than others, it may indicate uneven baking, and you should consider using a different pan or adjusting the heat distribution in your oven.
8. Keep in Mind Variations in Meatloaf Recipes
Different meatloaf recipes may require slightly different cooking times and temperatures, depending on the ingredients. For example, a meatloaf made with turkey or chicken might cook faster than one made with beef or pork, and a meatloaf with additional ingredients like vegetables or cheese could alter cooking times as well. Always factor these variations into your check for doneness, as they can affect the overall texture and moisture content.
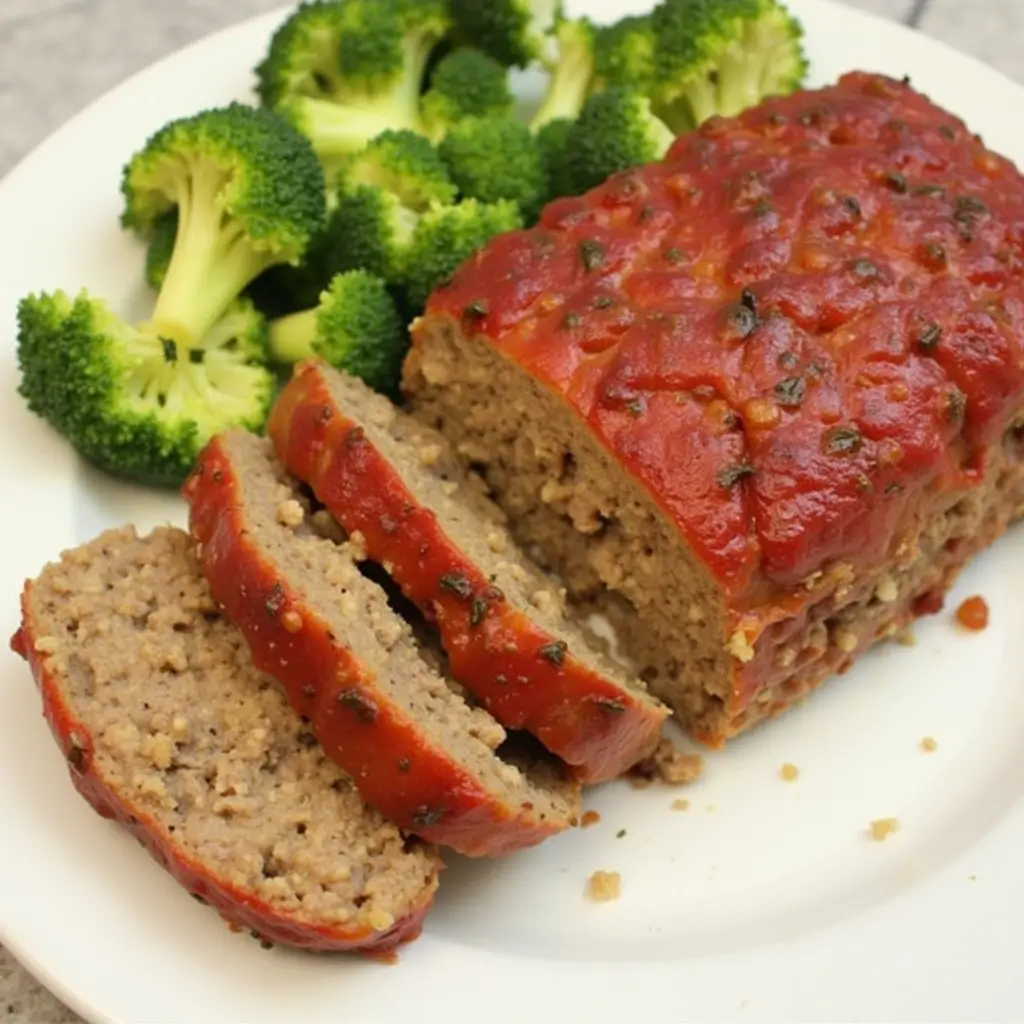
Serving Ideas: Side Dishes to Pair with Meatloaf
Mashed Potatoes: A Classic Combination
Mashed potatoes have long been a beloved side dish, often served alongside comforting main courses like meatloaf. Their creamy, buttery texture and mild flavor make them the perfect partner for meatloaf’s rich and savory taste. Whether you’re preparing a traditional meatloaf or a modern twist on the classic, mashed potatoes bring balance and texture to every bite. Below, we’ll explore why mashed potatoes are such a classic combination with meatloaf and how to elevate this timeless pairing.
1. The Creaminess Complements the Meatloaf’s Richness
One of the main reasons mashed potatoes pair so well with meatloaf is their creamy texture, which contrasts beautifully with the dense, savory nature of the meatloaf. The soft, velvety mashed potatoes help to balance the richness of the meatloaf, providing a smooth contrast that makes each bite feel satisfying. The creamy potatoes soak up the juices from the meatloaf, adding even more flavor and moisture, making the entire plate feel comforting and indulgent.
2. Flavor Harmony: Butter, Cream, and Seasonings
Mashed potatoes are often made with simple ingredients—butter, cream, and seasonings—which bring out a mild yet rich flavor that doesn’t overwhelm the meatloaf. The butter adds silky smoothness, while the cream or milk brings a subtle richness that complements the meatloaf’s savory profile. Adding a pinch of salt and pepper enhances the natural taste of the potatoes, making them the perfect neutral backdrop for the bold flavors of meatloaf. For extra flavor, consider stirring in ingredients like garlic, cheese, or herbs to elevate the dish further.
3. Versatility of Mashed Potatoes: How to Customize
Mashed potatoes are incredibly versatile and can be customized in a variety of ways to suit your taste and dietary preferences. Here are some popular variations that can add an extra twist to your meatloaf meal:
- Garlic Mashed Potatoes: Adding roasted or sautéed garlic to your mashed potatoes infuses them with a deep, savory flavor that pairs beautifully with the beefy taste of the meatloaf. Roasted garlic, in particular, brings a mellow sweetness that enhances the overall dish.
- Cheese Mashed Potatoes: Mixing in shredded cheddar, parmesan, or cream cheese makes the mashed potatoes extra rich and creamy. The cheese adds a layer of flavor that complements the meaty, umami-rich meatloaf.
- Herbed Mashed Potatoes: Fresh herbs like parsley, chives, or rosemary can be folded into mashed potatoes for added freshness and flavor. The herbal notes not only brighten the dish but also pair well with the savory meatloaf.
- Sour Cream Mashed Potatoes: For a tangy twist, you can substitute part of the cream or milk with sour cream. This adds a slightly tart flavor that complements the richness of the meatloaf and helps balance out the dish.
- Sweet Potato Mash: If you’re looking for a healthier alternative, consider using sweet potatoes instead of regular potatoes. The natural sweetness of sweet potatoes provides a unique contrast to the savory meatloaf and offers an added boost of nutrients like vitamin A and fiber.
4. The Perfect Temperature for Serving
Mashed potatoes are best served hot and fresh, but if you need to prepare them ahead of time, there are ways to ensure they stay creamy and ready to serve. You can keep mashed potatoes warm in a slow cooker or covered dish in the oven at a low temperature (around 200°F), ensuring they maintain their creamy texture until you’re ready to serve. Stir in a little extra butter or cream before serving to restore the richness.
5. A Textural Contrast: Why the Combo Works
While meatloaf has a dense, firm texture, mashed potatoes are soft and smooth. This contrast in texture is one of the reasons they work so well together. The fluffy mashed potatoes provide a textural relief from the dense, meaty meatloaf, offering variety and depth to each bite. For some, the contrast between the meatloaf’s slightly crisp crust and the creamy potatoes is a key component of what makes the pairing so satisfying.
6. A Side That Complements the Glaze
If you’re using a glaze on your meatloaf (whether it’s a ketchup-based glaze, BBQ sauce, or a balsamic reduction), mashed potatoes serve as an ideal vessel to soak up the extra glaze that drips off the meatloaf. As you spoon the creamy potatoes onto your plate, they naturally absorb some of the delicious meatloaf juices and glaze, creating an even more flavorful bite. The glaze infuses the potatoes, adding extra richness and sweetness that pairs perfectly with the savory meatloaf.
7. Nutritional Balance: Adding Comfort Without Overloading
While mashed potatoes are indulgent, they don’t overpower the meal with excessive richness. In fact, they can provide a nutritional balance when paired with meatloaf. Potatoes are a good source of carbohydrates and fiber, making them a satisfying addition that complements the protein-packed meatloaf. To make the meal even more balanced, consider adding a green vegetable (such as steamed broccoli or green beans) alongside the mashed potatoes and meatloaf to provide extra vitamins, minerals, and fiber.
8. A Classic for Any Occasion
Mashed potatoes are incredibly versatile, not just as a side to meatloaf but also for a wide range of other main courses. Whether you’re making a weeknight dinner, hosting a holiday meal, or preparing a comfort food feast, mashed potatoes are a timeless side dish that suits virtually any occasion. Their ability to pair with various meats—beef, pork, chicken, turkey—makes them a classic choice that will never go out of style.
Roasted Vegetables: A Healthy and Colorful Side
Roasted vegetables have become a beloved side dish in many households, and for good reason. Their natural sweetness, depth of flavor, and appealing texture make them an excellent complement to a variety of main dishes, especially meatloaf. Roasting vegetables caramelizes their natural sugars, giving them a rich, savory flavor that perfectly balances the savory, hearty taste of meatloaf. Additionally, roasted vegetables add a burst of color to your plate, making the meal more visually appealing and nutritionally balanced. Here’s why roasted vegetables are the perfect pairing for meatloaf, and how you can make them a standout side.
1. A Variety of Vegetables for Flavor and Color
One of the greatest benefits of roasted vegetables is their versatility. You can roast nearly any vegetable, making it easy to customize the side dish based on what’s in season or what you have on hand. Whether you choose root vegetables, cruciferous options, or sweet produce, roasting brings out their natural flavors and creates a perfect textural contrast with the meatloaf.
- Root Vegetables: Carrots, parsnips, and sweet potatoes become wonderfully tender when roasted. Their natural sweetness develops through caramelization, which pairs beautifully with the savory profile of meatloaf. For a heartier side, sweet potatoes are an excellent option, offering a touch of sweetness that complements the meat’s richness.
- Cruciferous Vegetables: Brussels sprouts, cauliflower, and broccoli are perfect for roasting. When caramelized, Brussels sprouts turn crispy on the outside while remaining tender inside, giving a great contrast to meatloaf. Cauliflower and broccoli take on a nutty, slightly charred flavor when roasted, adding depth to your meal.
- Squash and Zucchini: Butternut squash, acorn squash, and zucchini are flavorful and colorful options for roasting. These vegetables soften and become sweeter during roasting, providing a light contrast to the heavier meatloaf.
- Peppers and Onions: Bell peppers, red onions, and shallots add a mild sweetness and rich flavor. These vegetables are visually striking, providing pops of color that can make your plate look more vibrant and inviting.
2. Nutrient-Dense and Flavorful
Roasting vegetables not only enhances their flavors but also helps preserve their nutrients. Vegetables like broccoli, carrots, and sweet potatoes are packed with vitamins, fiber, and antioxidants, which contribute to a balanced and healthy meal.
- Vitamins: Roasted vegetables retain a significant amount of vitamins like vitamin A (from carrots and sweet potatoes), vitamin C (from bell peppers and broccoli), and vitamin K (from Brussels sprouts and cabbage), all of which support immune function, vision health, and bone health.
- Fiber: Vegetables are an excellent source of fiber, which is essential for digestive health. Roasting vegetables helps preserve their fiber content, allowing you to enjoy a more satisfying, filling side dish that complements the protein-packed meatloaf.
- Antioxidants: Many vegetables, such as tomatoes and squash, are rich in antioxidants that fight free radicals in the body and reduce inflammation. Roasting them enhances their natural flavors, making them both delicious and beneficial to your health.
3. Roasting Brings Out Natural Sweetness
The process of roasting vegetables brings out their natural sweetness through caramelization. This makes them an ideal counterpoint to the savory, sometimes fatty nature of meatloaf. The slight crispiness on the outside, combined with the tender interior, creates a dynamic texture that’s pleasing to the palate.
- For example, carrots and parsnips become tender and caramelized during roasting, their sweetness intensifying, which balances the hearty, savory taste of meatloaf. Similarly, sweet potatoes roasted with a touch of olive oil and seasoning develop a rich, almost syrupy texture that pairs beautifully with meatloaf.
4. Easy to Prepare and Customize
Roasting vegetables is a simple and hands-off cooking method that doesn’t require a lot of attention, making it ideal for busy weeknight dinners or special occasions. Plus, the vegetables can be customized with your favorite herbs and seasonings to add extra flavor.
- Seasonings and Herbs: A simple seasoning of olive oil, salt, and pepper can work wonders. But for extra depth, you can add garlic powder, onion powder, rosemary, thyme, oregano, or even a sprinkle of parmesan cheese for a richer flavor.
- Flavor Additions: If you want to add a touch of sweetness, drizzle your vegetables with honey or balsamic vinegar before roasting. For a more savory twist, a sprinkle of paprika, cumin, or chili flakes can add a bit of heat and complexity to the dish.
5. Roasting Techniques: How to Get It Right
To ensure your roasted vegetables turn out perfectly every time, follow these key tips:
- Cut Evenly: Ensure your vegetables are cut into uniform pieces to ensure even cooking. Larger pieces may take longer to cook, while smaller ones may burn before they’re tender. Aim for pieces that are roughly the same size.
- Don’t Overcrowd the Pan: If you pile too many vegetables onto the roasting pan, they’ll steam instead of roast, which can prevent that delicious caramelization. Spread the vegetables out in a single layer with a little space between them.
- Toss Occasionally: Halfway through roasting, give the vegetables a gentle toss to ensure they cook evenly and get that beautiful, golden-brown crust on all sides.
- Optimal Temperature: Roast at 400°F (200°C) for vegetables like carrots, squash, and Brussels sprouts. This temperature allows the vegetables to cook through while developing a crispy exterior. Adjust the roasting time based on the vegetable—root vegetables might take around 30-40 minutes, while softer vegetables like zucchini or bell peppers may only need 15-20 minutes.
6. Adding a Pop of Color to Your Plate
In addition to the great flavor and texture they add, roasted vegetables are also visually stunning. The vibrant colors—from the deep orange of carrots and sweet potatoes to the rich green of broccoli and Brussels sprouts—create a beautiful contrast with the rich, brown tones of the meatloaf. This visual appeal can make the meal feel more festive and satisfying, whether you’re serving it for a family dinner or a special occasion.
7. A Versatile Side for Any Occasion
Roasted vegetables are not only a fantastic pairing for meatloaf but also for a wide variety of other dishes. Whether you’re serving roast chicken, steak, or pasta, roasted vegetables can complement almost any main course. Their versatility and ease of preparation make them a go-to side for many types of meals.
A Fresh Green Salad for a Light, Balanced Meal
While meatloaf is rich and hearty, a fresh green salad provides the perfect contrast, balancing the meal with crispness, lightness, and nutrient density. The cool, refreshing nature of a salad offers a lighter alternative to the heavier sides, like mashed potatoes or roasted vegetables, while still providing essential vitamins, minerals, and fiber to make the meal more balanced. Whether it’s a simple mix of leafy greens or a more elaborate salad with toppings, a fresh salad serves as the perfect accompaniment to meatloaf, ensuring a well-rounded and satisfying meal. Here’s why a fresh green salad is a great choice and how you can make it your own.
1. Enhancing Flavor with Freshness and Crispness
A fresh green salad adds a crisp, refreshing texture that contrasts nicely with the dense, savory meatloaf. The crunchiness of leafy greens and other salad ingredients like cucumbers, carrots, and radishes offer a pleasant textural contrast to the rich meatloaf, making each bite feel more balanced. The natural bitterness of greens such as arugula or spinach also complements the savory flavors of the meatloaf, helping to cleanse your palate between bites.
- Lettuce Varieties: Crisp varieties like romaine, butter lettuce, or iceberg are perfect for building a light salad base, while more flavorful greens like arugula, kale, or spinach bring additional depth to the salad.
- Other Crisp Additions: Ingredients like cucumbers, carrots, celery, and radishes not only add crunch but also vibrant colors and mild flavors, making the salad feel refreshing and inviting.
2. Nutrient Density and Health Benefits
One of the main reasons to include a fresh green salad alongside a meatloaf dinner is the nutritional balance it brings. While meatloaf provides protein and fat, a salad adds a burst of vitamins, minerals, and fiber that are crucial for overall health.
- Vitamins and Minerals: Leafy greens are packed with essential nutrients, including vitamin C, vitamin K, and folate. Spinach, for example, is rich in iron and calcium, which support bone health and blood health. Other greens like arugula and kale provide a significant amount of vitamin A for immune health and skin health.
- Fiber: Salads are a great source of dietary fiber, which aids in digestion, promotes gut health, and helps maintain a feeling of fullness. The fiber from ingredients like leafy greens, carrots, and avocados adds a beneficial nutritional element to balance out the heavier meatloaf.
- Antioxidants: Many salad ingredients, such as tomatoes, bell peppers, and red onions, contain antioxidants like lycopene and beta-carotene, which help protect the body from oxidative stress and support overall health.
3. Flavor and Dressing Combinations
A salad can be as simple or complex as you like, depending on your taste preferences. You can keep it basic with just a few ingredients or create a more elaborate salad with a variety of toppings. The right dressing can bring all the ingredients together and enhance the flavor of the salad, creating a harmonious balance with the meatloaf.
- Classic Dressings: For a basic, light salad, dressings like balsamic vinaigrette, lemon olive oil dressing, or a simple vinaigrette with mustard and honey provide a tangy, bright contrast to the richness of meatloaf. These dressings don’t overpower the salad but rather complement the fresh ingredients and the savory meatloaf.
- Creamy Dressings: If you prefer a creamy dressing, options like ranch, blue cheese, or Caesar dressing can add richness without overshadowing the salad. However, it’s important to use these sparingly, as they can be heavier than lighter vinaigrettes.
- Homemade Dressing: For a healthier and customizable option, consider making your own dressing at home. A Greek yogurt dressing with lemon and garlic or a vinaigrette with tahini can add a creamy element without the heaviness of store-bought creamy dressings.
4. Adding Color and Texture with Toppings
While a simple salad of greens is delicious, adding a few toppings can elevate the dish both visually and texturally. Nuts, seeds, cheese, and fruits can add variety to your salad, making it feel more dynamic and complete.
- Cheese: Adding a small amount of feta, parmesan, or goat cheese can bring creaminess and richness to the salad that balances the flavor of the meatloaf. A sprinkling of shredded cheese or crumbled blue cheese also adds depth.
- Nuts and Seeds: Almonds, walnuts, sunflower seeds, or pumpkin seeds add a delightful crunch and a bit of healthy fat, enhancing the texture and flavor of the salad.
- Fruit: Consider adding slices of apple, pear, or grapes to the salad for a sweet touch that complements the savory meatloaf. Pomegranate seeds or dried cranberries can also add a pop of color and tang.
- Avocado: Adding sliced avocado gives the salad a creamy texture and provides healthy fats, making it a satisfying addition to the meal.
5. Light Yet Satisfying: Ideal for Balancing a Hearty Main Course
A fresh green salad serves as a light yet satisfying side dish that doesn’t weigh down the meal. The fresh ingredients and the bright, crisp flavors help to cleanse the palate and refresh the senses between bites of the heavier meatloaf. When paired with a rich and hearty main dish, the salad’s lightness helps balance out the meal and prevent it from feeling too heavy.
- The bitterness of some greens, like arugula or radicchio, can help cut through the fatty richness of meatloaf, while the crispness adds a delightful texture contrast.
- The acidity from a vinegar-based dressing helps balance the savory richness of the meatloaf, while the natural sweetness from fruits or roasted veggies adds a touch of complexity that makes the salad a perfect complement.
6. Versatility: Customize Your Salad to Match Your Meal
The beauty of a green salad is in its versatility. You can adjust it to match the flavors and style of the meatloaf, whether you prefer a simple Caesar salad or a tangy citrus salad. For instance, if you’re making a BBQ-glazed meatloaf, a salad with cilantro, lime, and avocado might be a great choice. Alternatively, a more classic meatloaf pairs wonderfully with a Mediterranean-inspired salad, complete with olives, tomatoes, and feta cheese.
Storing and Reheating Leftover Meatloaf
How to Store Leftover Meatloaf for Freshness
Meatloaf is a great make-ahead meal, and it often tastes even better the next day after the flavors have had time to meld together. Properly storing your leftover meatloaf is key to maintaining its flavor, texture, and freshness. Whether you plan to enjoy it within a few days or store it for later use, following the right techniques ensures that your leftovers stay safe to eat and tasty.
1. Allow the Meatloaf to Cool Completely Before Storing
Before storing any leftovers, it’s important to allow the meatloaf to cool to room temperature. This helps prevent condensation from forming inside the storage container, which could lead to soggy meatloaf. Let the meatloaf sit on the counter for 15 to 30 minutes after baking, but don’t leave it out for too long (no more than two hours) to avoid bacterial growth. Once the meatloaf has cooled, you can move on to the storage process.
2. Storing Leftover Meatloaf in the Refrigerator
For short-term storage, the refrigerator is your best option. Properly stored, leftover meatloaf will stay fresh for about 3 to 4 days.
- Use an Airtight Container: After cooling, place the leftover meatloaf in an airtight container or wrap it tightly with plastic wrap or aluminum foil to prevent air from entering. This will help retain its moisture and prevent it from drying out. If the meatloaf is in slices, wrap each piece individually or store them in layers separated by parchment paper to avoid sticking.
- Wrap It Well: If you don’t have an airtight container, you can wrap the entire meatloaf in plastic wrap or aluminum foil. Be sure to seal the edges tightly so no air can get in and dry out the meatloaf.
- Keep It in the Original Baking Dish (Optional): If you prefer to keep the meatloaf in the same dish it was baked in, simply cover the dish with plastic wrap or aluminum foil. This can be a convenient option, as it helps the meatloaf retain its shape and stay fresh.
3. Freezing Leftover Meatloaf for Long-Term Storage
If you don’t think you’ll be able to finish the leftover meatloaf within a few days, freezing is an excellent option for long-term storage. Meatloaf freezes well and can be stored for up to 3 to 4 months without significant loss of flavor or texture. Here’s how to properly freeze your meatloaf:
- Slice Before Freezing: To make defrosting and reheating easier, slice the meatloaf into individual servings before freezing. This way, you can thaw and reheat only the amount you need without having to defrost the entire loaf.
- Wrap in Plastic and Foil: Wrap each slice of meatloaf (or the entire loaf) in plastic wrap, ensuring that it is tightly sealed to prevent freezer burn. Then, wrap it again in aluminum foil or place it inside a freezer-safe zip-top bag. Double wrapping ensures better protection against air exposure and helps preserve the flavor and texture of the meatloaf.
- Label and Date: Be sure to label the wrapped meatloaf with the date so you can keep track of how long it’s been in the freezer. This will help ensure you use it within a safe time frame.
- Vacuum Sealing: If you have a vacuum sealer, this is one of the best methods for storing meatloaf in the freezer. Vacuum sealing removes all the air, which helps preserve freshness and prevents freezer burn.
4. Thawing Frozen Meatloaf
When you’re ready to enjoy your frozen leftover meatloaf, there are a few ways to thaw it and bring it back to its original delicious state:
- Thaw in the Refrigerator: The safest way to thaw frozen meatloaf is by placing it in the refrigerator for 6 to 8 hours or overnight. This gradual thawing process ensures the meatloaf stays at a safe temperature, preventing bacterial growth.
- Quick Thawing in the Microwave: If you’re short on time, you can thaw individual slices of meatloaf in the microwave. Place the meatloaf slices on a microwave-safe plate and use the defrost setting to gently thaw the meat. Be sure to check frequently so it doesn’t start cooking.
- Direct Reheating: You can also heat frozen meatloaf directly without thawing. Simply place it in a preheated oven at 350°F (175°C) and bake for 25 to 30 minutes or until heated through. If the meatloaf is frozen as a whole loaf, cover it with foil to retain moisture and prevent it from drying out.
5. Reheating Leftover Meatloaf
Once your leftover meatloaf is thawed (or if you’re reheating it directly from the fridge), follow these tips to reheat it without losing flavor or moisture:
- In the Oven: The best way to reheat meatloaf is in the oven, as it will heat evenly and preserve the texture. Preheat the oven to 350°F (175°C) and place the meatloaf on a baking sheet. Cover it with aluminum foil to keep it moist, and heat for 10 to 15 minutes or until heated through.
- In the Microwave: If you’re in a hurry, you can reheat meatloaf slices in the microwave. Place the slices on a microwave-safe plate and cover them with a damp paper towel. Heat for 1 to 2 minutes, checking halfway through to make sure it’s heated evenly.
- In a Skillet: For a quick, stovetop option, you can reheat meatloaf slices in a skillet over medium heat. Cover the pan with a lid to trap the moisture and prevent the meatloaf from drying out. Heat for 4 to 5 minutes on each side, flipping carefully to avoid breaking the slices.
6. Best Practices to Maintain Freshness
To ensure that your leftover meatloaf remains as fresh and flavorful as possible, avoid repeatedly reheating it. Each time the meatloaf is reheated, it loses moisture and flavor, so it’s best to only reheat the portion you plan to eat at that moment. If you have a large amount of leftovers, consider freezing some portions so they can be reheated later with minimal loss in quality.
Best Ways to Reheat Meatloaf Without Drying It Out
Reheating leftover meatloaf is a great way to enjoy it again, but it’s important to use the right methods to ensure that it stays moist, tender, and flavorful. The key to reheating meatloaf without drying it out is to avoid high, direct heat and to preserve the moisture that keeps it juicy. Below are some of the best methods to achieve that perfect reheated meatloaf:
1. Reheating Meatloaf in the Oven: The Best Method for Moisture Retention
The oven is the most reliable way to reheat meatloaf, especially when you want to maintain its moisture and texture. Using the oven ensures even heating without overcooking the meat, and you can control the process to prevent it from drying out.
- Preheat the Oven: Preheat your oven to 350°F (175°C). This temperature is perfect for gently reheating the meatloaf, allowing it to heat through without becoming dry or overcooked.
- Cover with Foil: To prevent the meatloaf from drying out during reheating, cover it with aluminum foil. This traps the moisture and helps keep the meatloaf juicy. If you’re reheating slices, lay them on a baking sheet and cover them with foil. If reheating an entire loaf, you can wrap it tightly in foil or place it in a baking dish and cover it.
- Add a Little Liquid: If your meatloaf feels particularly dry, add a splash of broth, water, or even a little ketchup or barbecue sauce before covering it with foil. The added moisture will steam the meatloaf as it reheats, ensuring it stays juicy.
- Bake Time: Bake the meatloaf for about 15 to 20 minutes for individual slices or 25 to 30 minutes for a whole loaf, or until the meatloaf is heated through. Check the internal temperature with a meat thermometer to make sure it reaches 165°F (74°C), the safe reheating temperature.
2. Reheating Meatloaf in the Microwave: Fast and Convenient
If you’re short on time, the microwave is a quick option for reheating meatloaf. However, microwaving can sometimes cause the meatloaf to dry out if not done carefully, so follow these tips to keep it moist.
- Cover with a Damp Paper Towel: When microwaving, place your meatloaf slices on a microwave-safe plate and cover them with a damp paper towel. The damp towel helps trap moisture and steam, preventing the meatloaf from drying out.
- Use Low Power Settings: Instead of microwaving on high heat, use the low or medium power setting. Reheat the meatloaf in 1-minute intervals, checking between each interval to avoid overheating and drying it out. This gradual reheating method ensures the meatloaf warms evenly without becoming rubbery.
- Microwave in Short Bursts: For best results, microwave the meatloaf for 30-second bursts, checking the texture and temperature after each burst. This method helps ensure that the meatloaf heats through without turning tough or chewy.
- Add a Little Liquid: If you’re reheating a larger portion, or if the meatloaf appears dry, you can add a small splash of broth or water before microwaving. This helps prevent the meatloaf from becoming too dry, as the liquid will steam it as it heats.
3. Reheating Meatloaf in a Skillet: For a Crispy Exterior
If you enjoy a slightly crispy crust or caramelized edges, reheating meatloaf in a skillet is a great option. This method provides a nice contrast of textures, with a moist interior and a slightly crisped exterior.
- Use Medium Heat: Heat a non-stick skillet over medium heat and add a small amount of oil or butter. If you prefer a more flavorful crust, you can use olive oil or bacon grease.
- Cover with a Lid: Once the skillet is hot, add the meatloaf slices and cover the skillet with a lid. This traps the heat and moisture, allowing the meatloaf to steam and stay moist while the exterior becomes crispy.
- Flip Carefully: Heat the meatloaf for 4 to 5 minutes on one side, then flip it gently to heat the other side. If you’re reheating a larger piece of meatloaf, you can cover it and cook on low heat for 5 to 7 minutes on each side to ensure it’s heated evenly.
- Check the Temperature: Use a meat thermometer to check that the internal temperature has reached 165°F (74°C) to ensure the meatloaf is fully reheated.
4. Reheating Meatloaf in a Slow Cooker: Ideal for Stews and Soups
For those who like the convenience of a slow cooker, this method works especially well if you want to turn your leftover meatloaf into a hearty soup or stew.
- Add Liquid: Place your leftover meatloaf in the slow cooker along with broth or gravy to create a flavorful base. The liquid helps keep the meatloaf moist and enhances the overall flavor. You can add vegetables or additional seasonings as well.
- Low and Slow: Set the slow cooker to low and allow the meatloaf to reheat for 2 to 3 hours, stirring occasionally. The slow cooking process will help the meatloaf absorb the liquid, keeping it moist and tender.
- Use for Meatloaf Soup: If you’d like to transform your meatloaf into a comforting soup, break it up into smaller pieces and mix it with broth, vegetables, and seasonings of your choice. Allow it to simmer in the slow cooker for a few hours to develop a rich, savory soup.
5. Avoid Reheating Multiple Times
While reheating meatloaf is convenient, it’s best to avoid reheating the same leftovers multiple times, as this can lead to a dry, tough texture. Repeated reheating causes moisture loss and results in a less desirable meal. Instead, only reheat the amount you plan to eat at one time and store any unused portions for future meals.
Creative Ways to Use Leftover Meatloaf
While enjoying a classic slice of reheated meatloaf is always satisfying, leftover meatloaf offers endless possibilities for transforming into new and exciting meals. Whether you’re looking to repurpose your leftovers into a fresh dish or just want to give your standard meal a creative twist, these ideas will help you make the most of your leftover meatloaf.
1. Meatloaf Sandwich: A Classic with a Twist
One of the easiest and most delicious ways to enjoy leftover meatloaf is by turning it into a hearty meatloaf sandwich. This is a comfort food favorite that can be customized with a variety of toppings and spreads.
- Classic Meatloaf Sandwich: Place a slice of reheated meatloaf between two slices of your favorite bread (white, whole wheat, or a toasted brioche bun). Add a smear of ketchup, mustard, or mayonnaise, and top with pickles or sautéed onions for added flavor. Serve with a side of crispy fries or a pickle spear for the ultimate comfort food experience.
- Gourmet Meatloaf Sandwich: Upgrade your meatloaf sandwich by using artisanal bread, such as a ciabatta roll or sourdough, and adding fresh greens, tomato slices, and cheese (such as melted cheddar or Swiss cheese). For an extra flavor boost, try adding a drizzle of barbecue sauce or sriracha for a tangy kick.
- Open-Faced Meatloaf Sandwich: For a lighter version, serve your meatloaf on an open slice of toasted bread and top with a creamy horseradish sauce or garlic aioli. This makes for an elegant, modern twist on the classic sandwich.
2. Meatloaf Tacos: A Mexican-Inspired Creation
Transform your leftover meatloaf into a fun, flavorful taco filling. Crumble the meatloaf into small pieces and reheat it with a little taco seasoning or chili powder to add some spice. Then, pile the seasoned meatloaf into soft corn or flour tortillas and top with your favorite taco toppings.
- Taco Meatloaf: Add a spoonful of guacamole, sour cream, shredded cheese, lettuce, and salsa for a delicious twist on traditional beef tacos. The crumbled meatloaf gives your taco a hearty, savory flavor while still retaining that classic taco vibe.
- Meatloaf Nachos: Instead of using traditional ground beef for nachos, crumble leftover meatloaf and scatter it over a plate of tortilla chips. Add melted cheese, jalapeños, sour cream, and guacamole for an indulgent and creative snack or meal.
3. Meatloaf Stuffed Peppers: A Healthy, Filling Option
Meatloaf is an excellent filling for stuffed peppers, creating a nutritious and hearty dish. This idea is a great way to repurpose leftovers while adding some healthy vegetables to the meal.
- Stuffed Bell Peppers: Slice the tops off of bell peppers and remove the seeds. Hollow them out and fill each pepper with crumbled meatloaf, along with a scoop of cooked rice or quinoa. Top with shredded cheese and bake the peppers until they’re tender and the cheese is melted. The peppers add a fresh, crunchy contrast to the savory meatloaf, making for a balanced, satisfying meal.
- Zucchini or Eggplant Boats: For a low-carb option, hollow out zucchini or eggplant and fill them with the leftover meatloaf. Bake them until the vegetables are tender, and top with a bit of parmesan cheese or mozzarella for extra flavor.
4. Meatloaf Pizza: A Fun Twist on a Classic Favorite
Leftover meatloaf makes an excellent topping for homemade pizza, creating a unique variation on traditional meat-based pizzas.
- Meatloaf Pizza: Crumble the meatloaf and sprinkle it over a prepared pizza crust, adding your favorite pizza toppings such as tomato sauce, cheese, onions, and peppers. Bake the pizza until the crust is golden and the cheese is bubbly. This combination of flavors results in a hearty and delicious meal.
- Mini Meatloaf Pizzas: For individual servings, cut the leftover meatloaf into small slices and place them on mini pizza crusts. Top each mini pizza with sauce, cheese, and vegetables, then bake until everything is melted and golden. These make for perfect appetizers or quick snacks.
5. Meatloaf Casserole: A One-Pot Meal
Transform your leftover meatloaf into a satisfying casserole that’s perfect for family dinners. Combining the meatloaf with mashed potatoes, vegetables, and cheese creates a comforting and filling dish that’s easy to prepare.
- Meatloaf and Mashed Potato Casserole: Slice the leftover meatloaf and layer it in a baking dish with mashed potatoes, vegetables, and a sprinkle of cheese. Bake the casserole at 350°F (175°C) for 20 to 30 minutes, until the top is golden and bubbly. This is a great way to incorporate extra leftovers into a hearty, one-pot meal.
- Meatloaf Pasta Bake: Break up the meatloaf and stir it into cooked pasta, adding tomato sauce, cheese, and herbs. Bake the mixture in a casserole dish until bubbly and golden. This version makes for a satisfying twist on classic pasta bakes, with the richness of the meatloaf adding a savory punch to the dish.
6. Meatloaf Salad: A Hearty, Light Meal
Turn leftover meatloaf into a protein-packed topping for a fresh salad. This is a great way to enjoy your leftovers while incorporating healthy, crunchy veggies.
- Meatloaf Salad Bowl: Slice the leftover meatloaf into small pieces and serve it over a bed of mixed greens, such as arugula, spinach, or romaine lettuce. Add tomatoes, cucumber, avocado, and red onion, and drizzle with a light vinaigrette or creamy ranch dressing. This salad is perfect for a light lunch or dinner, offering a balance of freshness and richness.
- Meatloaf Cobb Salad: For a more indulgent salad, create a Cobb-style salad with sliced meatloaf, hard-boiled eggs, bacon, avocado, tomatoes, and blue cheese. Serve with a creamy dressing like ranch or blue cheese for a rich, satisfying meal.
7. Meatloaf Soup: A Hearty, Comforting Dish
If you have a lot of leftover meatloaf, consider turning it into a hearty meatloaf soup. This is a great way to repurpose the meat into a warm, filling dish.
- Meatloaf Soup Base: Crumble the leftover meatloaf and add it to a large pot with broth (chicken, beef, or vegetable) and your favorite vegetables (carrots, celery, onions, etc.). Simmer the soup for 30 to 40 minutes, allowing the flavors to meld together. Add pasta or rice for a more filling meal. This is an excellent dish for chilly evenings.
- Meatloaf Stew: For a thicker, heartier option, combine the crumbled meatloaf with root vegetables like potatoes, turnips, and parsnips, and simmer in beef broth for a rich, comforting stew. This filling dish is perfect for feeding a crowd or enjoying throughout the week.